DIY: Portable Photography Floor for Photo Staging
This post may contain affiliate links, meaning that I may earn a small commission if you make a purchase. See our disclosure policy for more information.
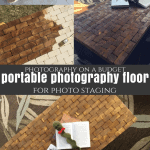
One thing I have learned from my experience in crocheting, blogging, and crochet blogging together? Photos are E-V-E-R-Y-T-H-I-N-G. Having clear, bright photos is key to selling you, your brand and your finished product. We have already discussed my top TEN tips for getting the best photos with what you’ve got, and now I am sharing my latest DIY creation, my new portable photography floor for photo staging.
Portable Photography Floor for Photo Staging
It is inexpensive to make, takes my photos up a notch or two on the wow-factor and was super easy to construct. You may have seen the floor project made out of 2×4 ends. Don’t worry! This is a similar project but on a much smaller scale.

You will need:
(2) 8-foot 2X4s
(1) 2’ x 4’ – ½” thick wood board
Sand paper
Liquid Nails
Stain (very light and a little darker)
Polyurethane
Drawer pull or two for carrying
We used a table saw to cut our pieces, but you could also use a miter saw with a guide if you have one.
Cut it up!
First, you’ll want to cut your 2x4s into ½ inch thick “bricks”. Just set up the guide on your table (or miter) saw and cut them all as uniformly as possible. Using your liquid nails, start at one end of the 2’ x 4’ board and add the wood pieces, staggering as if you were laying bricks. When finished, let the Liquid Nails dry overnight for sanding/staining in the morning.

Sand it down!
I personally didn’t want my photo floor to be too smoothly sanded. I wanted real texture to add depth to my photos, so I sanded with a rough 60 grit sandpaper. Once finished, prepare your stain.
Stain it up!

Wanna save this for later?
Note! Since you will be staining the raw end of the wood, the stain will soak in much faster and turn out much darker than anticipated. I HIGHLY recommend testing your stain on a few end pieces before starting on the entire project. I actually had to start my entire project over because it came out SO dark the first time. Lesson learned – and learn from my lesson!

On my second attempt, I started with the lightest stain I could find and added a bit of a darker color and mixed it in. I tested on a spare wood end, added just a splash more of the darker stain and tested again. We are going for a nice, rich color without it turning out black (like my first attempt).
Once you get your stain ready, simply stain the entire board. Go lightly at first, the raw wood will soak it right up and you want to make sure you have enough stain for the entire project. When you get the piece stained, let that dry for the afternoon and come back to it when you’re ready for polyurethane.

Poly it up!
Coat your project with several layers of polyurethane, letting each coat dry before applying the next. I did four coats on mine, and truth be told it could probably stand a few more coats (although not entirely necessary). Add a drawer pull handle or two to one side for easier transporting/storing.

What I love the most about this photography floor is that it has the look and feel of real wood without the commitment of an entire flooring made with 2×4’s. I love how I can store this behind the couch or in the closet if I wanted to while not using, and I love how easy it was to make!
Pick it up and move it wherever the light is best. I can use filters to darken it down or lighten it up a bit depending on my desired effect. Will you be making one as well? If you do, I’d love to see photos of your finished project in our crochet group: Heart Hook Home Crochet Community on Facebook!


One Comment