How to Read a Crochet Pattern
This post may contain affiliate links, meaning that I may earn a small commission if you make a purchase. See our disclosure policy for more information.


Perhaps the most daunting aspect of mastering crochet is learning how to read a crochet pattern. This article will help you to decipher what exactly it is that that crochet pattern is telling you to do. The best part of crocheting is being able to crochet with confidence!
How to Read a Crochet Pattern
Learning how to read a crochet pattern can be intimidating. The good news is that the more you understand, the less frustrated you get, which only makes the journey more rewarding in the end.
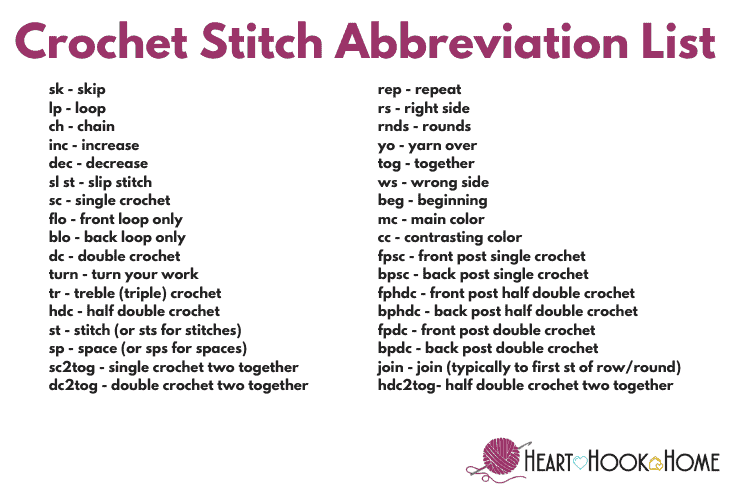
First, you’ll need to know the most popular crochet stitches and their abbreviations. You cannot follow a pattern without knowing these, so I have created a handy chart for reference!
Note that these are in US terms (as are all of my patterns), and that UK terms are slightly different. For example in UK terms you are told to “miss” a stitch instead of “skipping” a stitch as we say here in the US. These terms are something to pay particular attention to when purchasing a crochet pattern or even before attempting a free pattern.
Sc = Single Crochet
Dc = Double Crochet
Hdc = Half Double Crochet
Ch = Chain
While there are oodles of more fancy or intricate crochet stitches out there, most of those are made up of a combination of the stitches listed above. Not sure what that abbreviation is? Check the chart! I only use a handful of these stitches regularly, but they are good to know and an essential tool for becoming a master.
Crochet patterns will either be written in rows for flat projects (like my 2020 washcloth series) or in rounds (for hats like this one, coasters, or amigurumi etc). Most of the crochet patterns here on Heart Hook Home are beginner level or easy, with a few being intermediate or advanced.
One thing you’ll notice when you go to read a crochet pattern is that punctuation is extremely important. Pay attention to commas vs periods, parentheses vs brackets, and particularly pay attention to any text within a set of asterisks. Let’s break this down further.

For these examples we will be following my free pattern for the Dandy Dog Sweater. This is particularly helpful because this pattern also has a corresponding video tutorial. In the video I am making the smallest size of the pattern. A good idea would be to follow along with the video while reading the pattern at the same time. See both here.
The Dandy Dog Sweater comes in three sizes – X-Small, Small, and Medium.
1. Parentheses Part One – Sizes
If working a pattern with multiple sizes, you will see parentheses at the beginning of the row/round. The smallest size will always be listed first, the next size up with be listed second, the next size up will be listed third, and so on. For example, taken from row 1 of my Dandy Dog Sweater:
Row 1: Ch- (34, 44, 54), hdc in 2nd chain from hook and in each to end. Join to top of first st with sl st. Stitch count: (33, 43, 53)
In this example the smallest size needs to start with a chain of 34 stitches, the next size up needs to start with a chain of 44 stitches, and the largest size needs to start with a chain of 54 stitches.
2. Parentheses Part Two – Stitch counts
No matter what you’re crocheting, or how large your project is, it is very important to count your stitches at the end of every row/round. Any good pattern will tell you how many stitches you should have at the end of each.
If included they will be in the parenthesis at the end of the row. In this example, we should have 33, 43, or 53 stitches at the end of row 1 – depending on which size you are making.
Row 1: Ch- (34, 44, 54), hdc in 2nd chain from hook and in each to end. Join to top of first st with sl st. Stitch count: (33, 43, 53)
If you miss a stitch, or accidentally make two where there should have been only one, your project may start to look wonky or “grow” on one side. Crochet once and count twice, I always say! This will help you keep on track.
2. Parentheses Part Three – Working into one stitch
Another time you will see parentheses – particularly when in the middle of a row or round – is when you need to work said stitches into just one stitch from the previous row. For example, again taken from the Dandy Dog Sweater:
Row (7, 9, 11): Ch-1, do not turn. (sc, dc) in first st. * sk next st, (sc, dc) in next * repeat between * * around, sk next, (sc, dc, sc) in last st. Join to top of first sc with sl st. Stitch count: (35, 45, 55)
The (sc, dc) means that you will put both a single crochet AND a double crochet in the first stitch of that row.
In short, any parentheses at the beginning of a row/round should pertain to the size, any parentheses at the end of the row/round pertain to stitch counts, and any parentheses in the middle of a row means to put all of those stitches into the same stitch.
4. Asterisks
Anything written in between two asterisks means that that particular portion will be repeated. The pattern should tell you how many times to repeat that text, or it may tell you to “repeat to the end of the row”. For example, let’s take a look at the armhole row of the dog sweater – it’s a doozy!
Row (15, 19, 27): Ch-1, turn * sk next st, (sc, dc) in next * repeat between * * (0, 1, 2) more times. (2, 4, 6 sts total so far). Sk next st, sc in next. Ch-(7, 11, 15), sk-(9, 13, 17) sts. In next sc, place (sc, dc). Repeat between * * (10, 11, 17) more times. Sk next st, sc in next. Ch-(7, 11, 15), sk-(9, 13, 17) sts. In next sc, place (sc, dc). Repeat between * * to end. Join to top of first sc with sl st. Stitch count: (44, 58, 80)
This row looks intimidating, so let’s break it down step-by-step…
Row (15, 19, 27): Ch-1, turn * sk next st, (sc, dc) in next * repeat between * * (0, 1, 2) more times. (2, 4, 6 sts total so far). Sk next st, sc in next. Ch-(7, 11, 15), sk-(9, 13, 17) sts. In next sc, place (sc, dc). Repeat between * * (10, 11, 17) more times. Sk next st, sc in next. Ch-(7, 11, 15), sk-(9, 13, 17) sts. In next sc, place (sc, dc). Repeat between * * to end. Join to top of first sc with sl st. Stitch count: (44, 58, 80)
First, we know that we are on row 15 for the smallest size, 19 for the next size up, and row 27 for the largest size.
Row (15, 19, 27): Ch-1, turn * sk next st, (sc, dc) in next * repeat between * * (0, 1, 2) more times. (2, 4, 6 sts total so far). Sk next st, sc in next. Ch-(7, 11, 15), sk-(9, 13, 17) sts. In next sc, place (sc, dc). Repeat between * * (10, 11, 17) more times. Sk next st, sc in next. Ch-(7, 11, 15), sk-(9, 13, 17) sts. In next sc, place (sc, dc). Repeat between * * to end. Join to top of first sc with sl st. Stitch count: (44, 58, 80)
We see that we will chain one and turn our work.
Wanna save this for later?
Row (15, 19, 27): Ch-1, turn * sk next st, (sc, dc) in next * repeat between * * (0, 1, 2) more times. (2, 4, 6 sts total so far). Sk next st, sc in next. Ch-(7, 11, 15), sk-(9, 13, 17) sts. In next sc, place (sc, dc). Repeat between * * (10, 11, 17) more times. Sk next st, sc in next. Ch-(7, 11, 15), sk-(9, 13, 17) sts. In next sc, place (sc, dc). Repeat between * * to end. Join to top of first sc with sl st. Stitch count: (44, 58, 80)
The portion in between the asterisks says to * sk next st, (sc, dc) in next *. This means to skip the next stitch, and place both a single crochet AND a double crochet in the next st.
Row (15, 19, 27): Ch-1, turn * sk next st, (sc, dc) in next * repeat between * * (0, 1, 2) more times. (2, 4, 6 sts total so far). Sk next st, sc in next. Ch-(7, 11, 15), sk-(9, 13, 17) sts. In next sc, place (sc, dc). Repeat between * * (10, 11, 17) more times. Sk next st, sc in next. Ch-(7, 11, 15), sk-(9, 13, 17) sts. In next sc, place (sc, dc). Repeat between * * to end. Join to top of first sc with sl st. Stitch count: (44, 58, 80)
Then it tells you to repeat what is between these asterisks (0, 1, 2) more times. The smallest size will not repeat it at all since there is a zero, the next size up will repeat that portion one time (for a total of two times worked), and the largest size says to repeat that portion TWO more times (for a total of three times worked).
Row (15, 19, 27): Ch-1, turn * sk next st, (sc, dc) in next * repeat between * * (0, 1, 2) more times. (2, 4, 6 sts total so far). Sk next st, sc in next. Ch-(7, 11, 15), sk-(9, 13, 17) sts. In next sc, place (sc, dc). Repeat between * * (10, 11, 17) more times. Sk next st, sc in next. Ch-(7, 11, 15), sk-(9, 13, 17) sts. In next sc, place (sc, dc). Repeat between * * to end. Join to top of first sc with sl st. Stitch count: (44, 58, 80)
At this point you should have 2 stitches for the smallest size, 4 stitches for the next size, and 6 stitches for the largest size. Let’s continue…
Row (15, 19, 27): Ch-1, turn * sk next st, (sc, dc) in next * repeat between * * (0, 1, 2) more times. (2, 4, 6 sts total so far). Sk next st, sc in next. Ch-(7, 11, 15), sk-(9, 13, 17) sts. In next sc, place (sc, dc). Repeat between * * (10, 11, 17) more times. Sk next st, sc in next. Ch-(7, 11, 15), sk-(9, 13, 17) sts. In next sc, place (sc, dc). Repeat between * * to end. Join to top of first sc with sl st. Stitch count: (44, 58, 80)
We will skip the next stitch, and single crochet in the next stitch.
Row (15, 19, 27): Ch-1, turn * sk next st, (sc, dc) in next * repeat between * * (0, 1, 2) more times. (2, 4, 6 sts total so far). Sk next st, sc in next. Ch-(7, 11, 15), sk-(9, 13, 17) sts. In next sc, place (sc, dc). Repeat between * * (10, 11, 17) more times. Sk next st, sc in next. Ch-(7, 11, 15), sk-(9, 13, 17) sts. In next sc, place (sc, dc). Repeat between * * to end. Join to top of first sc with sl st. Stitch count: (44, 58, 80)
Then you will either chain 7 (smallest size), chain 11 (next size up), or chain 15 (largest size). After you have created this short chain, you will skip either 9 stitches (smallest size), 13 stitches (next size up) or 17 stitches (largest size). This will be your first armhole.
Row (15, 19, 27): Ch-1, turn * sk next st, (sc, dc) in next * repeat between * * (0, 1, 2) more times. (2, 4, 6 sts total so far). Sk next st, sc in next. Ch-(7, 11, 15), sk-(9, 13, 17) sts. In next sc, place (sc, dc). Repeat between * * (10, 11, 17) more times. Sk next st, sc in next. Ch-(7, 11, 15), sk-(9, 13, 17) sts. In next sc, place (sc, dc). Repeat between * * to end. Join to top of first sc with sl st. Stitch count: (44, 58, 80)
In the next single crochet you will place BOTH a single crochet and a double crochet.
Row (15, 19, 27): Ch-1, turn * sk next st, (sc, dc) in next * repeat between * * (0, 1, 2) more times. (2, 4, 6 sts total so far). Sk next st, sc in next. Ch-(7, 11, 15), sk-(9, 13, 17) sts. In next sc, place (sc, dc). Repeat between * * (10, 11, 17) more times. Sk next st, sc in next. Ch-(7, 11, 15), sk-(9, 13, 17) sts. In next sc, place (sc, dc). Repeat between * * to end. Join to top of first sc with sl st. Stitch count: (44, 58, 80)
Now we see asterisks again, which tells us to repeat that portion – the * sk next st, (sc, dc) in next *– either 10 more times (for smallest size), 11 more times (for next size up), or 17 more times (for largest size).
Row (15, 19, 27): Ch-1, turn * sk next st, (sc, dc) in next * repeat between * * (0, 1, 2) more times. (2, 4, 6 sts total so far). Sk next st, sc in next. Ch-(7, 11, 15), sk-(9, 13, 17) sts. In next sc, place (sc, dc). Repeat between * * (10, 11, 17) more times. Sk next st, sc in next. Ch-(7, 11, 15), sk-(9, 13, 17) sts. In next sc, place (sc, dc). Repeat between * * to end. Join to top of first sc with sl st. Stitch count: (44, 58, 80)
We will skip the next stitch, and single crochet in the next stitch.
Row (15, 19, 27): Ch-1, turn * sk next st, (sc, dc) in next * repeat between * * (0, 1, 2) more times. (2, 4, 6 sts total so far). Sk next st, sc in next. Ch-(7, 11, 15), sk-(9, 13, 17) sts. In next sc, place (sc, dc). Repeat between * * (10, 11, 17) more times. Sk next st, sc in next. Ch-(7, 11, 15), sk-(9, 13, 17) sts. In next sc, place (sc, dc). Repeat between * * to end. Join to top of first sc with sl st. Stitch count: (44, 58, 80)
Next we’ll make the second armhole by either chaining 7 (smallest size), chaining 11 (next size up), or chaining 15 (largest size). After you have created this second short chain, you will skip either 9 stitches (smallest size), 13 stitches (next size up) or 17 stitches (largest size). This will be your second armhole.
Row (15, 19, 27): Ch-1, turn * sk next st, (sc, dc) in next * repeat between * * (0, 1, 2) more times. (2, 4, 6 sts total so far). Sk next st, sc in next. Ch-(7, 11, 15), sk-(9, 13, 17) sts. In next sc, place (sc, dc). Repeat between * * (10, 11, 17) more times. Sk next st, sc in next. Ch-(7, 11, 15), sk-(9, 13, 17) sts. In next sc, place (sc, dc). Repeat between * * to end. Join to top of first sc with sl st. Stitch count: (44, 58, 80)
In the next single crochet you will place BOTH a single crochet and a double crochet.
Row (15, 19, 27): Ch-1, turn * sk next st, (sc, dc) in next * repeat between * * (0, 1, 2) more times. (2, 4, 6 sts total so far). Sk next st, sc in next. Ch-(7, 11, 15), sk-(9, 13, 17) sts. In next sc, place (sc, dc). Repeat between * * (10, 11, 17) more times. Sk next st, sc in next. Ch-(7, 11, 15), sk-(9, 13, 17) sts. In next sc, place (sc, dc). Repeat between * * to end. Join to top of first sc with sl st. Stitch count: (44, 58, 80)
We see more asterisks, so this means that we will repeat that portion – the * sk next st, (sc, dc) in next * – until we get to the end of the row. When you run out of stitches, you will join to the top of the first single crochet with a slip stitch.
Ta-da!!! We have completed the armhole row! 😅
5. Brackets
Unlike parentheses that mean you’ll work all of the stitches into the same stitch from the previous row, brackets [ ] in a crochet pattern (such as in the Open Ripple Chevron Blanket pattern) mean that everything within those brackets [ ] is worked a set number of times. For example, if you see:
[ch-1, dc in next ch-sp] 5 times
This means that you will do the portion in the brackets five times, but not all in the same stitch. Written out entirely it would look like this:
Chain one, double crochet in the next chain space. Chain one, double crochet in the next chain space. Chain one, double crochet in the next chain space. Chain one, double crochet in the next chain space. Chain one, double crochet in the next chain space.
Ready to try on your own? Head over to the Dandy Dog Sweater pattern with hook and yarn in hand. Watch a bit of the video, pause to read the corresponding portion of the crochet pattern, then crochet it along with me.
I hope this helps you to learn how to read a crochet pattern! If you are having trouble with a Heart Hook Home pattern simply leave a comment or shoot me an email and I’d be happy to help.
Did you also know that hook size and yarn size makes a huge difference in the way your item will turn out? Also, join the Heart Hook Home Crochet Community on Facebook where there are over 65,000 other crocheters!
More crochet tips and yarn hacks:
Why Size Matters in Crocheting and Knitting
How to Crochet The Single Crochet (Video Tutorial)
How to Crochet the Double Crochet (Video Tutorial)
Use Industrial Clips for Yarn Bobbins in Crochet and Knitting


50 Comments