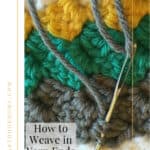
How to Weave in Yarn Ends {So They Don’t Come Out}
This post may contain affiliate links, meaning that I may earn a small commission if you make a purchase. See our disclosure policy for more information.


Weaving in yarn ends is a necessary evil in knitting and crochet projects. Here’s how to weave in yarn ends so they don’t come out!
How to Weave in Yarn Ends
The first time I crocheted a large blanket I was terrified to wash it. Scared that I hadn’t woven in the ends well enough, I slipped it into the washer, crossed my fingers (and downed a glass of wine) afraid that I’d take it out of the dryer (it was king size!) and find only large pieces instead of the finished project I had washed.
It came out perfect! I have never had an end work its way out (I’ve had the tiny little ends peek out after washing, but that doesn’t count as completely unraveling, just snip it and call it good) using this technique.
The main things to remember when you weave in ends are to:
a.) leave yourself enough yarn to work with.
b.) crochet over the end for a few stitches/rows, if possible, while still working on the project.
c.) take multiple passes with your yarn needle with each end while weaving.

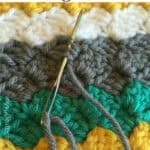
If possible, when changing to a different color yarn or starting a new yarn skein, hold the yarn tail flat on top of the previous row and crochet AROUND that strand, helping to “pin” the tail to the new row so that part of the weaving is already done. (see photo above)
Plus, this helps to move the yarn away from where you joined so that you can weave it in in another area of the project, helping it to not be so glaringly obvious where you joined.
Wanna save this for later?
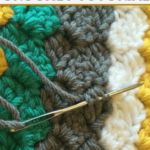
If you have a right side or wrong side of the work, I recommend weaving in your ends on the wrong side. I always go back and forth three times with each end. Once straight through, then I turn around and come straight back at it, but going THROUGH the fibers of the yarn. Then I turn around and go back through a third time (in the original direction).
Yarn can’t move in three directions at once.
I also go through the fibers of the yarn to help it stay put. This also helps to not make it so obvious if you pull the yarn too tight while weaving.

The needle you use to weave in ends is all up to personal preference. I like the pointy tip needles like these because I like to go through the fibers of the yarn. Some people prefer curved tip needles, bent tip needles, tapestry needles, and some like the plastic needles like these.
One thing for sure is that by weaving each end three times in opposite directions, and by going through the fibers of the yarn, that end ain’t goin’ nowhere, honey. Just grab a pair of scissors and snip off the remaining ends and rest assured that those loose ends won’t come undone.
Another pro tip: If you are making a wearable garment, don’t weave in the ends until you are completely done with your crochet pattern. There’s nothing worse than trying to frog crochet fabric that has had its ends already weaved in. Also, if there is a gap in say an armhole, you can first use your yarn tail to thread the hole closed before weaving in the tail.
Happy creating, and happy weaving!


57 Comments