Almond Ridges Crochet Stitch Tutorial
This post may contain affiliate links, meaning that I may earn a small commission if you make a purchase. See our disclosure policy for more information.
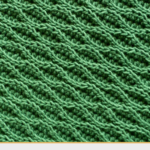
This new stitch we’re learning today is absolute perfection. I love the waves and the ridges, and the way the light plays off of the individual stitches. Learn how to create the Almond Ridges crochet stitch with this tutorial!

Almond Ridges Crochet Stitch
These stitches look like little almonds positioned just so. I love the ups and downs, and how easy this is to crochet! Make sure you check out the VIDEO tutorial below if you are a more visual learner.
For this stitch we are repeating a four row sequence. Once you get the foundation built, this stitch set is a breeze! All you need to know is how to make a slip stitch and how to make a Half Double Crochet stitch. Easy peasy!
For the entirety of this stitch set (with the exception of the first row) we work into the back loop only (BLO). This helps to give it that great, ridged effect we love.
Almond Ridges Foundation Steps

1. Chain a multiple of eight stitches + 5.

2. Slip stitch in the second chain from the hook and the next 3 chs.

3. Hdc in each of the next four chains.
4. Slip stitch in each of the next four chains.

Alternate steps 3 & 4 until you reach the end of the row, ending with 4 sl sts. Foundation row complete!

Wanna save this for later?
Note! Remember to go into the Back Loop Only for the duration of the entire pattern.

Chain one and turn. Sl st in the first 4 sts, hdc in next 4 sts, sl st in next 4 sts, hdc in next 4 sts, sl st in next 4 sts. Alternate four slip stitches and four hdc stitches to the end of the row, ending with sl sts.
 First two rows completed.
Tip: If you start a row with slip stitches, you will always end that row with slip stitches. Alternately, if you start a row with hdc, you will always end that row with hdc.
Now that we have two rows that both start (and end) with slip stitches, it is time to make two rows that start (and end) with hdc stitches. Don’t forget that you are still (always) going into the Back Loop Only.

Chain one and turn, hdc in first 4 sts, sl st in next 4 sts, hdc in next 4 sts, alternating to the end of the row so that you end with 4 hdcs.
 One hdc row made!
 Second hdc row made!
When you have two rows that both start (and end) with hdc, its time to do two more rows that start (and end) with slip stitches.

Alternate two rows that start with sl st and two rows that start with hdc until your piece is as tall as you like. End your pattern with two rows that start and end with slip stitches.
Almond Ridges Video


Once you get the rhythm down, you’ll be flying through those stitches! Let me know how you like this stitch in the Heart Hook Home Crochet Community on Facebook, or by tagging me with @HeartHookHome on social media!


