How to Crochet an I-Cord
This post may contain affiliate links, meaning that I may earn a small commission if you make a purchase. See our disclosure policy for more information.
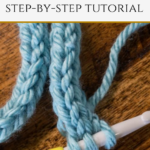
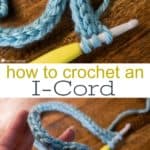
Are you looking for a way to crochet a rope or thick cord? The crocheted I-Cord will be perfect for you! Read on for a video and written tutorial.

How to Crochet an I-Cord
An I-Cord is a crocheted cord, or rope, that is as long as you wish it to be. I-Cords are great to use as drawstrings (such as in the Not Your Granny’s Jammies pants pattern) or as a purse strap, a lanyard, or any other rope or cord.
Once you get started, you’ll just keep adding rows until you reach your desired length! Knowing how to make an I-Cord is helpful in so many ways! Here’s how you’ll make one…

I-Cord Tutorial
Row 1: Chain-3. Insert hook into 2nd chain, pull up a loop. Insert hook into 3rd chain, pull up a loop. (3 loops on hook)
Rows 2 – desired length: Remove two loops from hook, being careful not to lose them. (I like to pinch the cord with my thumb and finger). With remaining loop, yarn over and chain-1. Insert hook into next (empty) loop, yarn over and pull up a loop. Insert hook into last (empty) loop, yarn over and pull up a loop. (3 loops on hook)
Continue creating rows in this manner until the cord is as long as you’d like.
Wanna save this for later?

To end the cord: yarn over and pull through all three loops on hook. Fasten off and weave in all ends. You are done

If you would prefer to watch a video tutorial, I have that for you, too!
Take some time to practice this technique, and before long you’ll be an I-Cord making pro!
More crochet tutorials for you:
How to Shorten a Zipper with Metal Teeth
Tunisian Honeycomb Crochet Stitch Tutorial
How to Make T-Shirt Yarn
Russian Join Tutorial for Crochet and Knitting
How to Make an Invisible Join in Crochet


12 Comments