Tunisian Honeycomb Crochet Stitch Tutorial
This post may contain affiliate links, meaning that I may earn a small commission if you make a purchase. See our disclosure policy for more information.
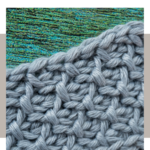

The Tunisian Honeycomb crochet stitch is fun and much easier than it looks. Create this beautiful crocheted texture with this written and video Honeycomb stitch tutorial. I promised you more Tunisian, so grab your hooks and let’s get to learning something new! My favorite!

Tunisian Honeycomb Tutorial
The Tunisian Honeycomb stitch is a simple stitch repeat that when offset creates a gorgeous, honeycomb texture. We will combine the Tunisian Simple Stitch with the Tunisian Purl Stitch to create the Tunisian Honeycomb stitch. Say that three times fast. 😅

Grab your Tunisian hook to practice, and find the VIDEO tutorial below.
About the Honeycomb stitch:
Is there a multiple for this stitch? Yes, I like to start with an ODD number of chains. This means that you will start and end with the same stitch which makes the overall piece more balanced.
You’ll need to start with a foundation row as with almost all other Tunisian stitches.
Alternate how you start the rows. If the previous row started with the TSS, start the current row with the TPS.
Always make a TSS in the previous row’s TPS, and a TPS in the previous row’s TSS. See what I mean in the video below.
How to Honeycomb Stitch:
Begin with a Tunisian foundation row. Crochet the Tunisian foundation row by chaining an ODD number of stitches. In these photos I am making 13. Pull up a loop in the second chain from the hook and in each chain to the end.


Now that all of the loops are on your hook (there should be 13 – one for each chain made) it is time to knock them back off in the Backward or Return Pass.
Backward Pass:
Chain one to make the side of the row.
Yarn over (YO), pull through two loops. Repeat this step to the end of the row, until only one loop remains.
This will be the same Backward Pass used for the duration of the Honeycomb Stitch.

Foundation Row made!
On row two, start with a Tunisian Simple Stitch (TSS) first, then do a Tunisian Purl Stitch (TPS) in the next. Alternate TSS and TPS to the end of the row. You should end with whichever stitch you started the row. (In this case, a TSS).


Pull up a loop using both sides of the outside stitch from the previous row as you normally do with Tunisian.
Wanna save this for later?

Make a Backward Pass as instructed above.

To start the next row, Tunisian Purl in the Tunisian Simple Stitch directly below, and Tunisian Simple in the Tunisian Purl stitch directly below. Alternate these two stitches to the end of the row.
By offsetting your stitches each row, the simple stitches are always worked into the purl stitches, and the purl stitches are worked into the simple stitches.

Continue alternating these two rows until the desired height is reached – or until your pattern tells you to stop.
Here’s the video, as promised. If you would rather watch this video on YouTube you can find it here.
I hope you love the Tunisian Honeycomb stitch!


Heart Hook Home patterns using the Honeycomb stitch:
Back in Brugge Slouchy Beanie Free Crochet Pattern
The Bee’s Knees Face Cloth: Free Crochet Pattern (great for practicing!)
Juliet’s Baby Blanket: Baby Blanket (or Nursing Cover) Crochet Pattern
Honeycomb Shawl: Free Tunisian Crochet Triangle Shawl Pattern
Honeycomb Cardi Top-Down Tunisian Crochet Pattern
If you love Tunisian crochet, you have got to check out my Timeless Tunisian Tunic pattern! It is flowy, lightweight, and so, so pretty.
More Crochet Stitches and Tutorials
How to Tunisian Crochet: Tunisian Simple Crochet Tutorial
DC2TOG: How to Double Crochet Two Together
How to Crochet The Mini Bean Stitch (Elizabeth Stitch)


12 Comments