How to Remove Print from Plastic Containers
This post may contain affiliate links, meaning that I may earn a small commission if you make a purchase. See our disclosure policy for more information.

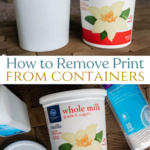

We’ve all been there. And by “there” I mean standing in front of an open fridge trying to decide which of the eight different containers of “butter” actually contain butter spread.
Wouldn’t it be awesome if we could remove the print from the tubs, making it obvious which are leftovers and which still contain said butter spread? Oh yeah, we did it, and it is much easier than you think!

How to Remove Print from Containers
What you’ll need:
*100% acetone nail polish remover
*gloves
*cotton balls

There are two ways you can go about this. Either submerge the container in the acetone and let it soak for a few minutes (wrapped in an acetone-doused paper towel also works great!) or apply the acetone nail polish remover with a cotton ball in a circular motion.
Doesn’t that just sound waaaay too easy? It really is!
I personally used the cotton ball method because it only takes as much nail polish remover as it does to remove your toe nail polish. With the soaking method, you’re looking at at least half of the bottle. It takes a bit more elbow grease, but I’d rather use less, myself (and tone my biceps).

Wanna save this for later?
What you’ll do:
Wear gloves if you like, your fingers will get dried out if you do not (but no more or less than when actually taking off your nail polish).
Take your cotton ball, and douse it with 100% acetone nail polish remover. In a circular motion, work it over the print on the container. It will take a few seconds to get going, but it will start to come off. Keep working, applying pressure and working your way around.
I did notice that the lid took a little bit extra elbow grease, but I just kept on going and voila! I have no more print whatsoever on my cottage cheese tub.

How cool is that?!
Now, I wouldn’t go through this process every single time I empty a tub of butter spread BUT you could save them up and do several of them at a time. Throw them in the dishwasher and BOOM! You’re done.
These can now be used for leftovers, for planting seeds for your garden, for organizing the pantry or the hall closet, the medicine closet and just about anything else you can think of.
You’ll want to check out these posts:
Clean Your Microwave Using NO Chemicals {or scrubbing}
How to Make a Floating Cooler {for less than $5}
Make Homemade Baby Wipes
How to Create Personalized Wall Art {Using Only an Old Pallet/Fence Board, Screws and Yarn}
How to Remove Wax from Yarn
Clean Jewelry at Home – Using just ONE or TWO Household Items!


117 Comments