Marvelous Moss Hooded Tunic Crochet Pattern
This post may contain affiliate links, meaning that I may earn a small commission if you make a purchase. See our disclosure policy for more information.


If I could name three things I wanted in the perfect tunic, it would have to be comfortable, have pockets, and have a hood. This NEW Marvelous Moss Hooded Tunic crosses everything off of my list!

Marvelous Moss Hooded Tunic
The Marvelous Moss Hooded Tunic uses the Moss stitch. Also known as the Granite, Woven, or Linen stitch, the Moss stitch works up quickly, is mindless to crochet, and the fabric has an excellent drape. If you’ve never worked up the Moss stitch before, you’re in for a treat!


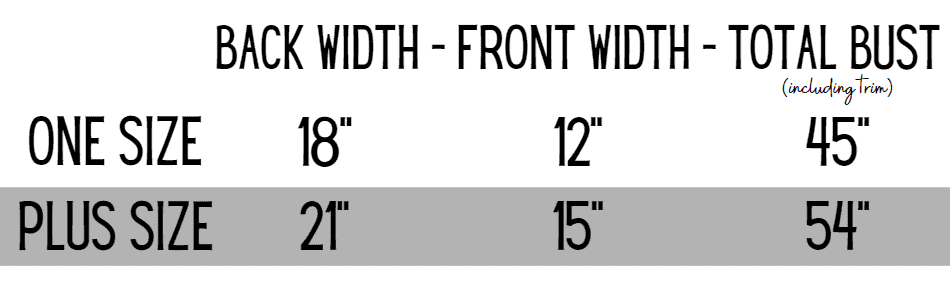
For this pattern we are using Brava Bulky yarn. This is a size 5, 100% acrylic yarn that is economical too! If this is your first experience with Brava yarns, I am sure you’ll love it. For this grey hooded tunic in “one” size (up to about 2XL), I used the “Dove Heather” colorway, and every bit of 8 skeins. For the larger size (up to about 4XL) you’ll need every bit of 10 skeins.
An ad-free, printable version of this pattern can be found on either Ravelry, Etsy, or in the Heart Hook Home shop. Thank you!

Of course you could use any bulky (size 5) yarn, or other yarn as long as you can meet gauge. You could also hold two strands of a thinner weight together to check gauge as well!
Materials:
Brava Bulky (size 5, bulky weight)
-approx. 1100 yards (9 skeins) for “one” size
-approx. 1400 yards (11 skeins) for “plus” size
Crochet hook in size 6.5mm (main body)
Crochet hook in size 6mm (edging only)
Gauge:
12 Moss sts (including both chains and scs) x 10 rows = 4” square
Pattern Notes:
Pattern written using US terms.
If you need help reading a crochet pattern, make sure you head over here and check out this detailed post.
“Right side” is odd numbered rows. “Wrong side” is even numbered rows.
The garment will lengthen after use. (Especially as you use the pockets)

Pattern:
Back:
Using 6.5mm hook…
Row 1: Fsc-(54, 64) or Ch-(55, 65), sc in 2nd ch from hook and in each ch to end. (54, 64)
Row 2: Ch-2 (counts as sc + ch-1 here and throughout), turn, sk-first st, sc in next. * ch-1, sk-next st, sc in next * repeat between * * to end. (55, 65)
Rows 3 – 80: Ch-2, turn, sk first sc, sc in ch-sp. * ch-1, sc in next ch-sp * repeat between * * to end. (55, 65)
Fasten off leaving a ~20” long tail for sewing shoulders.
Fronts:
Make two.
Row 1: Fsc-(36, 46), or Ch-(37, 47), sc in 2nd ch from hook and in each ch to end. (36, 46)
Row 2: Ch-2 (counts as sc + ch-1 here and throughout), turn, sk-first st, sc in next. * ch-1, sk-next st, sc in next * repeat between * * to end. (37, 47)
Rows 3 – 80: Ch-2, turn, sk first sc, sc in ch-sp. * ch-1, sc in next ch-sp * repeat between * * to end. (37, 47)
Fasten off ONE of the fronts only, leaving a ~20” tail for sewing shoulders. Do NOT fasten off the second “front”.

Construction:
Lay “back” with the “right side” down. (See pattern notes.) Position the two fronts with “right side” up on top of the “back” with the outside corners of each lined up. Place the “front” which still has the working yarn attached on the left and the fastened off “front” on the right. You should have a yarn tail at each top corner and the working yarn should be attached as pictured.

Sew the shoulders shut stitch for stitch for the width of (18, 24) stitches including single crochets and chain stitches. This should leave a total of (19, 23) stitches on both “fronts” and (19, 17) stitches along the neck for a total of (57, 63) stitches.
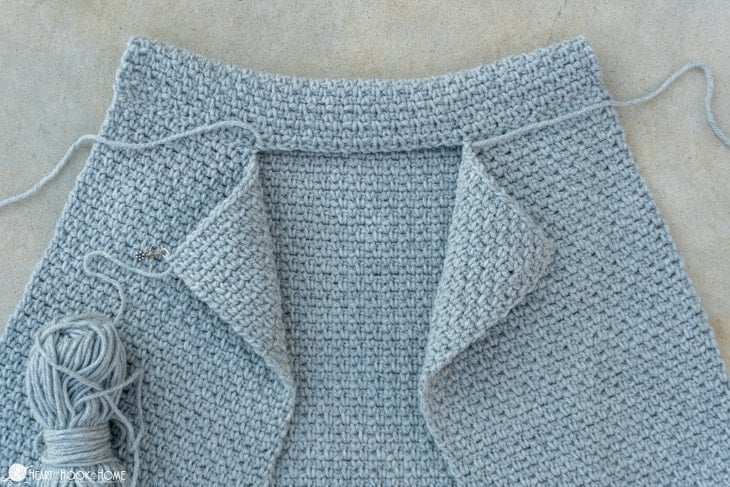
Hood:
Where still attached…
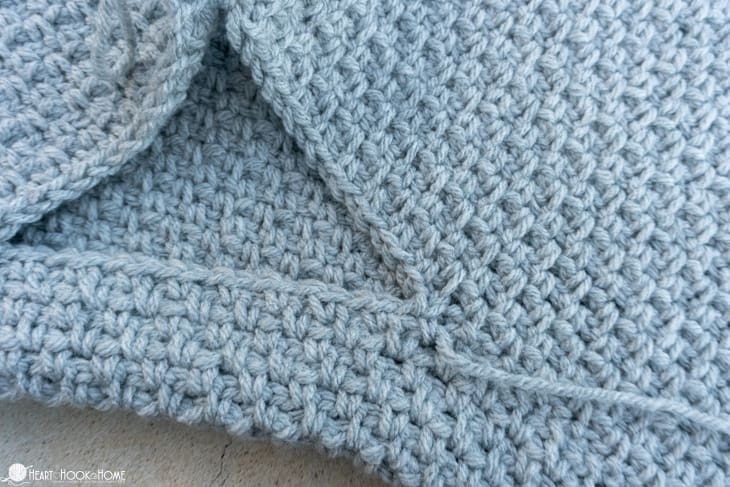
Row 1: Ch-2, turn, sk first sc, sc in ch-sp. * ch-1, sc in next ch-sp * repeat between * * (6, 8) more times. Ch-1, sc2tog using next 2 ch-sps (one ch-sp from “front” and one ch-sp from “back”). Repeat between * * (8, 7) more times. Ch-1, sc2tog using next 2 ch-sps. (one ch-sp from “back” and one ch-sp from “front”). Repeat between * * to the end of the row. (55, 61)
Wanna save this for later?
Rows 2 – 38: Ch-2, turn, sk first sc, sc in ch-sp. * ch-1, sc in next ch-sp * repeat between * * to end. (55, 61)


Fasten off leaving a long enough tail to sew the hood shut. Fold hood in half and sew, then weave in all ends.
Inside Edging (both sizes):
With 6mm hook…
Attach yarn at bottom right (were you wearing the garment) to work UP the inside edge, attaching as you go with sl sts…
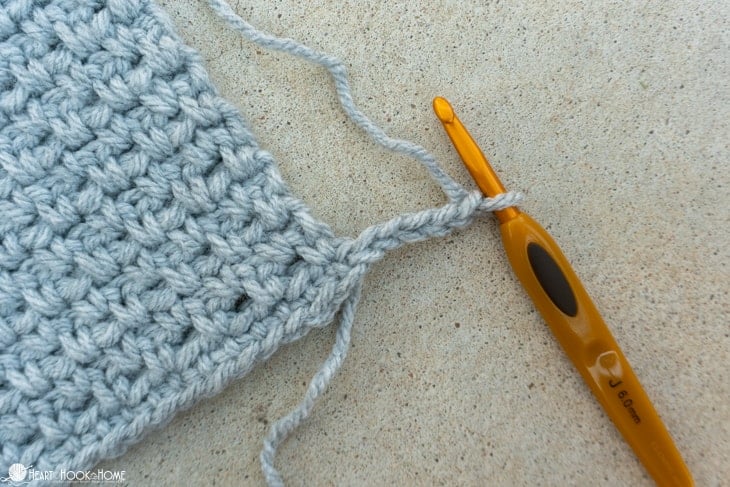
Row 1: Ch-5, sc in 2nd ch from hook and in each to end. Sl st to top of corresponding row on garment. (4)
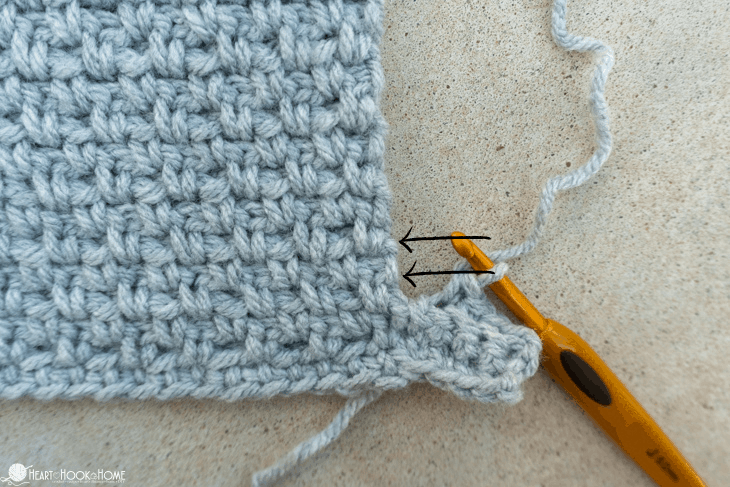
Row 2: Sl st to top of next row on body, turn. Sc in back loop only in first 3 sts, sc in both top loops of last st. (4)
Row 3: Ch-1, turn, sc in back loop only of each st to end. Sl st to top of corresponding row on garment. (4)

Alternate rows 2 & 3 up around the neck and down the other side, ending with a row 3 at bottom left of garment. Weave in all ends.
Sides (both sizes):
With garment laying face down so that you are looking at the back, and still with the 6mm hook… looking at the right edge, count up 24 sts from the bottom and attach with sl st. We’ll do the sides the same as we did for the inside edging, but fewer rows.

Row 1: Ch-5, sc in 2nd ch from hook and in each to end. Sl st to top of corresponding row on garment. (4)
Row 2: Sl st to top of next row on body, turn. Sc in back loop only in first 3 sts, sc in both top loops of last st. (4)
Row 3: Ch-1, turn, sc in back loop only of each st to end. Sl st to top of corresponding row on garment. (4)
Rows 4 – 16: Alternate rows 2 & 3, ending with a row 2. Fasten off leaving a long enough yarn tail to sew (or slip stitch) to the corresponding stitches on “right front”. Weave in all ends.

Now, looking at the left edge, count 40 sts up from the bottom and attach with sl st. Repeat as other edging side for 16 rows. Fasten off leaving a long enough yarn tail to sew (or slip stitch) to the corresponding stitches on “right front”. Weave in all ends.
Pockets (both sizes):
Make two.
Row 1: Fsc-26, or Ch-27, sc in 2nd ch from hook and in each ch to end. (26)
Row 2: Ch-2 (counts as sc + ch-1 here and throughout), turn, sk-first st, sc in next. * ch-1, sk-next st, sc in next * repeat between * * to end. (27)
Rows 3 – 18: Ch-2, turn, sk first sc, sc in ch-sp. * ch-1, sc in next ch-sp * repeat between * * to end. (27) Continue to “top edging”.
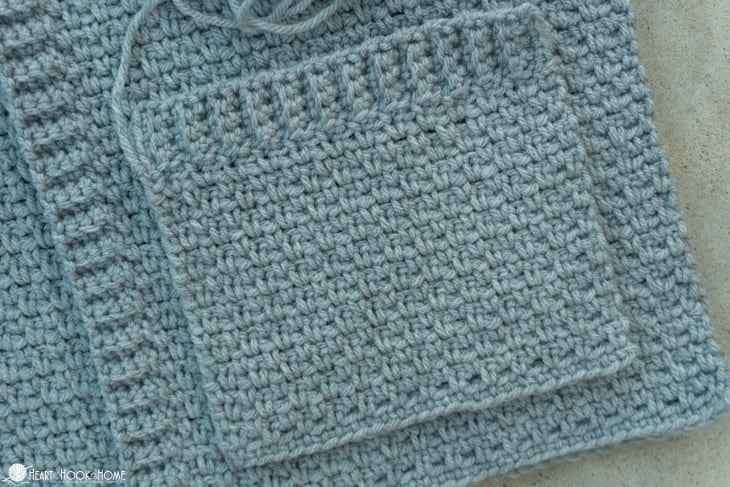
Pocket top edging:
Row 1: Ch-5, sc in 2nd ch from hook and in next 3 sts. Sl st to chain st. (4)
Row 2: Sl st to next sc st, turn, sc in blo of first 3 sts. Sc in both loops of last st. (4)
Row 3: Ch-1, turn, sc in blo of each st to end. Sl st to chain st. (4)
Repeat rows 2 & 3 until you reach the end of the pocket, finishing on a row 3.
Fasten off leaving a long tail for sewing into place. I stitched mine ~3 rows up from the bottom edge, centered on each “front”.
You are done! I absolutely love the feel of this. We can throw it on over a t-shirt, a long sleeved shirt as the weather cools, or sitting around the campfire. ♥ What color will you make yours?
I can not wait to see yours! Make sure you tag @HeartHookHome on social media, and/or share in the Heart Hook Home Crochet Community on Facebook!
More free crochet patterns:
Wave Market Bag Free Crochet Pattern
Let it Bee Wrap: A Free Crochet Pattern
Honeycomb Shawl: Free Tunisian Crochet Triangle Shawl Pattern


90 Comments