Holly Jolly Poncho: Free Christmas Poncho Crochet Pattern
This post may contain affiliate links, meaning that I may earn a small commission if you make a purchase. See our disclosure policy for more information.
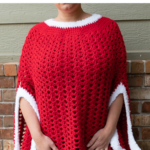

Are you ready to show off your Christmas spirit? Gear up for the holidays with this Holly Jolly Christmas Poncho! This is the perfect thing to throw on over some leggings and boots. Grab your hook and your yarn and whip up a festive poncho using this free Christmas Poncho crochet pattern!

Holly Jolly Poncho Crochet Pattern
This poncho pattern works up super fast at just 39 rows total. Of course, you could make one in any other color and omit the trim to make it a year-round poncho. I’ve already got a tweed one in the works! You’ll need just over 800 yards of your favorite, bright red worsted weight yarn. I chose Red Heart With Love in Holly Berry. You will also need one skein of white Bernat Pipsqueak to add the trim. This is an inexpensive, fun project! If additional length is needed, simply continue adding rows until the length is as long as you’d like.


Materials:
Red Heart With Love in “Holly Berry”
-approx. 807 yards (slightly more than two balls)
Bernat Pipsqueak in “Whitey White”
-approx. 93 yards (less than one ball)
Crochet hook in size 7mm
Gauge:
12 sc sts x 13 rows = 4″ square
Pattern Notes:
In the yoke, the ch-1 does not count as a stitch.
In the body, the ch-3 at the beginning of the row does count as a stitch.
Shell = (2dc, ch-1, 2dc) in same stitch/space.
Pay particular attention to the chains in between the shells after splitting the body into “front” and “back”.
Grab the ad-free, printable version of this pattern on Ravelry or Etsy. Thank you!
If you need help reading a crochet pattern, make sure you head over here and check out this detailed post.
Sizing:
This is a one-size-fits-most poncho pattern, up to about 2XL.


Christmas Poncho Pattern:
Yoke:
Round 1: Fsc-70 (or Ch-70, join to first sc without twisting chain. Ch-1, sc in each ch around) Join to top of first sc. (70)
Round 2: Ch-1, turn, * sc in next 6 sts, 2sc in next * repeat between * * around. Join to top of first sc. (80)
Round 3: Ch-1, turn, * sc in next 7 sts, 2sc in next * repeat between * * around. Join to top of first sc. (90)
Round 4: Ch-1, turn, * sc in next 8 sts, 2sc in next * repeat between * * around. Join to top of first sc. (100)
Round 5: Ch-1, turn, * sc in next 9 sts, 2sc in next * repeat between * * around. Join to top of first sc. (110)
Round 6: Ch-1, turn, * sc in next 10 sts, 2sc in next * repeat between * * around. Join to top of first sc. (120)
Round 7: Ch-1, turn, * sc in next 11 sts, 2sc in next * repeat between * * around. Join to top of first sc. (130)
Round 8: Ch-1, turn, * sc in next 12 sts, 2sc in next * repeat between * * around. Join to top of first sc. (140)
Wanna save this for later?
Body:
Round 9: Do not turn. Ch-3, (dc, ch-1, 2dc) in first st. * sk 3 sts, (2dc, ch-1, 2dc) in next st * repeat between * * around. Join to third ch from beg ch. (35 shells)
Rounds 10 – 20: Turn, sl st in first two sts, sl st in ch-sp. Ch-3, (dc, ch-1, 2dc) in same ch-sp. * Shell in next ch-sp (the ch-sp in the center of next shell) * repeat between * * around. Join to third ch from beg ch. (35 shells)
Split into “front” and “back”, changing from “rounds” to “rows” worked back and forth.
Back:
Row 21: Ch-3, turn, dc in same as join. * ch-1, shell in center of next shell * repeat between * * 17 more times. Ch-1, 2dc in between next two shells. (18 full shells and two half shells)
Rows 22 – 30: Ch-3, turn, dc in same st. * ch-1, shell in center of next shell * repeat between * * to end. Ch-1, 2dc in last st. (18 full shells and two half shells)
Rows 31 – 39: Ch-3, turn, dc in same st. * ch-2, shell in center of next shell * repeat between * * to end. Ch-2, 2dc in last st. (18 full shells and two half shells)


Front:
Attach yarn in same ch-sp as the end of row 21 above.
Row 21: Ch-3, dc in same ch-sp. * ch-1, shell in center of next shell * repeat between * * 16 more times. Ch-1, 2dc in between next two shells. (17 full shells and two half shells)
Rows 22 – 30: Ch-3, turn, dc in same st. * ch-1, shell in center of next shell * repeat between * * to end. Ch-1, 2dc in last st. (17 full shells and two half shells)
Rows 31 – 39: Ch-3, turn, dc in same st. * ch-2, shell in center of next shell * repeat between * * to end. Ch-2, 2dc in last st. (17 full shells and two half shells)
Trim:
Attach at any bottom corner with sl st.
Row 1: Ch-1, sc in each st around entire bottom, placing 3sc in each corner and just one sc at the top of the arm slit.
Rows 2 – 4: No need to turn. Sc in each st around, placing 3sc in each corner and one sc at the top of the arm slit.
Fasten off and weave in ends.

Neck:
Attach in any stitch with sl st.
Row 1: Ch-1, sc in each st around. Join to top of first sc with sl st.
*it helps if you mark your first st of each of these rows with a stitch marker.
Rows 2 – 4: Sc in each st around. Join to top of first sc with sl st.
Fasten off and weave in ends.
You are finished! Your Holly Jolly Christmas Poncho is ready to wear to your work gathering, to the Christmas meals with family, or on a trip to Target for some festive Christmas shopping.
More for Christmas:
Christmas Ornament Coasters – Free Crochet Pattern
8 Free Christmas Scarf Crochet Patterns


23 Comments