Painted Canyon Cardigan Crochet Along: Part THREE
This post may contain affiliate links, meaning that I may earn a small commission if you make a purchase. See our disclosure policy for more information.

Have you finished the body of your Painted Canyon Cardigan? Grab it and your hook and yarn because we are ready to add the hood, edging, and to crochet the pockets. This week is a doozy! (But you’re in good hands!) If you need help reading a crochet pattern, make sure you head over here and check out this detailed post.

Painted Canyon Cardigan: Part THREE
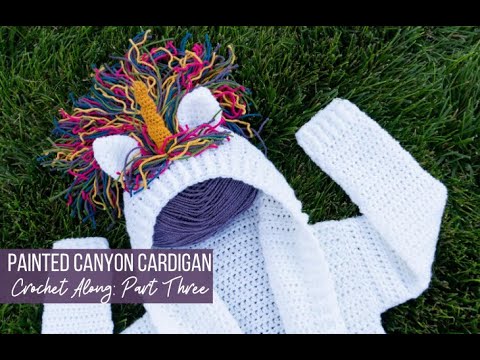
In part THREE of this CAL, we are working up the hood, then sewing it shut with the Mattress Stitch. You’ll remember this method of stitching from part two. 😉 Next we’ll add the edging to the body, and crochet the pockets. This week is the busiest week of the entire crochet along, but by the end of it you’ll feel more confident making cardigans. I promise!


Just joining us? Make sure you check out the Materials & Dates post for all of the information needed to participate. I do recommend having the printed version of the pattern (for the size you are making) in front of you, or otherwise available for easy/frequent referencing.

SIZES OF THE PAINTED CANYON CARDIGAN:
6 Month
12 Month
2/3T
4/5T
6/8
10/12
and all of the ADULT sizes of this pattern (0 – 28W) here.
Wanna save this for later?
The hood itself is not difficult, and the edging is described and shown in detail in the video below. The most important thing is to make sure you are following the stitch counts and row counts for the pattern size you are making. In the videos for this crochet along I am making the 2/3T size. At the end of part three, your cardigan-in-progress should look like this:

DATES FOR THIS CROCHET ALONG:
Part One can be found HERE
Part Two can be found HERE
Part Three – (this one!)
Part Four can be found HERE
Ready for some hood, edging, and pockets?! Let’s go!


12 Comments