Outdoor Chair Cushion Cover + Unwelcome Sign Tutorial
This post may contain affiliate links, meaning that I may earn a small commission if you make a purchase. See our disclosure policy for more information.
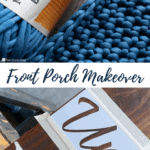
Are you limiting the number of visitors to your home right now? We actually made this “unwelcome sign” around Thanksgiving last year as a funny, but now with a global emergency underway, this sign could not be more perfect.

We also have an outdoor chair cushion that needed some love. It used to be black but after several years outdoors it has faded to a light grey and is in pretty sad shape. Thankfully using crochet, it is possible to whip up a new cushion cover and freshen up our whole front porch!
Chair Cushion Cover
If you’re here looking for the unwelcome sign, the tutorial for that can be found below. 😀

For this cushion cover I am using Bernat Maker BIG (discontinued, but this yarn would work too). This yarn calls for a large, 15mm hook, which also makes your project work up super quickly!
If you need help reading a crochet pattern, make sure you head over here and check out this detailed post.
To make a cushion cover, you’ll want to start with a crocheted chain that is ~2″ shorter than the width of your pillow.

Single crochet in the second chain from the hook and in each chain until you reach the end. Place three single crochets in the last chain, and rotate the work so that you can work up the opposite side of the chain in order to form a long oval. When you get back around to the beginning, place two single crochets in the final chain.

Do not join throughout the entire pattern, rather work in a spiral for the entirety of the cushion cover. Single crochet around and around in a spiral until you’ve reached the desired height.
When the cushion cover is ~3″ taller than your cushion, fasten off and weave in all ends. Add 3 buttons across the back side of the cover and, using any stitch space as a buttonhole, enclose the cushion in your new cover. Ta-da!
Wanna save this for later?

If you are here for the Unwelcome sign, that is easy too!
Unwelcome sign tutorial

For our “Unwelcome” sign, all we used were two inexpensive fence boards from the wood department of our local craft store. We then cut, stained, and painted the “unwelcome” using stencils.

When finished drying, we added the necessary hinges (for “welcome” vs “unwelcome”) and the hardware needed for hanging.

That’s it! How fancy is it that it is on hinges, meaning that we can also choose to WELCOME folks when we so desire! LOL! I love it and I hope you do, too!
More fun DIY:
How to Make a Ladder Golf Game Set Using PVC Pipe
Inexpensive & Easy DIY World Travel Map


4 Comments