Toe-Tally Easy Crochet Socks: Free Unisex Crochet Pattern
This post may contain affiliate links, meaning that I may earn a small commission if you make a purchase. See our disclosure policy for more information.
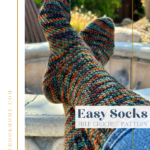
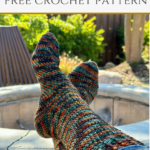

No question about it, crocheting socks can be intimidating. With this new, free unisex crochet sock pattern, we are changing that! This pattern is very beginner friendly, and you’ll walk away (in your super comfy socks) knowing how to crochet a toe-up, short row heel sock for just about any adult.

Toe-Tally Easy Crochet Sock Pattern
Crochet socks are a great way to show someone you care. Putting in the effort to crochet a pair of socks makes it absolutely known to the recipient that we want them to be warm, comfy, and feel loved every time they wear said socks. I can’t think of a better gift going into this gifting season. ♥

Crocheting socks can be intimidating because of the shaping needed to make the heel. The technique used to make this sock heel is called short rows, where we crochet half of the heel, then “turn” the heel so that we can make the second half, picking up the side of each row as we crochet it.
Keeping in mind that this may be your first sock or short row pattern, I made this pattern as easy to follow as possible. You will need plenty of stitch markers, but after making a pair for yourself, I think you’ll have a better understanding of how short rows themselves – and socks! – work. We’ll be playing around with short rows in future designs, so let’s get our feet wet here. 🙂
Socks should have what is called a “negative ease”, meaning that they are slightly smaller than the size of the foot. The nature of yarn is to stretch a bit with use, and you don’t want them falling off your feet after a few short wears! Let’s start our sock making adventures with this free, beginner friendly pattern.


For this pattern we are using the Linked Double Crochet stitch. This is a stitch that does not have a lot of bumps on back side (inside of the foot), meaning that it should not aggravate the soles of your feet like other stitches might.

The sizes for these crochet socks range from women’s size 5 up to men’s size 13. If you need them a bit smaller or a bit larger than that even, I would simply adjust your hook size – down to make them slightly smaller and up a hook size to make them slightly larger. If you need help with a particularly large pair, shoot me an email and I’d be happy to help!
Grab the ad-free, printable pdf either on Ravelry, Etsy, or in the Heart Hook Home shop. Thank you!
Materials:
Worsted weight yarn (Vanna’s Choice in “Navy” and “Linen” pictured, Wool of the Andes Tweed in “Flagstone Heather” pictured)
-approx. 110 yards per pair for Women’s Size 5 – 6
-approx. 160 yards per pair for Women’s Size 7 – 9
-approx. 232 yards per pair for Women’s Size 10 – 11/Men’s Size 8 – 9
-approx. 240 yards per pair for Men’s Size 10 – 11
-approx. 250 yards per pair for Men’s Size 12 – 13
Crochet hook in size H/5mm
Plenty of Stitch Markers

Gauge:
10 Linked Double Crochet stitches x 7 rows = 3”
Pattern Notes:
Mark the first st of each row with a stitch marker.
Do not turn throughout the pattern, except when working the HEEL rows. The heel is worked in rows, then we switch back to rounds (picking up where we left off) to finish the “ankle” and “leg”.
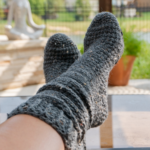
You could continue the “ankle” or “leg” rows to make the socks as tall as you like. In the tall pair I am modeling I took the ankle all the way to row 50 before adding the cuff.
The suede slipper bottoms I added can be found here in women’s sizes and here for men’s sizes. They really make them non-slip!
Pattern written using US terms.
If you need help reading a crochet pattern, make sure you head over here and check out this detailed post.
Photos of specific areas are displayed in their respective place on the Women’s Sizes 7 – 9 size pattern.
VIDEO included below.


Toe:
Round 1: Ch-4, 3sc in 2nd ch from hook, sc in next st, 5sc in last st. Turn to work up the opposite side of the chain… sc in next, 2sc in the same as starting. Do not join, mark the first st of each round with st marker. (12)
Round 2: * Sc in next st, 2sc in next, sc in 3 sts, 2sc in next * repeat between * * one more time. (16)
Round 3: * Sc in next st, 2sc in next, sc in next 5 sts, 2sc in next * repeat between * * one more time. (20) Sc one extra time to move the first stitch over by one before starting the next row.
Round 4: * Sc in next st, 2sc in next, sc in next 7 sts, 2sc in next * repeat between * * one more time. (24)
Rounds 5 – 6: Sc in each st around. (24)
Foot:
Round 7: Dc in first st, Ldc in each st around. (24)
Rounds 8 – 16: Ldc in each st around. (24)
Round 17: 2Ldc in first st. Ldc in 11 sts. 2Ldc in next, ldc in remaining 11 sts. (26)
Round 18: Ldc in each st around. (26)
Start the heel in rows:
Row 1: sc in 13 sts only. (13)
Row 2: Turn (do not chain), sk first st (place a marker here), sc in 12 sts. (12)
Row 3: Turn (do not chain), sk first st (place a marker here), sc in 11 sts. (11)
Row 4: Turn (do not chain), sk first st (place a marker here), sc in 10 sts. (10)
Row 5: Turn (do not chain), sk first st (place a marker here), sc in 9 sts. (9)
Row 6: Turn (do not chain), sk first st (place a marker here), sc in 8 sts. (8)
Row 7: Turn (do not chain), sk first st (place a marker here), sc in 7sts. (7)
Row 8: Turn (do not chain), sk first st (place a marker here), sc in 6 sts. (6)
Row 9: Turn (do not chain), sk first st (place a marker here), sc in 5 sts. (5)
Now we will use short rows to close (or “turn”) the heel.
Row 10: Ch-1, turn, sc in all 5 sts, sl st in marked st 2 rows down. (6)
Row 11: Ch-1, turn, sc in all 6 sts, sl st in marked st 2 rows down. (7)
Row 12: Ch-1, turn, sc in all 7 sts, sl st in marked st 2 rows down. (8)
Row 13: Ch-1, turn, sc in all 8 sts, sl st in marked st 2 rows down. (9)
Row 14: Ch-1, turn, sc in all 9 sts, sl st in marked st 2 rows down. (10)
Row 15: Ch-1, turn, sc in all 10 sts, sl st in marked st 2 rows down. (11)
Row 16: Ch-1, turn, sc in all 11 sts, sl st in marked st 2 rows down (this sl st should be in the very first sc made on row 1 – the first row of the heel). (12)
Row 17: Ch-1, turn, sc in all 12 sts, sl st in marked st 2 rows down. (13)
We will now continue the Linked double crochet portion across the top of the foot. To do so, Ldc in next 13 sts. This should get you back to where you were at the end of round 18, where we ended the “foot” and began the “heel”.
Round 19: Ldc in space between foot and heel. Ldc in 13 sts of “heel”, Ldc in space between heel and foot, Ldc in remaining 13 sts. (28)
Rounds 20 – 22: Ldc in each st around. (28)
Jump to “Cuff” for all sizes below.
~~~~~~~~~~~~~~~~~~~~~~~~~~~~~~~~~~~~~~~~~~~~~~~~~~~~~~~~~
Women’s Sizes 7 – 9:
Toe:
Round 1: Ch-4, 3sc in 2nd ch from hook, sc in next st, 5sc in last st. Turn to work up the opposite side of the chain… sc in next, 2sc in the same as starting. Do not join, mark the first st of each round with st marker. (12)
Round 2: * Sc in next st, 2sc in next, sc in 3 sts, 2sc in next * repeat between * * one more time. (16)
Round 3: * Sc in next st, 2sc in next, sc in next 5 sts, 2sc in next * repeat between * * one more time. (20) Sc one extra time to move the first stitch over by one before starting the next row.
Round 4: * Sc in next st, 2sc in next, sc in next 7 sts, 2sc in next * repeat between * * one more time. (24)
Round 5: Sc in each st around. (24)
Round 6: 2sc in next st, sc in next 11 sts, 2sc in next, sc in remaining 11 sts. (26)
Round 7: repeat round 5. (26)

Foot:
Round 8: Dc in first st, Ldc in each st around. (26)

Rounds 9 – 18: Ldc in each st around. (26)
Round 19: 2Ldc in first st. Ldc in 12 sts. 2Ldc in next, ldc in remaining 12 sts. (28)
Round 20: Ldc in each st around. (28)

Start the heel in rows:
Row 1: sc in 14 sts only. (14)

Row 2: Turn (do not chain), sk first st (place a marker here), sc in 13 sts. (13)

Row 3: Turn (do not chain), sk first st (place a marker here), sc in 12 sts. (12)

Row 4: Turn (do not chain), sk first st (place a marker here), sc in 11 sts. (11)

Row 5: Turn (do not chain), sk first st (place a marker here), sc in 10 sts. (10)

Row 6: Turn (do not chain), sk first st (place a marker here), sc in 9 sts. (9)

Row 7: Turn (do not chain), sk first st (place a marker here), sc in 8 sts. (8)

Row 8: Turn (do not chain), sk first st (place a marker here), sc in 7 sts. (7)
Row 9: Turn (do not chain), sk first st (place a marker here), sc in 6 sts. (6)

Now we will use short rows to close (or “turn”) the heel.
Row 10: Ch-1, turn, sc in all 6 sts, sl st in marked st 2 rows down. (7)
Row 11: Ch-1, turn, sc in all 7 sts, sl st in marked st 2 rows down. (8)


Row 12: Ch-1, turn, sc in all 8 sts, sl st in marked st 2 rows down. (9)
Row 13: Ch-1, turn, sc in all 9 sts, sl st in marked st 2 rows down. (10)
Row 14: Ch-1, turn, sc in all 10 sts, sl st in marked st 2 rows down. (11)
Row 15: Ch-1, turn, sc in all 11 sts, sl st in marked st 2 rows down. (12)
Row 16: Ch-1, turn, sc in all 12 sts, sl st in marked st 2 rows down (this sl st should be in the very first sc made on row 1 – the first row of the heel). (13)
Row 17: Ch-1, turn, sc in all 13 sts, sl st in marked st 2 rows down. (14)

We will now continue the Linked double crochet portion across the top of the foot. To do so, Ldc in next 14 sts. This should get you back to where you were at the end of round 20, where we ended the “foot” and began the “heel”.
Round 21: Ldc in space between foot and heel. Ldc in 14 sts of “heel”, Ldc in space between heel and foot, Ldc in remaining 14 sts. (30)

Rounds 22 – 24: Ldc in each st around. (30)
Jump to “Cuff” for all sizes below.
~~~~~~~~~~~~~~~~~~~~~~~~~~~~~~~~~~~~~~~~~~~~~~~~~~~~~~~~~
Women’s Sizes 10 – 11 & Men’s Sizes 8 – 9:
Toe:
Round 1: Ch-4, 3sc in 2nd ch from hook, sc in next st, 5sc in last st. Turn to work up the opposite side of the chain… sc in next, 2sc in the same as starting. Do not join, mark the first st of each round with st marker. (12)
Round 2: * Sc in next st, 2sc in next, sc in 3 sts, 2sc in next * repeat between * * one more time. (16)
Round 3: * Sc in next st, 2sc in next, sc in next 5 sts, 2sc in next * repeat between * * one more time. (20) Sc one extra time to move the first stitch over by one before starting the next row.
Round 4: * Sc in next st, 2sc in next, sc in next 7 sts, 2sc in next * repeat between * * one more time. (24)
Round 5: Sc in each st around. (24)
Round 6: * Sc in next st, 2sc in next, sc in next 9 sts, 2sc in next * repeat between * * one more time. (28)
Round 7: repeat round 5. (28)
Round 8: * Sc in next st, 2sc in next, sc in next 11 sts, 2sc in next * repeat between * * one more time. (32)
Foot:
Round 9: Dc in first st, Ldc in each st around. (32)
Wanna save this for later?
Rounds 10 – 20: Ldc in each st around. (32)
Round 21: * Ldc in next st, 2Ldc in next, Ldc in next 13 sts, 2Ldc in next * repeat between * * one more time. (36)
Round 22: Ldc in each st around. (36)
Start the heel in rows:
Row 1: sc in 18 sts only. (18)
Row 2: Turn (do not chain), sk first st (place a marker here), sc in 17 sts. (17)
Row 3: Turn (do not chain), sk first st (place a marker here), sc in 16 sts. (16)
Row 4: Turn (do not chain), sk first st (place a marker here), sc in 15 sts. (15)
Row 5: Turn (do not chain), sk first st (place a marker here), sc in 14 sts. (14)
Row 6: Turn (do not chain), sk first st (place a marker here), sc in 13 sts. (13)
Row 7: Turn (do not chain), sk first st (place a marker here), sc in 12 sts. (12)
Row 8: Turn (do not chain), sk first st (place a marker here), sc in 11 sts. (11)
Row 9: Turn (do not chain), sk first st (place a marker here), sc in 10 sts. (10)
Row 10: Turn (do not chain), sk first st (place a marker here), sc in 9 sts. (9)
Now we will use short rows to close (or “turn”) the heel.
Row 11: Ch-1, turn, sc in all 9 sts, sl st in marked st 2 rows down. (10)
Row 12: Ch-1, turn, sc in all 10 sts, sl st in marked st 2 rows down. (11)
Row 13: Ch-1, turn, sc in all 11 sts, sl st in marked st 2 rows down. (12)
Row 14: Ch-1, turn, sc in all 12 sts, sl st in marked st 2 rows down. (13)
Row 15: Ch-1, turn, sc in all 13 sts, sl st in marked st 2 rows down. (14)
Row 16: Ch-1, turn, sc in all 14 sts, sl st in marked st 2 rows down. (15)
Row 17: Ch-1, turn, sc in all 15 sts, sl st in marked st 2 rows down . (16)
Row 18: Ch-1, turn, sc in all 16 sts, sl st in marked st 2 rows down. (this sl st should be in the very first sc made on row 1 – the first row of the heel) (17)
Row 19: Ch-1, turn, sc in all 17 sts, sl st in marked st 2 rows down. (18)
We will now continue the Linked double crochet portion across the top of the foot. To do so, Ldc in next 18 sts. This should get you back to where you were at the end of round 22, where we ended the “foot” and began the “heel”.
Round 23: Ldc in space between foot and heel. Ldc in 18 sts of “heel”, Ldc in space between heel and foot, Ldc in remaining 18 sts. (38)
Rounds 24 – 26: Ldc in each st around. (38)
Jump to “Cuff” for all sizes below.
~~~~~~~~~~~~~~~~~~~~~~~~~~~~~~~~~~~~~~~~~~~~~~~~~~~~~~~~~

Men’s Sizes 10-11:
Toe:
Round 1: Ch-4, 3sc in 2nd ch from hook, sc in next st, 5sc in last st. Turn to work up the opposite side of the chain… sc in next, 2sc in the same as starting. Do not join, mark the first st of each round with st marker. (12)
Round 2: * Sc in next st, 2sc in next, sc in 3 sts, 2sc in next * repeat between * * one more time. (16)
Round 3: * Sc in next st, 2sc in next, sc in next 5 sts, 2sc in next * repeat between * * one more time. (20) Sc one extra time to move the first stitch over by one before starting the next row.
Round 4: * Sc in next st, 2sc in next, sc in next 7 sts, 2sc in next * repeat between * * one more time. (24)
Round 5: * Sc in next st, 2sc in next, sc in next 9 sts, 2sc in next * repeat between * * one more time. (28)
Round 6: * Sc in next st, 2sc in next, sc in next 11 sts, 2sc in next * repeat between * * one more time. (32) Sc one extra time to move the first stitch over by one before starting the next
Round 7. Sc in each st around. (32)
Round 8: 2sc in first st. Sc in 15 sts. 2sc in next, sc in remaining 15 sts. (34)
Foot:
Round 9: Dc in first st, Ldc in each st around. (34)
Rounds 10 – 20: Ldc in each st around. (34)
Round 21: * Ldc in next st, 2Ldc in next, Ldc in next 14 sts, 2Ldc * repeat between * * one more time. (38)
Round 22: Ldc in each st around. (38)
Start the heel in rows:
Row 1: sc in 19 sts only. (19)
Row 2: Turn (do not chain), sk first st (place a marker here), sc in 18 sts. (18)
Row 3: Turn (do not chain), sk first st (place a marker here), sc in 17 sts. (17)
Row 4: Turn (do not chain), sk first st (place a marker here), sc in 16 sts. (16)
Row 5: Turn (do not chain), sk first st (place a marker here), sc in 15 sts. (15)
Row 6: Turn (do not chain), sk first st (place a marker here), sc in 14 sts. (14)
Row 7: Turn (do not chain), sk first st (place a marker here), sc in 13 sts. (13)
Row 8: Turn (do not chain), sk first st (place a marker here), sc in 12 sts. (12)
Row 9: Turn (do not chain), sk first st (place a marker here), sc in 11 sts. (11)
Now we will use short rows to close (or “turn”) the heel.
Row 10: Ch-1, turn, sc in all 11 sts, sl st in marked st 2 rows down. (12)
Row 11: Ch-1, turn, sc in all 12 sts, sl st in marked st 2 rows down. (13)
Row 12: Ch-1, turn, sc in all 13 sts, sl st in marked st 2 rows down. (14)
Row 13: Ch-1, turn, sc in all 14 sts, sl st in marked st 2 rows down. (15)
Row 14: Ch-1, turn, sc in all 15 sts, sl st in marked st 2 rows down . (16)
Row 15: Ch-1, turn, sc in all 16 sts, sl st in marked st 2 rows down. (17)
Row 16: Ch-1, turn, sc in all 17 sts, sl st in marked st 2 rows down. (this sl st should be in the very first sc made on row 1 – the first row of the heel) (18)
Row 17: Ch-1, turn, sc in all 18 sts, sl st in marked st 2 rows down. (19)
We will now continue the Linked double crochet portion across the top of the foot. To do so, Ldc in next 19 sts. This should get you back to where you were at the end of round 22, where we ended the “foot” and began the “heel”.
Round 23: Ldc in space between foot and heel. Ldc in 19 sts of “heel”, Ldc in space between heel and foot, Ldc in remaining 19 sts. (40)
Rounds 24 – 25: Ldc in each st around. (40)
Jump to “Cuff” for all sizes below.
~~~~~~~~~~~~~~~~~~~~~~~~~~~~~~~~~~~~~~~~~~~~~~~~~~~~~~~~~
Men’s Sizes 12-13:
Toe:
Round 1: Ch-4, 3sc in 2nd ch from hook, sc in next st, 5sc in last st. Turn to work up the opposite side of the chain… sc in next, 2sc in the same as starting. Do not join, mark the first st of each round with st marker. (12)
Round 2: * Sc in next st, 2sc in next, sc in 3 sts, 2sc in next * repeat between * * one more time. (16)
Round 3: * Sc in next st, 2sc in next, sc in next 5 sts, 2sc in next * repeat between * * one more time. (20) Sc one extra time to move the first stitch over by one before starting the next row.
Round 4: * Sc in next st, 2sc in next, sc in next 7 sts, 2sc in next * repeat between * * one more time. (24)
Round 5: * Sc in next st, 2sc in next, sc in next 9 sts, 2sc in next * repeat between * * one more time. (28)
Round 6: * Sc in next st, 2sc in next, sc in next 11 sts, 2sc in next * repeat between * * one more time. (32) Sc one extra time to move the first stitch over by one before starting the next
Round 7. Sc in each st around. (32)
Round 8: 2sc in first st. Sc in 15 sts. 2sc in next, sc in remaining 15 sts. (34)
Foot:
Round 9: Dc in first st, Ldc in each st around. (34)
Rounds 10 – 21: Ldc in each st around. (34)
Round 22: * Ldc in next st, 2Ldc in next, Ldc in next 14 sts, 2Ldc * repeat between * * one more time. (38)
Round 23: Ldc in each st around. (38)
Start the heel in rows:
Row 1: sc in 19 sts only. (19)
Row 2: Turn (do not chain), sk first st (place a marker here), sc in 18 sts. (18)
Row 3: Turn (do not chain), sk first st (place a marker here), sc in 17 sts. (17)
Row 4: Turn (do not chain), sk first st (place a marker here), sc in 16 sts. (16)
Row 5: Turn (do not chain), sk first st (place a marker here), sc in 15 sts. (15)
Row 6: Turn (do not chain), sk first st (place a marker here), sc in 14 sts. (14)
Row 7: Turn (do not chain), sk first st (place a marker here), sc in 13 sts. (13)
Row 8: Turn (do not chain), sk first st (place a marker here), sc in 12 sts. (12)
Row 9: Turn (do not chain), sk first st (place a marker here), sc in 11 sts. (11)
Now we will use short rows to close (or “turn”) the heel.
Row 10: Ch-1, turn, sc in all 11 sts, sl st in marked st 2 rows down. (12)
Row 11: Ch-1, turn, sc in all 12 sts, sl st in marked st 2 rows down. (13)
Row 12: Ch-1, turn, sc in all 13 sts, sl st in marked st 2 rows down. (14)
Row 13: Ch-1, turn, sc in all 14 sts, sl st in marked st 2 rows down. (15)
Row 14: Ch-1, turn, sc in all 15 sts, sl st in marked st 2 rows down . (16)
Row 15: Ch-1, turn, sc in all 16 sts, sl st in marked st 2 rows down. (17)
Row 16: Ch-1, turn, sc in all 17 sts, sl st in marked st 2 rows down. (this sl st should be in the very first sc made on row 1 – the first row of the heel) (18)
Row 17: Ch-1, turn, sc in all 18 sts, sl st in marked st 2 rows down. (19)
We will now continue the Linked double crochet portion across the top of the foot. To do so, Ldc in next 19 sts. This should get you back to where you were at the end of round 23, where we ended the “foot” and began the “heel”.
Round 24: Ldc in space between foot and heel. Ldc in 19 sts of “heel”, Ldc in space between heel and foot, Ldc in remaining 19 sts. (40)
Rounds 25 – 26: Ldc in each st around. (40)
Jump to “Cuff” for all sizes below.
~~~~~~~~~~~~~~~~~~~~~~~~~~~~~~~~~~~~~~~~~~~~~~~~~~~~~~~~~
Cuff (All Crochet Sock Sizes):
There are three options for the cuff…
1.) In the Navy pair pictured my husband wanted only a single crochet row instead of anything fancy.
2.) A short cuff made by using single crochet in the back loop only, which creates a nice ridged edge – as seen in the Linen colorway photos.
3.) A Front Post/Back Post ribbing that can be as tall as you like – as pictured in the tall, Flagstone Heather version I am modeling.
Single Crochet Cuff:
Where you left off, simply single crochet in each st around. Fasten off using Invisible Join.

Short Cuff (all sizes):
Sc in next open st.
Row 1: Ch-6, sc in 2nd ch from hook and in each to end. (5) Sl st to next open st on ankle.
Row 2: Sl st to next open st, turn. Sc in BLO of next 4 sts, sc in both loops of last st. (5)
Row 3: Ch-1, turn, sc in BLO of each st to end. Sl st to next open st on ankle. (5)
Alternate rows 2 & 3 around, ending with a row 3. Fasten off and use yarn tail to sew first cuff row to last cuff row.

Front Post/Back Post Ribbing (all sizes):
Ldc2tog. (This ensures that you have an ODD number of stitches going into round 1 of the edging)
Row 1: Ch-1 (do not turn), * fphdc around next st, bphdc around next * repeat between * * around. Fphdc around last, join to top of first fphdc with sl st.
Row 2: Ch-1, turn. * bphdc around next st, fphdc around next * repeat between * * around. Bphdc around last, join to top of first bphdc with sl st.
Row 3: Ch-1, turn. * fphdc around next st, bphdc around next * repeat between * * around. Fphdc around last, join to top of first fphdc with sl st.
Rows 4 – 7 (or as tall as you like): Repeat rows 2 & 3
Row 8: Ch-1, sc in each st around. Join with Invisible Join.
I hope you enjoyed making these crochet socks, and if this was your first sock pattern that you feel more confident going forward. Please share a photo with me by tagging @HeartHookHome on social media, and/or share in the Heart Hook Home Crochet Community on Facebook!


60 Comments