Quick & Easy DIY Embroidery Floss Earrings Tutorial
This post may contain affiliate links, meaning that I may earn a small commission if you make a purchase. See our disclosure policy for more information.


If you’re looking for a super quick, super easy way to snazz up your wardrobe – this is it! Make these quick and easy Embroidery Floss Earrings with this fun new tutorial!

I have fond memories of my Grandma Schu cross-stitching for hours on end. When she would come to visit, us kids would wake up to her already well into her work, black coffee growing cold on the side table. All of us have a cross stitched piece from Grandma. Priceless now that she is gone. ♥

Embroidery floss earrings have several qualities that make them perfect for this quick tutorial: embroidery floss is crazy inexpensive, the color selection is incredible, and they are so, so quick to make! I actually timed myself (because of course I did) and on average it takes around 4 minutes to complete each pair. This means that if you need something green to wear so you don’t get pinched on St. Patrick’s Day, all you need is four minutes, one skein of green embroidery floss, a pair of pliers, jump rings, and fishhook earrings. BOOM!
Embroidery Floss Earrings Tutorial
These embroidery floss earrings are a perfect quick craft for a little one that just got their ears pierced. The best part? You only need ONE skein of floss for each PAIR!
Materials:
Embroidery Floss
10mm Jump rings
Fishhook earrings
Needle-nose or jewelry pliers
Yarn needle
Scissors
Pin this for later here.
To make Embroidery Floss earrings:

1. Lay the embroidery floss skein flat and pull out four skein-lengths of floss. The length should be about 25″ give or take. Trim. Do this again so that you have two strands; one 25″-ish length for each earring. Remove labels from embroidery floss skein.


2. Using pliers, open jump ring half way. Insert one end of embroidery floss (where it naturally curves) onto jump ring, carefully slip on the fishhook earring, close jump ring. Repeat on other side.

Wanna save this for later?


3. Using the first set-aside length of floss from step one, position the end about 4″ past the earring end. Hold tight with your thumb and finger and, using the remaining 20 or so inches with your other hand, wrap and wrap around until the length remaining is about 4″.


4. Double knot the ends and insert the needle into the top of the wrapping. Thread embroidery floss through the eye of the needle and feed through center. Pull to secure.

5. Repeat steps 3 & 4 on opposite side of embroidery floss. You now have one skein of embroidery floss with two earrings attached at each end.

6. Cut the skein right down the middle to separate the earrings into two. Give them a good shake to get rid of any loose ends. Trim uneven ends.

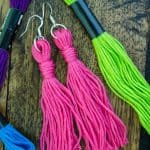
Embroidery Floss Earrings made!
Wasn’t that waaaayyyyyy easier than it looks?! So easy, so QUICK, so versatile! Make a pair using your favorite college or NFL team colors, make a red, white, and blue pair for 4th of July, red for Valentine’s Day, green for St. Patrick’s Day, etc, etc!

More DIY:
DIY: Portable Photography Floor for Photo Staging
How to Make a Toy Car Parking Garage
Make a Ladder Golf Game Set Using PVC Pipe
How to Make a Floating Cooler Using Pool Noodles


3 Comments