Furry Throw Pillow Cover Free Crochet Pattern
This post may contain affiliate links, meaning that I may earn a small commission if you make a purchase. See our disclosure policy for more information.


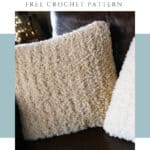

I’m a sucker for decorative throw pillows. Whether it’s a fun fur throw pillow cover like we’re making today, or a splash of color in an otherwise muted room, they contribute so much to the vibe of a space. Let’s make a Furry Throw Pillow Cover using this free crochet pattern!

Furry Throw Pillow Cover Crochet Pattern
This throw pillow cover is fun and easy to make – beginner level even! If you’ve made the Faux Fur Throw, you’re familiar with this yarn and how dreamy it is next to your skin. It is almost cool to the touch, and so, so soft. For this throw pillow crochet pattern, we are holding two strands of yarn together; one strand of the Red Heart Hygge Fur and one strand of a corresponding color of Red Heart Super Saver. Holding the two strands together makes the stitches easier to see and gives substance to the fabric.


We are using the Half Double Crochet stitch for this pattern. See a video tutorial for this stitch here. Use these pillow covers on existing pillows, or purchase a 14″ x 14″ pillow insert.
Because of the construction of this pillow cover, it is easily removed for washing. Sweet!
If you need help reading a crochet pattern, make sure you head over here and check out this detailed post.
Materials:
Red Heart Super Saver (Buff and Aran colorways pictured)
-approx. 183 yards (approximately half a skein)
Red Heart Hygge Fur (Sand Castle and Cotton Tail colorways pictured, respectively)
-approx. 215 yards (less than one skein)
Crochet hook in size 7mm
14″ square throw pillow (or pillow insert)
Gauge: 9 hdc sts x 7 rows = 4″ square
Rectangle Dimensions: 13” x 32”
Pattern Notes:
The chain at the beginning of the row does not count as a stitch.
Hold the two yarns together so that you have a fur strand and a worsted weight strand.
Make sure you don’t lose the fur strand as you’re going along. Check your work every few rows to make sure you are continuously completing stitches with both strands.
Pillow Cover Pattern:
Row 1: Ch-29, hdc in 2nd ch from hook and in each ch to end. (28)
Wanna save this for later?
Rows 2 – 58: Ch-1, turn, hdc in each st to end. (28)
Measure. If size is correct (approx. 13″ x 32″) fasten off and weave in all ends.

Construction:
Lay rectangle out flat. Fold right side in 9″ as pictured.

Fold left side in so that there are 4″ overlapping in the middle, as pictured.


Attach yarn in top corner with slip stitch. Slip stitch through all layers of fabric across the top of the pillow. (Two layers, then the three layers in the center, then two layer once more.) Do not slip stitch too tightly.

Flip pillow cover over and do the same on the other side. Weave in all ends. This is the INSIDE of the pillow. Flip pillow cover right-side out and insert your pillow insert and you. are. done!


If you loved this pattern, I think you’ll also enjoy these:
Personal Pouch: Free Crochet Pouch Pattern
Heavenly Hygge Hat Free Tunisian Crochet Pattern


3 Comments