Home » Hook » How to Crochet the Crocodile Stitch (Video Tutorial)
| | |

How to Crochet the Crocodile Stitch (Video Tutorial)

This post may contain affiliate links, meaning that I may earn a small commission if you make a purchase. See our disclosure policy for more information.

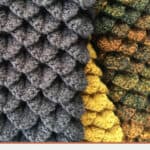
The Crocodile Stitch (also known as Dragon Tears or Dragon Scales) is such a plush, textured crochet stitch. While this stitch does look intimidating, with this written and video tutorial you’ll be crocheting Crocodile Stitches in no time! Let me show you how.

crocodile stitch crochet tutorial

Crocodile Stitch Tutorial

The Crocodile Stitch consists of double or half double crochets and a chain, all worked around a V stitch from a previous row. To create the Crocodile Stitch, you must first create the backbone for the actual scales.  In order to do this, you will create a row of V-stitches. (V-stitches are two double crochets placed in the same stitch so that they form a V when finished.) After you complete the row of V-stitches, you’ll then go back working on that same row adding the “scales” to the front of those very same V-stitches.

About the Crocodile Stitch

It is important to note that whether you are working crocodile stitches in flat rows or in the round (such as for leg warmers, purses, etc) makes a difference in how many chains you’ll need to start.

If working in the round, start with a multiple of six.

If working a flat project using dragon scales (such as this 12″ afghan square for the Stitch Sampler Afghan), I start with a multiple of 6 + 5. (I do mine a little bit differently than other tutorials I have seen, and this keeps the edges nice and straight instead of dipping in at the edges.)

First we’ll create a row of V-stitches, then we will go back on top of those stitches to form the actual scales. The V-stitches are always made going one direction, then the scales are always made in the opposite direction. (For right handed crocheters, this means V-stitches are worked right to left, then the scales are made worked left to right – opposite for left handed crocheters).

If you are having a difficult time finagling your hook, the trick is to rotate your work for each half of the scale. (See what I mean in the video below)

Some patterns call for different kinds of crocodile stitches, but the concept is always the same.  Some patterns call for double crochet (either 4 or 5 per side of each scale) and others like to use half double crochet (either 3, 4 or 5 stitches on each side of each scale).  The difference makes the scales either smaller or larger, depending on half or full double and how many stitches completed.

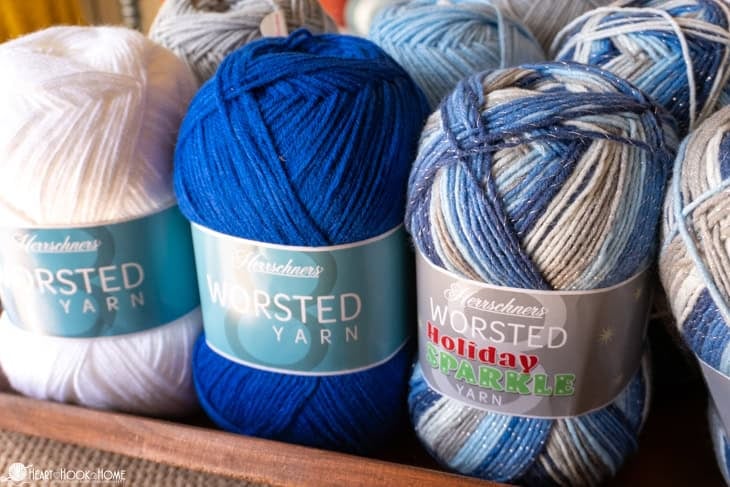
This stitch is definitely a yarn eater! But isn’t it gorgeous?!

dragon scales crochet tutorial

To make a crocodile stitch:

For this tutorial we will be crocheting a flat project.

1. Start with a chain in multiples of 6 + 5. For the tutorial here I am starting with 23 chains.

2. In the 4th chain from the hook place two double crochets.

3. Chain one, skip two chains, and place two double crochets in the next chain.

Repeat step three until you only have one chain remaining.

4. Place one double crochet in that final chain.

Now that we have this row of V-stitches in place, it is time to crochet the scales on the front of those V-stitches, working in the opposite direction.

5. Chain one and rotate your work (as pictured). Place five double crochets around the second leg of the final V-stitch made.

6. Chain one (this is the bottom of the scale and creates a pointier tip). Rotate your work so that you are looking at it from the opposite direction.

how to crochet crocodile stitch

7. Place five double crochets around the second side of that same V-stitch.

Scale made!

8. Slip stitch to the next V-stitch. I find that working into the center of that V-stitch helps to keep things laying nice and flat.

Note that you will not create a crocodile stitch in the V-stitches into which you slip stitch. You will always crocodile stitch around one, then slip stitch in the next, then crocodile stitch in the next, etc.

Repeat steps 5 – 8 to the end of the row. When you get there, slip stitch to the top of the beginning chain. First row complete!

Now we will offset the next row of scales so that they stagger.

9. Chain three (this counts as a double crochet), and place two double crochets in the center of that first scale.

10. Chain one, place two double crochets in between the next two scales (again, I find going through the center of the V-stitch looks best).

11. Chain one, place two double crochet in the center of the next scale.

Repeat steps 10 and 11 until you get to the end of the row. When you get there, place one double crochet in the very last stitch. (This looks like it is behind the scale and is better explained in the video tutorial below.)

Now that we have the V-stitches in place, we are ready to crochet the offset scale row.

12. Turn your work and slip stitch in each of the two double crochets that make up the final V-stitch made. Turn your work back again and prepare to make scales.

13. Rotate your work. Place five double crochets around the first leg of the next V-stitch.

14. Chain one (this is the bottom of the scale). Rotate your work so that you are looking at it from the opposite direction.

15. Place five double crochets around the second side of that same V-stitch.

16. Slip stitch to the next V-stitch.

Repeat steps 13 – 16 to the end of the row. When you get there, place one more slip stitch to the top of that beginning chain.

Now you’ll create another V-stitch row, and start over at step 5 to make the next non-offset row. Whew!

Crocodile tears crochet stitch

In the following photo you can see the “framework” of V-stitches that creates the backbone for the Crocodile Stitch. Isn’t that neat?!

If you’re feeling intimidated – don’t be! I do think this video tutorial captures the essence and the beauty of the Crocodile Stitch. I hope you love it! ♥

YouTube video
Join us in the Stitch Sampler Afghan by crocheting different stitches into 12″ squares that we will then join together to form a fabulous blanket. Get all of the Stitch Sampler details here and don’t forget that you can work at your own pace!

How to crochet the Crocodile Stitch

More crochet tips:

How to Read a Crochet Pattern

Waffle Stitch Crochet Tutorial

How to Crochet the Trinity Stitch

Aligned Clusters Crochet Stitch Tutorial

How to Crochet the Bobble Stitch: Written and Video Tutorial

Similar Posts

Leave a Reply

Your email address will not be published. Required fields are marked *

This site uses Akismet to reduce spam. Learn how your comment data is processed.

38 Comments

  1. How do you decrease when you are doing the crocodile stitch? I know it has to be done when you are creating the v stitch.
  2. Hi, I arrived just now and I am in love with this stitch. Looking for the perfect yarn to try it. thanks a lot
  3. HI: I just love your tutorials cause I can understand you so well. I am so glad I found you. Now I wondering if you had a tutorial using long and short stitches double crochet stitches together. I seen on the computer but I deleted it by mistake and now I want to make with using those stitches. I hope I explained well enough, It looked like they put a long dble crochet in about 3 or 4 stitches, then some short single dble crochets then back to one.
  4. Wow. Just wow! Your tutorial is the ONLY one that I can actually understand! Thank you very much. You don't say more than necessary. Very clear! I have been trying this pattern for awhile...thank you
  5. Hi, I’m wanting to make a blanket for my 3 year old granddaughter she is into fishing so this is closes thing to fish scales I found. Do you have an Afghan pattern? Thank-you
  6. THANK YOU! THANK YOU! TODAY I HAVE LEARNED THE CROCIDILE.STITCH AND THE MOSS AKA LINEN ETC. STITCHES. I ABSOLUTELY LOVE YOUR TUTORIALS! THEY ARE VERY CLEAR AND EASY TO FOLLOW! NOW I'M GOING TO TRY THE HEART! IT'S A COLD, WET DRY HETE IN NEBRASKA TODAY. PERFECT CROCHET WEATHER. THANK YOU SO MUCH! PLEASE CONTINUE YOUR TUTORIALS! I AM A BEGINNER AND YOU ARE MY INSTRUCTOR.
  7. I’ve made many attempts to make the dragon neck warmer from the Crochet Ever After book, but the “body” section is completely unclear. I thought maybe I’ll do the crocodile stitch instead. The directions I brought were also frustrating. So I decided to go digital. Your site is perfect! I can now do the stitch and alternate the colors on each round. Thanks for saving my project and reducing the stress:)
  8. Pingback: Stitches to Learn for Crochet or Knit - Holton Handicrafts
  9. This is legitimately the first tutorial I’ve ever laughed through I love your personality and I can’t wait to put this stitch to use with your pattern =)
  10. This is a great tutorial. Very clear and easy to follow. I haven't tried actually doing it yet but will very soon. I tried the croc stitch before without a video and that was a disaster. Can't wait to get time to try this... I may just make time today.Thank you
  11. I'm typically impatient with video tutorials, but a friend bought your pattern for me to make her some gloves, so I gave this a watch. What a clear, easy to follow video! Thank you so much! This vidoe inspired me to join your list. Thank you for doing what you do, so the rest of us benefit.
    1. Hi Mary! I am so glad you found my tutorial helpful! I hope you enjoy being a part of the Heart Hook Home community! Happy crocheting!
  12. A little confused as to why you come up and under you stitches instead of inserting hook thru the top which is normal and how the books teach you. That is a legitimate way to do a stitch but it's not the norm.
    1. Thank you for this tutorial. I am a lefty but was pretty easy to follow. I tried two other videos it yours is the best.
  13. How do you make sure yours are so pointy? Min seem to come out more rounded. Not sure if it is a tension thing or something else...
    1. I inserted an extra chain between the scales (ch2 instead of 1) and this helped to make the full scale look pointier rather than look like a flower petal.
  14. I’ve made the crocodile baby blanket but lost when it comes to doing the edgeing. Any help I would love. ThAnks!
    1. Hi Vonda! I would work 1 stitch into each stitch along the top and bottom of blanket. When working your way up the sides, I would put 2 stitches into the sides of each double crochet...so you would have 2 stitches per row. I have a edging tutorial with video if you need more help. http://hearthookhome.com/how-to-add-a-border-in-crochet/
  15. This is by far the clearest video tutorial for this stitch that I’ve seen! Your technique produces a better set then I’ve been able to stitch before so thank you very much! I know you had requested ideas for other needed tutorials. I am in desperate need to find a good tutorial regarding increasing the crocodile stitch (or your dragon tear stitch) while working in a round. Currently trying to stitch up a baby mermaid tail but when I increase the round, all of the scales are bunched too close together. Not sure if this is even avoidable but if you have any ideas, it would be greatly appreciated!!! :-) Thank you again! Just loved this video and your other work :-)
  16. Thank you so much, best tutorial that I have ever come across! I'm teaching myself to crochet through great crocheter's like yourself but like I said your tutorial is by far my favorite.
  17. That may be the clearest tutorial I've ever seen. I'm an expert crocheter and no longer use patterns to make anything. I sculpt all my pieces on my own. But the crocodile stitch had me baffled. I couldn't find an instruction that made it clear. You're a born teacher. Thank you so much!
  18. I just wanted to leave you a note to thank you for your very clear tutorial for crocodile stitch. I am a beginner stitcher (like a month - total crochet virgin!). I have watched and tried two other instructional videos with varying methods and they had me all muddled up. Yours is the most simple and straightforward to follow. Thank you so much. Btw, I found you through a Pinterest post if you keep track of that sort of metric.
  19. Hi, LOVE this tutorial! Can you by any chance do one for increasing and decreasing in Crocodile stitch? I’m trying to make baby hats and I’m struggling to understand the patterns I’m reading and I’d love to see it visually. Thank you!!!! Ali (I know I posted twice...I'm a techno slow poke!)
  20. You are very gifted in your ability to demonstrate these crochet stitches on video! You make it so easy easy! Thank you for your work.
      1. Hi, LOVE this tutorial! Can you by any chance do one for increasing and decreasing in Crocodile stitch? :) I'm trying to make baby hats and I'm struggling to understand the patterns I'm reading and I'd love to see it visually. Thank you!!!! :) Ali