Easy Foldover Crossbody Bag: Free Crochet Pattern
This post may contain affiliate links, meaning that I may earn a small commission if you make a purchase. See our disclosure policy for more information.
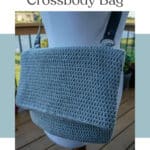

This has got to be the easiest crochet bag pattern ever. For this Foldover Crossbody bag we use simple half double crochet, then decide whether or not to add the lining, pocket, pouches and zipper. So simple and so sleek!

Easy Foldover Crossbody Bag
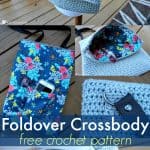
I have always been a sucker for a good foldover/newsboy/messenger/crossbody bag. I’m also a bit picky when it comes to my crochet purses, so I combined all of my “wants” to create this gorgeous crossbody bag. It has a zippered pocket, a cellphone pocket, a pen (or crochet hook!) pocket, and then the zipper at the opening of the bag. ALL of these are optional! If you’d rather just crochet the shell of the bag, and throw a strap on it, that would be perfect too! If you’ve got a sewing machine, and you’re up for a challenge, the possibilities are endless!
This is a free crochet pattern, great for beginners, and it really is so very easy. I hope you love it!

It is not technically reversible, but I flipped it inside out to show the pockets…


Materials:
Approx. 380 yards cotton yarn
*Crafter’s Secret in “gray” used
Crochet hook in size D/3.25mm
(2x) 1” D-rings (edited to add that I believe O-rings would work better!)
Yarn needle for sewing
Belt, leather strap, or old crossbody purse handle (about 46” long)
*check thrift stores for goodies!
This purse pattern is meant to be a small crossbody bag. It is big enough for a checkbook, phone, Chapstick, and keys. It looks best when not overstuffed, so this is a great excuse not to carry the rest of your family’s crap just because you have a purse! 😉


Optional:
Fabric for lining (about ½ yard)
12 – 14” zipper (for purse opening)
7” zipper (for inner pocket)
Lightweight interfacing (for lining and inner pocket)
Finished Dimensions:
Approx. 11” wide x 14.5” tall (not folded) 8.5” tall (folded)
Pattern Notes:
Pattern written in US terms.
Hdc = Half Double Crochet
Get the ad-free, printable version of this pattern on Ravelry. Thank you!
If you need help reading a crochet pattern, make sure you head over here and check out this detailed post.
Pattern
Leave about a 14” tail for weaving in ends.
Round 1: Ch-43. 6hdc in 2nd ch from hook, hdc in next 40 sts, 6hdc in last. Turn to work up other side: hdc in 40 sts. Do not join. (92)
Use stitch markers to mark the first st of each row.
Wanna save this for later?
Round 2: * hdc in next, 2hdc in next * repeat between * * 2 more times, hdc in next 40 sts. Repeat between * * 3 times, hdc in next 40 sts. Do not join.(98)
Rounds 3 – 48: hdc in each st around. Do not join. (98)
Rounds 49 & 50: hdc in each st to side fold, then sc around the entire opening. (this is technically a row and a half, but will keep the transition from hdc to sc cleaner)

Fasten off using Invisible Join and weave in all ends. Use tail from beginning of purse to sew up any gaps in the bottom of the bag (where the 6hdc were placed in the first row).

Ring holder straps:
Make two, start with a long tail for sewing.
Row 1: Ch-5, hdc in 2nd ch from hook and each to end (4)
Rows 2 – 10: Ch-1, turn, hdc in each st to end. (4)
Fasten off leaving long tail for securing to bag.

Finishing:
Insert into D-Ring (I do believe O-rings would work better) and fold over strap for only the height of four rows, leaving 6 rows free to sew to the bag itself. Use beginning tail to sew the folded over portion closed along the entire width of the strap. Position on back of bag. I placed the bottom of my straps 24 rows up from the bag bottom and about 5 crochet stitches in from the sides. Use the other long tail to sew the remaining six rows as securely as possible.

Add strap:
You could salvage a strap from an old purse you already own, or hit up the thrift store in search of an old bag there as well. For the bag pictured, I actually brainstormed with the employee at the fabric counter of my local craft store. She recommended using faux leather from their home décor department, so I made a purchase of the smallest cut I could (1/8 yard) for only $1.40 on sale! I then cut off a 3/4″ strip and trimmed it to length (about 46″). Then I used my rivet tool, just like I did on the Life’s a Beach bag, and it worked like a charm! I will keep an eye on this strap to make sure that it does not begin to stretch, or otherwise cease to function. If this ends up not being a viable option, I’ll be sure to update this post but as of right now I am super hopeful – especially at that cost!


Lining/pocket/pouches:
The lining, zipper, zippered pocket, and inside pouches are all optional for this pattern, however because crochet crossbody bags can sometimes stretch, I didn’t want to lose any small trinkets that I may want to put inside. I have never added a zippered pocket to a lining myself, so I watched this excellent video tutorial, then positioned the cell phone and pen pocket directly across from it. I then inserted the lining and top zipper as per this tutorial and I couldn’t be happier with the final result!

Will you be lining and adding a zipper to yours? I think it’s fine without, and certainly faster – and cheaper to make! On the other hand, it sure does take the project up a notch, don’t you think? It’s the perfect accessory to any outfit. I hope you absolutely love your Foldover Crossbody bag crochet pattern, and be sure to tag me with @HeartHookHome on social media when you share photos! I can’t wait to see!


13 Comments