Vintage Christmas Stocking: Free Crochet Pattern
This post may contain affiliate links, meaning that I may earn a small commission if you make a purchase. See our disclosure policy for more information.
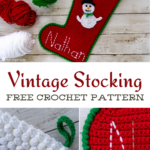


What is one thing that makes someone feel particularly loved at Christmas time? A personalized stocking that will last for years, that’s what. Let’s make an EASY Vintage Christmas Stocking for all of our loved ones using this free crochet pattern.

Vintage Christmas Stocking: Free Crochet Pattern
This is the second full year I will be celebrating the holidays with my boyfriend’s family. They are such a loving, fun group of people and I am so happy to share the holidays and get-togethers with them and their people.

Last year I noticed that one of the stockings was not the same. The older two boys have personalized stockings that have been with them throughout their lives, enduring all sorts of stocking stuffers, candies, and the weight of expectation for more than 40 years.

Sadly, by the time their younger brother came around the aunt that had made the first two was unable to complete a third. So, the youngest has spent his entire life set apart at Christmas time — until now! I knew that many of us could use such a stocking pattern as well so I’ve done my own take to make this EASY Christmas stocking pattern.
If you can single crochet and double crochet, you can make this stocking. Let’s make one!

Grab the ad-free, printable PDF of this pattern on Ravelry, Etsy, or right here in the Heart Hook Home Blog Shop. Thank you!
If you need help reading a crochet pattern, make sure you head over here and check out this detailed post.
Materials:
Worsted weight yarn (Red, Green, and White + scrap of black and scrap of orange for snowman)
-approx. 205 yards RED yarn
-approx. 75 yards WHITE yarn
-approx. 30 yards GREEN yarn
Crochet hook in size H/5mm
Gauge: 17 sts x 20 rows = 4” square using single crochet
Pattern Notes:
Pattern written using US terms.
The chain at the beginning of each row does not count as a stitch.
Rsc = Reverse Single Crochet (aka Crab Stitch, tutorial here)
Pop = Popcorn Stitch (tutorial here) = 5dc in same stitch, remove hook and insert in first dc made, hook working loop and pull through to appropriate side (to the back if working on “wrong side” and to the front if working the “ride side” rows.

Vintage Stocking Pattern:
Using Red yarn, make two…
Row 1: Ch-31, sc in 2nd ch from hook and each ch to end, 2sc in last. (31)
Row 2: Ch-1, turn, sc in each st across. (31)
Row 3: Ch-1, turn, sc in each st across, 2sc in last. (32)
Rows 4 – 7: repeat rows 2 & 3 (ending with 34 sts)
Rows 8 – 13: repeat row 2 (34)
Row 14: Ch-1, turn, sc2tog, sc in each st across. (33)
Row 15: repeat row 2 (33)
Rows 16 – 19: repeat rows 14 & 15 (ending with 31 sts)
Row 20: Ch-1, turn, sc3tog, sc in each st across. (29)
Row 21: Ch-1, turn, sc in 20 sts only. (20)
Rows 22 – 26: repeat row 2 (20)
Row 27: Ch-1, turn, sc in each st across, 2sc in last. (21)
Rows 28 – 32: repeat row 2 (21)
Rows 33 – 68: repeat rows 27 – 32 (ending with 27 sts)
Fasten off first and weave in ends, do NOT fasten off on second.

Construction:
Line up two pieces and, using red yarn where still attached and crocheting through both thicknesses…


Row 1: Sc 1x per row end around entire stocking (not including top opening).
Change to two strands of green yarn by pulling from both ends of the same skein…


Row 2: Ch-1, do not turn, * Rsc (crab stitch) in next st, sk next st * repeat between * * around entire stocking (again, not including top opening)
Wanna save this for later?
Fasten off and weave in all ends.


Top/snowballs:
Attach using white yarn at either top corner… (as you crochet the top, make sure to pull the popcorns to the front or back appropriately with each turn! A tutorial for the Popcorn Stitch can be found here.)

Row 1: Ch-2, * Pop in next st, ch-2, sk-2 sts * repeat between * * around. Join to top of first st. (18 Popcorns)
Rows 2 – 5: Ch-2, turn, * Pop around next ch-sp, ch-2 * repeat between * * around. Join to top of first st. (18 Popcorns)
Fasten off and weave in all ends.
Loop for Hanging:
Using green yarn…
Row 1: Ch-21, sc in 2nd ch from hook and in each to end. (20)
Row 2: Ch-1, turn, sc in each st to end. (20)
Fasten off leaving a long enough tail to sew securely to stocking top.
Snowman Body:
With white yarn…
Round 1: Magic Circle, Ch-1, 14dc in circle. Join to top of first dc. (14)
Round 2: Ch-2, turn, * 2dc in each of next 7 sts, ch-6, sc in 2nd ch from hook and in next 4 chs * repeat between * * one more time. Join to top of first dc. (28)
Fasten off leaving a long enough tail for sewing to stocking.
Snowman Head:
With white yarn…
Round 1: Magic Circle, ch-1, 14dc in circle. Join to top of first dc. (14)
Round 2: Ch-1, 2sc in each st around. Join to top of first st. (28)
Fasten off leaving a long enough tail for sewing to snowman body/stocking.
Snowman Hat:
With black yarn…
Row 1: Ch-13, sc in 2nd ch from hook and in each to end. (12)
Row 2: Turn, sl st in 4 sts, ch-1, sc in 4 sts only. (4)
Rows 3 – 5: Ch-1, turn, sc in each st across. (4)
Fasten off leaving a long enough tail for sewing to snowman head/stocking.
Position all pieces into place and sew to stocking body. Add a small nose using the orange yarn and a small mouth and eyes using the black yarn.

If you would like to add a name, I suggest adding it BEFORE construction. I just used white yarn and sewed it using the horizontal bars made when crocheting the single crochet. I eyeballed the entire thing and I did have to start over once, but it was fun and easy once I plotted it all out accordingly.


I love how the white yarn through the red stocking almost looks like a candy cane. How fun is this?! Please be sure to share a photo with me when you finish yours by tagging @HeartHookHome across all social media. I can’t wait to see what you create!
More Christmas Crochet Patterns:
Ugly Christmas Beanie: Free Crochet Pattern
Holly Jolly Poncho: Free Christmas Poncho Crochet Pattern


4 Comments