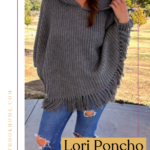
Lori Hooded Poncho Crochet Pattern
This post may contain affiliate links, meaning that I may earn a small commission if you make a purchase. See our disclosure policy for more information.
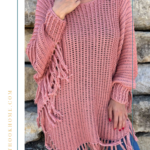


If there is ONE design you simply have to make this year, it is the Lori Poncho. This free hooded poncho crochet pattern is the absolute perfect accessory to throw on for football games, hanging out with friends, or while running errands. Available in two sizes, the Lori Poncho is sure to become a staple in your wardrobe. Let’s make one – or three!

Lori Hooded Poncho Crochet Pattern
The Lori Poncho is a design that I have been wanting to create for months and months. I am SO happy with the way this crochet pattern turned out, and I think you will be, too!


About the Lori Poncho
I decided to name this the Lori Poncho in dedication to a crochet member of the Heart Hook Home Crochet Community that recently passed from cancer. Lori was a yarn enthusiast. She frequently shared photos of her makes including the Woven In Time blanket, the On Point Poncho, the travel neck pillow, and all sorts of other projects in the crochet group on Facebook.

A tip from Lori that may help you in the future if you’re working the Solomon’s Knot stitch… since the loops all need to be both large and consistent in size she marked 1/2″ on her finger. What a great tip! May her memory live on.
Who ever came up with marking 1/2” on your finger I thank you. I didn’t realize a 1/2” was so big. I was making mine much smaller and it just didn’t look right. So try #3 is looking much better with this simple little tip. Thank you who ever you are. – Lori
I hope that when you make your own Lori Poncho, that you will be fondly reminded of friends that are no longer with us. Whether that’s a family member or close friend, or a crochet buddy you met online. ♥ Please share photos of your ponchos with us in the Facebook group!


For this poncho there are a couple of options to consider. First you’ll make the poncho body (all in one piece with ZERO sewing involved 🙌) then you’ll decide if you:
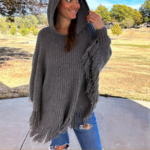
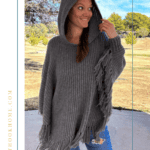
The hood is 100% optional and I think it drastically changes the overall look and feel of the poncho. With the hood it gives a much more slouchy, comfortable vibe. Without the hood I think it looks much more chic and date night worthy! Throw on some heels or boots and add in some jewelry and you’ll be ready to hit the town in style. LOVE THIS!
This free poncho crochet pattern was originally designed to be made using a size 2/sport weight yarn. That being said, I’ve made one with size 2/sport weight, one using size 3/DK yarn, and now one using size 4/worsted weight yarn. See specific suggestions for yarn choices below.
Lori Poncho Pattern Yarn Choices:
You can use either size 2, size 3, or size 4 weight yarn. The crochet gauge will remain the same no matter which yarn thickness you decide to use. Simply adjust your hook size to match the gauge of the pattern. Read more on gauge and how to measure it or watch informative podcast episode.

The thinner the yarn you choose, the more delicate and lightweight your poncho will be. The thicker the yarn you choose, the more dense (and WARM!) your poncho will be.
Size 2 yarn choices include: Brava Sport (shown in “Cobblestone Heather” colorway), Shine Sport, I Love This Yarn Sport, etc.
Size 3 yarn choices include: Lion Brand Coboo (shown in “Mauve colorway), Lion Brand Truboo, CotLin, Baby Bee Sweet Delights, etc.
Size 4 yarn choices include: Lion Brand Pound of Love, Heartland, Brava Worsted, Brava Tweed, Red Heart Super Saver, etc. Note: My worsted weight version is very dense and warm. It took a few washings for it to really soften up but I do love it. It is WARM!

If you choose to use the size 4 yarn you will need to bump your yardage by about 15%. My worsted weight “one size” used 1950 yards of yarn for the poncho body (200 more than “normal), and 370 yards of yarn for the hood.

There are two sizes of this poncho pattern. The hood pattern is the same for each size. If you are unsure of which size poncho to make for yourself, make the larger of the two.
Sizing Info: The “One Size” fits about XS – 1XL and the “Plus Size” fits up to about 5XL.
Materials:
Size 2/Sport or Size 3/DK weight yarn
-approx. (1750, 2700) yards for body
-approx. (100, 150) yards for fringe – optional
-approx. (370) yards for hood – optional
Note! If you choose size 4/worsted weight yarn you will need to bump these yardage amounts by about 15%! I needed 1950 yards (an extra 200) for the body.
Crochet hook in size 5mm through 7mm depending on yarn used.
Gauge: 13 sts x 12 rows = 4” square
For the Lori Poncho we are using the Double Crochet Rib Stitch. There is a brand new tutorial for this stitch here, and/or you can watch this video:
Row 1: Ch-22, dc in 3rd ch from hook and in each across. (20)
Row 2: Turn, loosely sl st across. (20)
Row 3: Ch-2, turn, dc in each sl st across. (20)
Rows 4 – 15: Alternate previous two rows, measure for gauge.
Pattern Notes:
Pattern written using US terms.
If you need help reading a crochet pattern, make sure you head over here and check out this detailed post.
Odd numbered rows ae “right side”.
There is a “One Size” and a “Plus Size”. If in doubt, make the larger of the two.
Make sure to crochet loosely on the slip stitch rows. Check gauge periodically to make sure width is maintained. (It tends to narrow, consider going up a hook size for the sl st rows only.)
The chain-2 at the beginning of the double crochet rows does not count as a stitch.
Do not chain to start the sl st rows.
If you would like to use a worsted weight yarn that will make a more dense and warmer poncho. Make sure that you can match gauge (I needed an H/5mm hook) and you will need to buy extra yarn. About 15% more yarn.
The width of the poncho at it’s widest point should be around (60″, 64″). This means that the overall length when worn should be about (30″, 32″).
If you would like to adjust the length to make the poncho smaller, try to get your gauge closer to 15 sts x 14 rows. This will make the poncho about 4″ shorter and more narrow.
We start at the right hand wrist, work our way across the body, shaping the neck, to the left hand wrist. Then we add the cuffs, optional fringe, and optional hood.

If you would like to purchase the ad-free, printable version of this pattern you can find that on Ravelry, Etsy, or right here in the Heart Hook Home blog shop!
Lori Poncho Pattern:
Poncho Body:
Row 1: Fdc-(25, 30)
Row 2: Turn, loosely sl st in each st across. (25, 30)
Row 3: Ch-2, turn, 2dc in each sl st across. (50, 60)

Row 4: repeat row 2 (50, 60)
Row 5: Ch-2, turn, 4dc in first, dc in each st across, 4dc in last. (56, 66)
Row 6: repeat row 2 (56, 66)
Rows 7 through 48: repeat rows 5 & 6 (ending with 182, 192)
Row 49: Ch-2, turn, 3dc in first, dc in each st across, 3dc in last. (186, 196)
Row 50: repeat row 2 (186, 196)
Rows 51 & 52: repeat previous two rows (190, 200)
Row 53: Ch-2, turn, 2dc in first, dc in each st across, 2dc in last. (192, 202)
Row 54: repeat row 2 (192, 202)
Row 55: Ch-2, turn, dc in each st to end. (192, 202)
Row 56: repeat row 2 (192, 202)
Rows 57 through (64, 72): alternate two previous rows. (192, 202)

Neck Shaping (Front):
Row (65, 73): Ch-2, turn, dc in (87, 92) sts only, dc3tog. (88, 93)
Row (66, 74): repeat row 2 (88, 93)
Row (67, 75): Ch-2, turn, dc in (85, 90) sts, dc3tog. (86, 91)
Row (68, 76): repeat row 2 (86, 91)
Row (69, 77): Ch-2, turn, dc in (83, 88) sts, dc3tog. (84, 89)
Row (70, 78): repeat row 2 (84, 89)
Row (71, 79): Ch-2, turn, dc in each st to end. (84, 89)
Row (72, 80): repeat row 2 (84, 89)
Row (73, 81) through (84, 92): alternate previous two rows (84, 89)
Row (85, 93): Ch-2, turn, dc in each st to end, 3dc in last st. (86, 91)
Row (86, 94): repeat row 2 (86, 91)
Row (87, 95): repeat row (85, 93) Stitch count: (88, 93)
Row (88, 96): repeat row 2 (88, 93)
Do not fasten off. Place a stitch marker. We will pick this back up after completing the “back”.
Wanna save this for later?

Back:
Looking at row (64, 72) from earlier, leave 6 sts open and attach in the 7th stitch.

Row (65, 73): Ch-2, dc in same as join and in each st across. (96, 101)
Row (66, 74): repeat row 2 (96, 101)
Row (67, 75): Ch-2, turn, dc in each st across. (96, 101)
Row (68, 76): repeat row 2 (96, 101)
Rows (69, 77) through (88, 96): repeat previous two rows (96, 101)
Do not fasten off. Place a stitch marker.
Join the poncho body together…
Where we left off on row (88, 96) of the “front”…
Row (89, 97): Ch-2, turn. Dc in each st across “front”, 3dc in final “front” st. (90, 95 sts so far) Ch-6, dc in each st across “back”. (192, 202)

Row (90, 98): repeat row 2 (192, 202)
Where still attached on “back” and looking at “outside”, sc 72 times evenly around the entire neck opening. Fasten that yarn off and continue with the poncho body.
Row (91, 99): Ch-2, turn, dc in each st to end. (192, 202)
Row (92, 100): repeat row 2 (192, 202)
Rows (93, 101) through (102, 118): repeat previous two rows (192, 202)
Row (103, 119): Ch-2, turn, dc2tog, dc in each st across, dc2tog in last two sts. (190, 200)
Row (104, 120): repeat row 2 (190, 200)
Row (105, 121): Ch-2, turn, dc3tog, dc in each st across, dc3tog in last three sts. (186, 196)
Row (106, 122): repeat row 2 (186, 196)
Rows (107, 123) & (108, 124): repeat previous two rows (182, 192)
Row (109, 125): Ch-2, turn, dc4tog, dc in each st across, dc4tog in last four sts. (176, 186)
Row (110, 126): repeat row 2 (176, 186)
Rows (111, 127) through (152, 168): repeat previous two rows (ending with 50, 60 sts)
Row (153, 169): Ch-2, turn, dc2tog across. (25, 30)
Do not fasten off. If needed, block the poncho body to (60”, 64”) height and (48″, 52”) cuff to cuff.
Cuffs:
Where still attached on body… Join to first st with sl st. We are using Front Post/Back Post stitches to create the cuff.
“One Size” Row 1: Ch-2, do not turn, * fpdc around next st, bpdc around next * repeat between * * around. Fpdc around final st. Join to top of first st. (25)
“Plus Size” Row 1: Ch-2, do not turn, * fpdc around next st, bpdc around next * repeat between * * around. Fpdc2tog around final two sts. Join to top of first st. (29)
Both Sizes:
Row 2: Ch-1, turn, * bpdc around next st, fpdc around next * repeat between * * around. Bpdc around final st. Join to top of first st. (25, 29)
Row 3: Ch-1, turn, * fpdc around next st, bpdc around next * repeat between * * around. Fpdc around final st. Join to top of first st. (25, 29)
Rows 4 – 10: alternate previous two rows (25, 29)
Row 11: Ch-1, turn, sc in each st around. Fasten off with Invisible Join.
Find the first and last sts from row 1 of the poncho body. Sl st together and repeat cuff pattern.
Hood:
Row 1: Ch-42, dc in 3rd ch from hook and in each to end, 3dc in last. Dc in each ch down the other side. (81)
Row 2: Turn, loosely sl st in each st across. (81)
Row 3: Ch-2, turn, dc in 40 sts, 3dc in next, dc in remaining 40 sts. (83)
Row 4: repeat row 2 (83)
Row 5: Ch-2, turn, dc in 41 sts, 3dc in next, dc in remaining 41 sts. (85)
Row 6: repeat row 2 (85)
Row 7: Ch-2, turn, dc in 42 sts, 3dc in next, dc in remaining 42 sts. (87)
Row 8: repeat row 2 (87)
Row 9: Ch-2, turn, dc in 43 sts, 3dc in next, dc in remaining 43 sts. (89)
Row 10: repeat row 2 (89)
Row 11: Ch-2, turn, dc in 44 sts, 3dc in next, dc in remaining 44 sts. (91)
Row 12: repeat row 2 (91)
Row 13: Ch-2, turn, dc in 45 sts, 3dc in next, dc in remaining 45 sts. (93)
Row 14: repeat row 2 (93)
Row 15: Ch-2, turn, dc in 46 sts, 3dc in next, dc in remaining 46 sts. (95)
Row 16: repeat row 2 (95)
Row 17: Ch-2, turn, dc in 47 sts, 3dc in next, dc in remaining 47 sts. (97)
Row 18: repeat row 2 (97)
Row 19: Ch-2, turn, dc in 48 sts, 3dc in next, dc in remaining 48 sts. (99)
Row 20: repeat row 2 (99)
Row 21: Ch-2, turn, dc in 49 sts, 3dc in next, dc in remaining 49 sts. (101)
Row 22: repeat row 2 (101)
Row 23: Ch-2, turn, dc in 50 sts, 3dc in next, dc in remaining 50 sts. (103)
Row 24: repeat row 2 (103)
Row 25: Ch-2, turn, dc in 51 sts, 3dc in next, dc in remaining 51 sts. (105)
Row 26: repeat row 2 (105)
Row 27: Ch-2, turn, dc in each st around. (105)
Row 28: repeat row 2 (105)
Rows 29 & 30: repeat previous two rows (105)
Row 31: Ch-2, turn, 2dc in first, dc around, 2dc in last. (107)
Row 32: repeat row 2 (107)
Rows 33 – 36: alternate previous two rows (ending with 111 sts)
Row 37: Ch-1, turn, sc in each st around. (111)
Rotate hood and sc 72 times evenly across bottom. “Pin” the hood in place. Line up the center of the hood with the center of the “back”. The two ends should meet in the front middle. Sew into place using the Mattress Stitch. Weave in all ends.
Fringe:
Cut fringe in ~10” strands. Place two strands per dc row end around the entire bottom.
Remember that if you would like to purchase the ad-free, printable version of this pattern you can find that on Ravelry, Etsy, or right here in the Heart Hook Home blog shop!
That is it! I hope that you adore your Lori Poncho as much as I love mine, and that you will wear it daily during the cooler months. Will you share a photo of it with us in the Heart Hook Home Crochet Community? I hope so! You can also tag @HeartHookHome across social media so we can find them that way as well. I can’t wait to see!
More free patterns:
Come On I Wanna Ruana: Free Crochet Along!
Marvelous Moss Hooded Tunic Crochet Pattern
Basic V-Neck Crochet Sweater: Free Pattern in Sizes XS – 5XL
Easy Peasy Pullover Crochet Pattern (Sizes XS – 5XL)


103 Comments