8 Tips for Creating More Professional Crochet Cardigans
This post may contain affiliate links, meaning that I may earn a small commission if you make a purchase. See our disclosure policy for more information.


For any crocheter, no matter the experience level, branching out from crocheting flat projects like scarves and blankets to crocheting wearables like cardigans can be frightening. We all strive to produce high quality crochet pieces, so here are my top eight tips for making crochet cardigans look more professional.

Tips for Crocheting More Professional Looking Cardigans
I consider crocheting your first cardigan (or other wearable) a rite of passage; a graduation of sorts. When you start loving your handmade cardigans more than store-bought, you know you’ve hit a whole new level of crochet mastery.
For this tutorial I am using the Painted Canyon Cardigan pattern using Red Heart With Love yarn in True Blue colorway.
1. Gauge
Gauge will always be the most important aspect of crocheting wearables. Whether you’re crocheting cardigans or any other wearable crochet pattern, the fit is always dependent on the size of your stitches compared to the designer’s. If you are off by even a few stitches in the gauge measurement, your garment may end up child size instead of adult size – or vice versa . If you need help, this article on understanding crochet gauge is for you!

2. Read through the entire pattern before starting.
When crocheting a new-to-you pattern, it helps tremendously if you start by reading through the pattern in its entirety. This helps to make sure you understand all of the terms used and that you understand the basic makeup of the pattern. If you need help reading a crochet pattern, make sure you head over here and check out this detailed post.
3. Always turn your work in the same direction.
This isn’t necessarily a tip strictly for more professional crochet cardigans, but anything that will have a border attached later. When you turn your work at the end of the row (specifically flat rows, not worked in rounds) you’ll notice that you have a small bump where you made your turning chain. By turning in the same direction each row, you are creating a more consistent raw edge that will then be easier to crochet into when you start your first row of edging. Note that whether you turn the work to the right or left doesn’t matter as long as you remain consistent. I do this with ALL of my crochet.

4. Weave in all yarn tails only after you’ve finished the entire garment.
Leave all yarn tails to be woven in upon completion of the cardigan – NOT as you go. If you need to rip some of your work out (say you missed a stitch or added an extra stitch and you don’t notice for rows and rows) you don’t want to have to contend with frogging (ripping stitches out) woven in yarn ends. The only exception to this rule is when you are experienced with the pattern (ie: you’ve successfully crocheted it before) and you’re sure you won’t need to frog any. Part of the reason I do this is explained in #5.
See: Tips for weaving in yarn ends
5. Leave longer yarn tails at crucial areas such as the underarms and shoulders/neck.
At load-bearing areas of the cardigan such as the neck seam, underarms, and sleeve seams, leave longer tails when sewing or attaching yarn and DO NOT weave them in until you are completely finished. By leaving longer tails at those crucial areas, you are giving yourself the opportunity to use those yarn tails to cinch up any holes or problem areas left from seaming/sewing. This is my favorite tip!

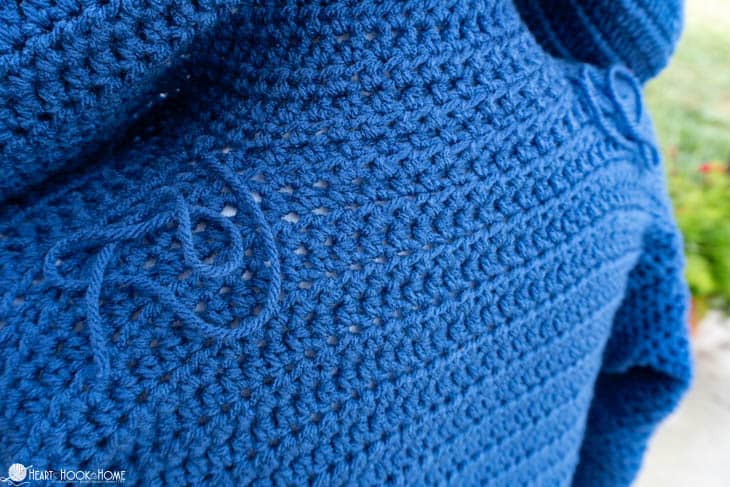
Doesn’t this look nicer? Had I already woven in ends, this would look much sloppier.
Wanna save this for later?


6. Be consistent on stitch placement on the first edging/border/sleeve row.
If you take my advice on number 3, you’ll have a nice, clean edge into which to crochet the first row of the border, edging, or sleeve. By having a clean edge to work into you’re allowing yourself to be more consistent in your stitch placement, meaning little to no puckering, curling, or bunching up of your stitches.


7. Use Invisible Join for fastening off edging.
The Invisible Join is an invaluable crochet technique for crocheting more professionally. Instead of fastening off with a knot and trying to weave it in inconspicuously, try the Invisible Join! This only works when crocheting in rounds and joining, so you’ll use it on sleeves and possibly edgings – if they go around the entire garment. Even YOU won’t be able to tell where you fastened off.


8. Adding crochet pockets.
Crocheting pockets can be intimidating. Normally I prefer to crochet afterthought pockets, meaning that they are made separately and then attached to the completed cardigan. When sewing your pockets to the piece, use plenty of stitch markers to pin the pocket into place, and remain as consistent as possible with their placement. For example, if you have 15 cardigan stitches in between the top left and top right corners of the pocket, make sure you will also have 15 cardigan stitches in between the bottom left and bottom right corners.
If you are crocheting inside pockets (such as an option in the Painted Canyon Cardigan) these can get quite bulky. Consider crocheting only the first few rounds of the inside pocket and sewing in a fabric pocket instead. This way when looking at the pocket from the outside it appears less bulky, it lays nicer, and you won’t be able to see the fabric because of the few rows you crocheted at the opening. Give this method a try – a fabric Fat Quarter would be the perfect size!
What tips do you have for making more professional crochet? I hope these tips take your crochet cardigans to a whole new, professional level!
10 Tips for Crocheting with Black Yarn
7 Tips for Counting Rows in Crochet
18 Craft Fair Tips for Beginners: How to Run a Successful Craft Show Booth


12 Comments