Reversible Boot Cuffs: Free Crochet Pattern
This post may contain affiliate links, meaning that I may earn a small commission if you make a purchase. See our disclosure policy for more information.
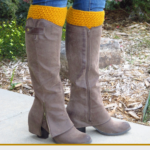

Boot cuffs are a great addition to any wardrobe. Use them to add a splash of color, or to simply keep your legs warmer in the frigid winter temperatures. Grab your hook and whip up a pair of Reversible Boot Cuffs with me using this free crochet pattern!

Reversible Boot Cuffs
These boot cuffs are created short/bottom side first. Meaning that we will crochet a strip using the pattern below until it reaches the size of our calf circumference.
When we get to the correct length, we sew the short ends together to create a circle, then we go around the top and continue building until we reach the desired height.
This pattern is very customizable and great for beginners too!
Materials:
Any worsted weight yarn
-less than one skein
Crochet hook in size H/5mm
Gauge: unimportant
Pattern Notes:
Pattern written using US terms.
The chain(s) at the beginning of the row do not count as a stitch.
For these boot cuffs we are using the Lemon Peel stitch. This stitch uses just single crochets and double crochets, and there is a full tutorial for this stitch here.
If you need help reading a crochet pattern, make sure you head over here and check out this detailed post.

Boot Cuff Pattern:
Row 1: Ch-17, dc in third ch from hook and in each ch across. (15)
Row 2: Ch-1, turn, sc in each st across. (15)
Row 3: Ch-2, turn, dc in each st across. (15)
Alternate rows 2 & 3 until, when wrapped around your calf, the sides barely touch.
Wanna save this for later?

When desired length is reached, put wrong sides together and sl st the first row to the last row. (You could also seam using the Mattress Stitch, but this creates more ends to weave in).

Turn right-side out.
Upper portion of boot cuff:
Preparation row: Ch-1, sc in each row end around, making sure you end with an even number of stitches. Try to place two scs per double crochet row and one st per single crochet row. Join to top of first st with sl st.
Row 1: Ch-1, turn, * sc in next st, dc in next * repeat between * * around. Join to top of first st.
Row 2: Ch-2, turn, * dc in first st, sc in next * repeat between * * around. Join to top of first st.
Rows 3 – 14 (or until desired height is reached): Alternate rows 1 & 2 until desired height is reached. Fasten off and weave in ends.

You can wear them right side up OR flip them upside down for the ribbed look instead. How versatile and fun!

Looking for more crochet? Sure you are!
The Joker (Batman) Amigurumi FREE Crochet Pattern
Beanie Hat for Preemie Babies Free Crochet Pattern
Dragon Tears Fingerless Gloves Crochet Pattern
How to Crochet a Classic Granny Square


14 Comments