The Cordillera Cape Pattern: A Free Crochet Pattern
This post may contain affiliate links, meaning that I may earn a small commission if you make a purchase. See our disclosure policy for more information.


The Cordillera Cape is the perfect piece of clothing to wear on chilly nights around the fire or keeping cozy while watching television with the family. Work up a gorgeous garment with this free crochet cape pattern!

Cordillera Cape Crochet Pattern
We are using Wool of the Andes Tweed for this cape pattern. Because the Andes are a mountain range in South America, and in Spanish they are called Cordillera de los Andes, I decided the “Cordillera Cape” was the perfect name!

This chic little cape is perfect to wear over your favorite tee or long-sleeved top. When designing this cape pattern, I wanted it to be flowy yet flattering, and weighty but a touch of elegance. I think the “feathers” of this cape, when paired with the Wool of the Andes Tweed, are simply perfection and gives it texture and an amazing drape.

We’ll use a big ol (1.5″) button to hold everything in place. I opted for a wood-like button because it gives such character but I think a toggle button would give it charm as well! Something neutral will compliment any outfit and this cape will soon be a staple in your wardrobe.

Materials:
Knit Picks Wool of the Andes Tweed (worsted weight yarn)
-approx. 1850 yards for “one size” (Lost Lake Heather colorway pictured)
-approx. 2050 yards for “plus size”
Crochet hook in size 8mm (or size needed to obtain gauge)
(1) Button – 1.5″ (approx. 38mm)
Gauge:
5 feathers wide x 9 feather rows tall = 4” square
Sizing:
This cape pattern is a one-size-fits-most, up to about 1X. One of my fantastic testers worked up a plus size version that fits up to 6X.
Sizes in pattern: (one size, plus size)
Pattern Notes:
Feather stitch = * Yo and pull up a loop in same ch-sp (3 loops on hook), yo and pull up a loop in the skipped st directly below from row 1 (5 loops on hook), yo and pull up a loop in next ch-sp (7 loops on hook). Yo pull through all 7 loops. Ch-1 to close the stitch. *
Watch the VIDEO tutorial for the feather stitch!
Do not forget to include the chain-1 at the end of each feather.
Even numbered rows are “right side” and odd numbered rows are “wrong side”.
The ch-1 at the beginning of the row does not count as a stitch.
Work a bit tighter on the longer loops of the feathers. This helps them from becoming too loose and easily snagged.
Do not weave in ends until you are completely finished. Use the tails to cinch up any holes/spaces near the arm slits.
IMPORTANT! The beginning of the cape will curl/ripple and may appear too tight. If on gauge, and the initial chain is loose, this should resolve itself.
If you need help reading a crochet pattern, make sure you head over here and check out this detailed post.
Pattern:
Row 1: Loosely ch-(67, 79), hdc 2nd ch from hook and in each st to end. (66, 78)

Row 2: Ch-1, turn, 2hdc in each st to end, placing just one hdc in last st. (131, 155)

Row 3: Ch-1, turn, hdc in first st. * Ch-1, sk next st, hdc in next st. * repeat between * * to end. (131, 155)

Row 4: Ch-1, turn, hdc in first st, ch-1. * Yo and pull up a loop in same ch-sp (3 loops on hook), yo and pull up a loop in the skipped st directly below from row 2 (5 loops on hook), yo and pull up a loop in next ch-sp (7 loops on hook). Yo pull through all 7 loops, and ch-1 to close the stitch. * Feather stitch made. Repeat between * * to end, hdc in last st. (64, 76 feathers and 1 hdc in each end of the row)

Rows 5 – 26: Ch-1, turn, hdc in first st, ch-1. Feather to end. Hdc in last st. (64, 76 feathers and 1 hdc in each end of the row) Do not fasten off.
Separate into three panels; left, center, and right.
Left:
Row 27: Ch-1, turn, hdc in first st, ch-1. Feather (9, 10) times. Hdc in same sp. (9, 10 Feathers and 1 hdc in each end)

Rows 28 – 48: Ch-1, turn, hdc in first st, ch-1. Feather (9, 10) times. Hdc in last st. (9, 10 Feathers and 1 hdc in each end)
Do not fasten off. (We’ll use this to start the remainder of the body later.)
Center:
Attach in same ch-sp as “left” ended.
Row 27: Ch-1, hdc in same sp, ch-1. Feather using same sp and next. Complete a total of (46, 56) Feathers. Hdc in same sp. (46, 56 Feathers and 1 hdc in each end)

Rows 28 – 48: Ch-1, turn, hdc in first st, ch-1. Feather (46, 56) times. Hdc in last st. (46, 56 Feathers and 1 hdc in each end) Fasten off.
Right:
Attach in same ch-sp as “center” ended.
Row 27: Ch-1, hdc in same sp, ch-1. Feather using same sp and next. Complete to end of row, Hdc in last st. (9, 10 Feathers and 1 hdc in each end)

Rows 28 – 48: Ch-1, turn, hdc in first st, ch-1. Feather 9 times. Hdc in same sp. (9, 10 Feathers and 1 hdc in each end) Fasten off.
Connect all together once more…
Where still attached from “left” above…
Row 49: Ch-1, turn, hdc in first st, ch-1. Feather (9, 10) times. Feather straddling last ch-sp of “left” and first ch-sp of “center”. Feather (46, 56) times across “center”, feather straddling last ch-sp of “center” and first ch-sp of “right”. Feather (9, 10) more times, hdc in last st. (66, 78 Feathers and 1 hdc in each end)
Wanna save this for later?


Rows 50 – 71: Ch-1, turn, hdc in first st, ch-1. Feather to end. Hdc in last st. (66, 78 feathers and 1 hdc in each end of the row) Do not fasten off. We’ll use this for the “bottom” below.
Bottom:
Where still attached from “body” above…
Ch-1, turn, sc in each st/ch across. (135, 159) Do not fasten off. We will use this for the “right” edging below.
Hood:
The hood is optional, but adds so much warmth. If adding the hood, do so before starting the edging. Attach yarn in top right corner, looking at outside of cape.
Row 1: Ch-1, hdc in first st. * Ch-1, sk next st, hdc in next st. * repeat between * * to end, placing hdc2tog in last 2 sts. (65, 77)
Row 2: Ch-1, turn, hdc in first st, ch-1. * Yo and pull up a loop in same ch-sp (3 loops on hook), yo and pull up a loop in the skipped st directly below from row 2 (5 loops on hook), yo and pull up a loop in next ch-sp (7 loops on hook). Yo pull through all 7 loops, and ch-1 to close the stitch. * Feather stitch made. Repeat between * * to end, hdc in last st. (31, 37 feathers and 1 hdc in each end of the row)
Rows 3 – 38: Ch-1, turn, hdc in first st, ch-1. Feather to end. Hdc in last st. (31, 37 feathers and 1 hdc in each end of the row) Fasten off leaving a long enough tail to sew hood shut. Fold in half and sew using the Mattress Stitch.
Edging:
If you DID add a hood: skip “left edging” below and jump straight to “right edging”. Instead of stopping at the neck, continue edging all the way up the hood and then down the other side to the opposite hem line.
If you did NOT add a hood: start with the “left edging” below and continue as normal.
Left edging:

Looking at the inside, attach yarn at bottom left corner (if were you wearing the cape).
Row 1: Ch-7, hdc in 2nd ch from hook and in each ch. Sl st to top of last row on cape body. (6)


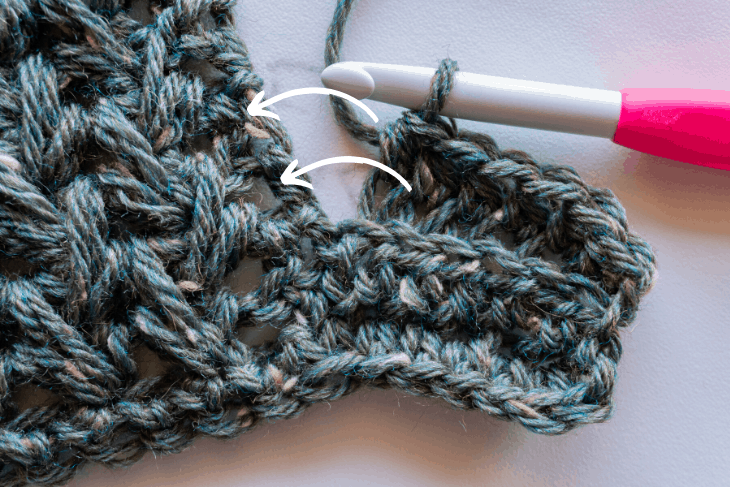
Row 2: Sl st around the hdc from the next row on body (shown above), turn, hdc in blo of next 5 sts, hdc in both loops of last st. (6)

Row 3: Ch-1, turn, hdc in blo of each st to end. (6) Sl st to next row on body.
Rows 4 – 71: Repeat rows 2 & 3 thirty-four more times.
Row 72: Sl st around the last available st, turn, hdc in both loops of each st to end. (6) Fasten off.
Slip stitch placement (both sides of edging):

Right edging:
Where still attached from “bottom” on body…
Row 1: Ch-7, hdc in 2nd ch from hook and in remaining chs. Sl st to top of first row on body. (6)
Row 2: Sl st around the hdc of the next row on body, turn, hdc in blo of next 5 sts, hdc in both loops of last st. (6)
Row 3: Ch-1, turn, hdc in blo of each st to end. (6) Sl st to next hdc row on body.
Rows 4 – 67: Repeat rows 2 & 3 thirty-two more times.
Row 68: repeat row 2
Row 69: Ch-1, turn, hdc in both loops of each st to end. (6) Sl st to next hdc row on body.
Row 70: Sl st around the hdc of the next row on body, turn, hdc in both loops of each row to end. (6)
Row 71: Ch-1, turn, hdc in both loops of first 2 sts, Ch-2, sk 2 sts, hdc in both loops of remaining 2 sts. Sl st to next row end on body.
Row 72: (Do not sl st again) Turn, hdc in both loops of each st to end. (6) Do not fasten off.

Around the neck:
Where still attached from “right” edging…
Row 1: Ch-1, turn, sc in first 6 sts, sc2tog. * Sc in next 9 sts, sc2tog * repeat between * * 5 more times. Sc in remaining 6 sts to end. (73)
Rows 2 – 3: Ch-1, turn, sc in each st around neck opening.
Armholes:
Looking at outside of cape…
Row 1: Join at the bottom of arm slit. Sc in each row end up and around back to bottom.
With a yarn needle, fasten off and weave in all ends using the tails from the arm slit rows (especially at the top) to sew up any weak points.
I hope you love wearing your cape, and that you will make another using this free pattern! ♥ Please share a photo with me by tagging @HeartHookHome on Twitter or Instagram, or in the Heart Hook Home Crochet Community on Facebook.
More free crochet patterns:
The Herringstone Cowl: Free Cowl Crochet Pattern
Shell Yeah! Free Tunic Crochet Pattern
Come On I Wanna Ruana: Free Crochet Along!
The Elizabeth Cardigan – Crochet Along (CAL) – Free Crochet Pattern


23 Comments