Home » Hook » Crochet Tips & Tutorials » How to Create a Straight Seam When Crocheting in the Round
| |

How to Create a Straight Seam When Crocheting in the Round

This post may contain affiliate links, meaning that I may earn a small commission if you make a purchase. See our disclosure policy for more information.

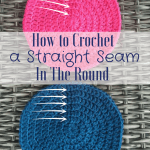
If you crochet, and crochet in the round – hats, bags, coasters etc – chances are at some point or another your seams have been a little, well… wonky.   😐 Mine always veered of to the right (see pink) until I learned this tip to crochet a straight seam.

How to Create a Straight Seam When Crocheting in the Round

How to Create a Straight Seam When Crocheting in the Round

I always, always, always start my NEW row IN the same stitch as the join slip stitch.  It’s part of what keeps straight edges in crochet. Make sure that your tension is tight enough not to create a gap, and make your first stitch in that same stitch.  Give it a try, and let me know what you think!

For many in-the-round patterns you’ll start each row with {for example} ch-2, 2 dc in next stitch, dc in next three sts, 2 dc in next, dc in next three sts, repeat to end, then joining to beginning dc etc. Try reversing the order of the stitches in the pattern, for each round. For example, do the single dc stitches FIRST and then do your double to increase the row.

It would look like this for example:

Wonky Seam:

Row 1: ch-2, 2 dc in each st (20)
Row 2: ch-2, *2 dc in first, 1 dc in next*  repeat around, join with sl st (30)

Row 3: ch-2, *2 dc in first, 1 dc in next 2 sts* repeat around, join with sl st (40)
Row 4: ch-2, *2 dc in first, 1 dc in next 3 sts* repeat around, join with sl st (50)

Straight Seam:

Row 1: ch-2, 2 dc in each st (20)
Row 2: ch-2, *1 dc in first, 2 dc in next* repeat around, join with sl st (30)
Row 3: ch-2, *1 dc in first 2 sts, 2 dc in next* repeat around, join with sl st (40)
Row 4: ch-2, *1 dc in first 3 sts, 2 dc in next* repeat around, join with sl st (50)

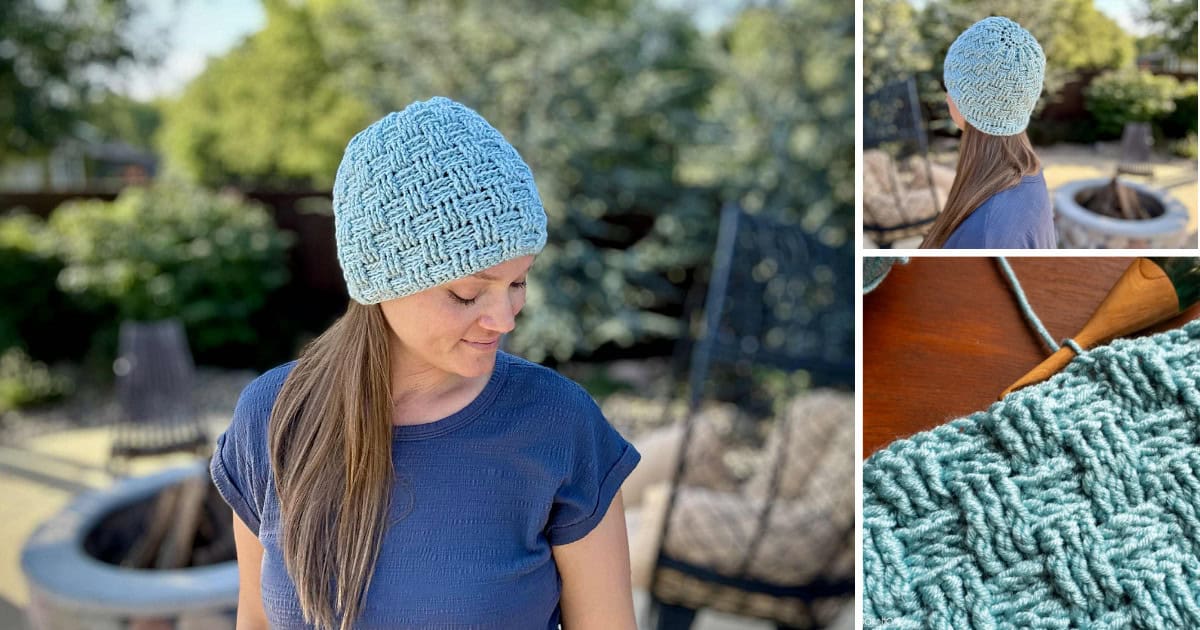
If you are new to crocheting beanies I highly recommend reading this article on how to size beanies, including a head size chart AND a master beanie pattern!

After your beanie reaches the neccessary crown width (see the chart here for measurements) start joining your rounds using the YARN UNDER method. All this means is that instead of slip stitching by yarning OVER as normal, you use the more awkward (but nearly-invisible-so-its-worth-it) yarn UNDER. Simply hook the yarn the “wrong way” for the slip stitch only.

How to Create a Straight Seam When Crocheting in the Round

I think you’ll like these:

How to Weave in Yarn Ends {So They Don’t Come Out}
9 Tips for Traveling with Crochet
Tapestry Needles Explained: Yarn Needles for Beginners
How to Keep Straight Edges in Crochet
How to Crochet The Single Crochet (Video Tutorial)

Similar Posts

Leave a Reply

Your email address will not be published. Required fields are marked *

This site uses Akismet to reduce spam. Learn how your comment data is processed.

49 Comments

  1. I'm not okay at all. I'm frustrated, i have been trying to make a bucket hat that's plain and i have been trying thr circle thing for almost 2 days and now i have to start again after getting to the 4th Layer but my circle is wonky ughh
  2. I am trying to crochet a sweater that is completed in split single crochet (in the round) and all my vertical rows are leaning left ! (I’m right handed if that matters). I have ripped it apart numerous times trying to figure out what the issue is! I am having so much trouble trying to figure out what I’m doing wrong! I’ve crocheted for many years and never had this issue, although this is my first sweater. Do you have any ideas?
    1. If you need to you can adjust the wonky seam when you block the sweater. I had to do that with the last sweater i made. It was the first sweater I've made in the round.
  3. Hi. I'm trying your hat. My first time making something other than a Afghan blanket type stuff. I finally got the magic ring down. Whoop whoop!! But I'm a beginner again! And trying to re-teach myself on everything. Im hacing trouble understanding the UNder slip stitch and every stitch on, etc. Can you please help me so i can get going on this sucker!? All help is appreciated. Shelly
    1. colleen. I have done as you say in dc joined rounds but still seam slants ?????? Please help.......where do I join my rounds and where I then start my first st. I have watched your videos on this but don't understand. I don't find it very clear from. colleen . dewar136@hotmail.com august 20. 2021 thanks.
    2. colleen. I have done as you say in dc joined rounds but still seam slants ?????? Please help.......where do I join my rounds and where I then start my first st. I have watched your videos on this but don't understand. I don't find it very clear from. colleen . august 20. 2021 thanks.
  4. Pingback: Double Crochet Hat In The Round | Crochet Terms
    1. I also use they under method to join in dc but the seam still slants please tell me why?thanks. please help with the answer to this problem colleen lynn. email add is dewar136@hotmail.com
  5. I was taught many years ago to always end an increase round on an increase. So your method of beginning an increase round with the single stitches is correct.
  6. I really want to learn this. But I don’t understand. My language is too weak :( Google translate don’t help.
  7. I have made a cluster stitch as 1st stitch in row & last to cover this unsightly seam,& almost quit making hats ,which I have been making it my goal for the NICU & homeless . I just have to find this invisible seam & make it work.
  8. I do this too, but with a minor difference. I can't crochet tightly enough to eliminate that gap like you do. So I work an invisible decrease into the slip stitch join when working the last stitch of the round. It works like a charm.
  9. I try crocheting but get frustrated with my rounds and slip stitches, Thus is my problem,i.e. Crocheting magic circle with 6 sc, join to first stitch, with a slip stitch, does this cause an increase in stitches? Or before completing last stitch,join to first? I.e. Next round, ch 1, work 2 sc in each stitch around, join to first sc with sl st. Many thank you for how to keep my circle stitches lined. And on crocheting first stitch in round, whereas,each stitch will have two, I just need to add one stitch in it? Thank you for taking time to help this novice!
  10. I wish I had read this earlier. I have made both a Superman and a Spiderman and notice both seem to twist slightly to the left. I'll have to keep this in mind for my next project.
  11. I wish I had read this sooner. I have made a Superman and a Spiderman and have noticed both twist just a bit to the left. I'll have to keep this in mind for the next time.
  12. I am certainly going to try this. However, I do like the slant at times and also think it is artistic, (see post above) but there have been many times I have wanted to have a straight seam. Thank you so much!
  13. Pingback: How to Create a Straight Seam When Crocheting in the Round hearthookhome.com...... - Guides, Manuals and Instructions
  14. what about when making a hat and not increasing. example- row x: ch 2, 1 hdc in each around, sl st into beginning. how do i make an invisible seam?
  15. I am so happy that you made this post! I've been cranking out messy bun beanies like a boss, but when I tried to make a regular beanie for my kid it freaking spiraled at the seam. He says it's artistic lol. I couldn't for the life of me figure out where I went wrong. Thank you ❤
  16. Pingback: 10+ Best Crochet Tips for Beginners - Crafts Booming
  17. Ashley, when you say you work in reverse order and work into the slip stitch first, does that mean you actually turn your work?
    1. Hi Anne! I don't turn the work, I just reverse the order of the increase stitches. Many people do the 2dc, then dc, dc, dc etc. while I do the dc, dc, dc, 2dc. The increase at the end instead of the beginning makes the difference. Hope that helps!
  18. 1. Are you dc in the slip stitch from the last row? 2. Think this would work on something round-ish. Like hats, socks, eos cozys?
  19. Hi, my seam doesn't start curving until after I've done all my increase rounds. I've been told it's normal but it drives me crazy!! How can I prevent this?!
    1. OMG me too. I finally figured out how to get the increasing rounds not to slant by following this method. I hate the slant, drives me nuts and I refuse to work in a continuous round. Someone please help us!! :D
  20. I SO very much want to learn to crochet but I can't watch the video because of the ads popping up covering the pictures and causing the screen to go up & down & I kept losing my place. I wish the ads were on the side so I could follow the video.
    1. Hey Linda! I'm sorry about that. There isn't a video though (yet). Just a paragraph explaining for now. I'm hoping to get a video posted soon!
  21. I finally did a pattern that actually started each row like you said and it works. You might try taking a close up picture of your crocheting and point an arrow where the 1st single crochet should go. It would be easier than a video. Keep up the good work!!!!
  22. Thanks will give this a try I just made a slouchy hat so dissapointed because my seams practially wraps around half the hat. Thanks
  23. great. got it. tried it and it works beautifully. thanks. always looking on how to improve my crocheted products.
  24. Pingback: Use Yarn Bobbins for Easier (and Faster!) Crochet and Knitting
  25. I have done this for years. I feel like it makes my circle look smoother around the edges than stacking my increases does.
    1. Me too I feel like those of us who have never been taught or are intimidated get left out of some really nice projects. Especially if there's none to teach us. Help us please
      1. Go to YouTube, they have videos for everything. Usually a left hand and a right hand version. This is how I learned to do the bobble stitch. I know they have videos for learning to crochet. Hope this helps.
  26. Pingback: Deal Detecting Diva Daily Deals Roundup! April 19, 2016