Bead Stitch Crochet Tutorial
This post may contain affiliate links, meaning that I may earn a small commission if you make a purchase. See our disclosure policy for more information.
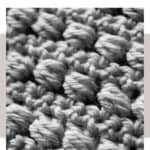


The Bead Stitch is such a neat, textured stitch. While it is a yarn eater, this crochet stitch is fun to work up and is gorgeous too! Learn how to crochet the Bead Stitch with this written and video tutorial.

For this tutorial I am using Brava Worsted from WeCrochet.
About the Bead Stitch
The Bead Stitch is made up of two elements: the double crochet that acts as the backbone of the stitch, and then wrapping the yarn around that double crochet.
Wrapping the yarn around the post of the double crochet gives it a cyclone effect, reminding me of tiny little tornadoes – but then again that could just be the Kansas girl in me. 😀
The Bead Stitch is the width of two stitches. Because of this, you want to set your piece up using an even number of stitches.
I like to have one double crochet on each end of a bead row. This provides something for you to work into (or around) when adding a border, and offers the fabric a bit more stability.
To give the fabric even more stability, I like to alternate each bead row with a row of single crochet.
To start, chain any odd number. Single crochet in the second chain from the hook and in each chain to the end. This should leave you with an even number of single crochet stitches for that first row – and now you’re ready to bead!
To start a Bead Stitch row:
Chain three and turn. We will count this as a double crochet (but not part of the bead stitch itself).

Since the chain-3 is counted as a double crochet, we’ll skip the first stitch and place a double crochet in the next. Like so:

Now that you have the backbone made (ie: the double crochet), we’re going to wrap the yarn several times around that double crochet. Like this:

Yarn over pull up a loop. (three loops on hook)

Yarn over pull up a another loop. (five loops on hook)

Yarn over pull up yet another loop. (seven loops on hook)

You should now have 7 loops on your hook.

Wanna save this for later?
Yarn over and pull through the FIRST SIX LOOPS ONLY.

You should now have just two loops remaining.

Yarn over and pull through the last two.

Ta-da! Bead stitch made!
Because each bead is two stitches wide, you’ll skip the next open stitch, and double crochet in the next. This will be the backbone of your next Bead Stitch.

When you reach the end of the row, double crochet in the last stitch.

Alternate this row with a single crochet row. To start that next row, chain one and turn. Single crochet in each stitch to end. Remember that each bead is two stitches wide, so each one gets two single crochets across the top. Like so:

After finishing the row of single crochet, you’re ready to do it all over again! Chain three, turn, and work another row of beads. If you’re a visual learner, here’s a video tutorial!
Video tutorial
If, for some reason, you would rather watch the video tutorial on YouTube, you can find that here.
I do hope you enjoy crocheting the Bead Stitch. It is so textured and fun, and a great stash buster too!
More crochet stitch tutorials:
How to Add Ear Flaps to a Crochet Beanie
Alpine Stitch Crochet Tutorial
How to Crochet the Thicket (Suzette) Stitch


4 Comments