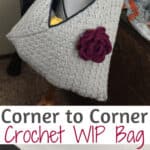
Crochet WIP Bag (Work In Progress) Using Corner to Corner
This post may contain affiliate links, meaning that I may earn a small commission if you make a purchase. See our disclosure policy for more information.

The other day in the Heart Hook Home Crochet Community we were discussing my Emergency Crochet Kit and how useful it is. I carry my smaller WIPs (work in progress) everywhere and it turns out that many other crochet enthusiasts do as well. What better to carry around those WIPs than in a crocheted WIP bag?
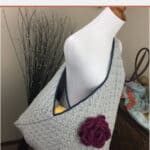
Crochet WIP Bag
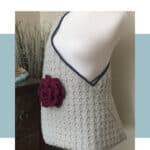
I’ve created other market bags using the AZUMA BUKURO method of folding, but this bag is bigger, it is deeper and wider AND its super chic with the big ol’ flower I slapped on the side.
What I love about the Corner to Corner (C2C) method of crochet is that when you get sick of increasing (or when you use half of your yarn) you simply stop increasing and start decreasing instead. Not sure what I’m talking about? You’ll want to get caught up on the Corner to Corner craze. Still not sure about Corner to Corner? You could also use regular fabric or any other crochet stitch to obtain a similar effect. As long as you know how to measure it and how to fold it you can use whatever fabric you like.
If you need help reading a crochet pattern, make sure you head over here and check out this detailed post.
The finished dimensions for my large bag are approximately 22″ wide and 22″ from base to strap. It holds FIVE regular skeins or three Caron One Pound skeins.
MATERIALS:
Two skeins (approx. 700 yards) worsted weight yarn (I used I Love This Yarn!)
Crochet hook in size H
Yarn needle for sewing

PATTERN:
Important! You need a 1:3 size ratio to get the correct shape for folding. This means that if your piece is 15″ wide, it needs to be 45″ long. If it were 5″ wide, it would need to be 15″ long etc. The larger the rectangle, the larger the bag.

To make my exact bag: Crochet your Corner to Corner until the width reaches 15″. Start decreasing on that one side only, continuing the other side until it reaches 45″.

When rectangle is completed, single crochet around entire piece to give it a nice, clean and even border.

Wanna save this for later?
Fold piece as pictured. I highly recommend practicing with a piece of paper cut to a 1:3 ratio in miniature dimensions before sewing your crocheted work. Just good practice. 😉

I also recommend using stitch markers (or bobby pins) to hold the piece together after folding and as you sew.

Sew the seams on the front and back, I go straight through each single crochet from the border because I like that little ridge effect it provides.

For strap:
Make a smaller Corner to Corner in whichever width you’d like. I did three blocks wide (which is perfect for my shoulder) and fourteen blocks long. When finished, single crochet a border around this piece as well, then place into position. Using your upholstery needle, sew the strap securely to each top corner of the bag.

If you wish, change colors and add a contrasting border around the bag opening, including the strap. It will help to give the strap a little more support, but is not entirely necessary.

Slap a BIG beautiful flower on it (I used two strands and followed this pattern) and call it a WIP bag!

More crochet fun before you go:
How to Make the Perfect Mohawk Beanie Using Pom Poms
Different Methods of Making Pom Poms
Make Faux Fur Pom Poms in Minutes
The Crab Stitch Crochet Stitch + Video Tutorial
How to Crochet a Corner to Corner (C2C) Throw + Video Tutorial
How to Weave in Yarn Ends {So They Don’t Come Out}
Make Cat Toys Using Yarn and Felting
How to Soften Economical or Scratchy Yarn
Yarn Hacks Every Crocheter and Knitter Needs to Know


11 Comments