How to Make a Mohawk Beanie With Pom Poms
This post may contain affiliate links, meaning that I may earn a small commission if you make a purchase. See our disclosure policy for more information.


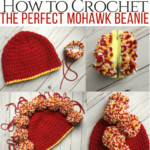
I’ve been a pom pom makin’ fool lately. I recently purchased a set of Clover pom pom makers (all four sizes cause I’m OCD like that) annnnd I’m in love. My youngest asked for a “tiger mohawk beanie” for his birthday and when my sweet boy asks, momma delivers! Except that adding all of those mohawk “hairs” is tedious and aggravating, and ain’t nobody got time for that! So, I used pom poms instead and saved myself hours of time and my sanity.
How to Make the Perfect Mohawk beanie
Now I have noticed that you can’t just attach the pom poms and think you’re done. Oooooooh no. They will be floppy and not exactly straight. I just wasn’t satisfied with the way my first one looked (again, my crochet OCD coming out to play). So I came up with a new, sure-fire way to make that mohawk beanie more awesome.
Stand proud pom poms! Do not waver in your steadfastness of mohawk glory!
First, you’ll want to make a beanie in the size desired. Not sure how to make a perfect beanie? Head on over here and get to work, then come back. Or you could make a 30-Minute Beanie (as pictured here) if you’re in a hurry. I’ll wait. 😀
If you need help reading a crochet pattern, make sure you head over here and check out this detailed post.

For each mohawk beanie, I make and attach a total of nine pom poms (leaving long-ish tails on each for tying). One at the very top, four on the front and four on the back. We kind of squeeze them closer together than they need to be, just so that it’s nice and fluffy and a FULL mohawk. Got your beanie and your nine pom poms ready to go?
Let’s do this!
Attach the first pom pom to the beanie so that it straddles the magic circle. Simply pull the two tails through and tie ONCE (do not tie it securely yet). I tie it just like I’m tying my shoelaces, we’ll secure it later.

Every two rows, add another pom pom in the same manner. Four in the front, four in the back. Remember we are putting them close together so the end result is more dense.

Lay the mohawk beanie out so that you can see how they line up. Are they lookin’ like little ducks in a row? Great! Are they wonky? Simply pull that one out and re-do it. This is why we don’t secure them right off the bat. 😉

When you get all nine pom poms in a line, and you are ready to secure, grab a length of yarn (about 24″) in the same color as your beanie and thread your upholstery needle.
Wanna save this for later?

We are going to secure the yarn inside the beanie, directly inside the first pom pom. It doesn’t matter which side you start with; front or back. When you’ve got the yarn secure on the inside of the beanie, stick your needle through to the outside.

We are going to sew through each pom pom (being sure to go through the middle of each so it doesn’t come out) all the way to the other side.
♪ ♫ Hello from the other side ♪♫
When you get to the other side, make sure that each pom pom has been included on your way. Pull the yarn taut, but not so much so that it puckers the hat. You’ll be able to feel immediately how much more sturdy the mohawk has become.

Insert your upholstery needle so that you can attach it securely inside on this end of the beanie, same as how you started.

Now that the mohawk is tight, dense and secured, you’ll want to flip the beanie inside out so that you can secure each individual pom pom.

Weave in the ends just like you would with any other crochet project.

Wear your mohawk beanie with pride, cause that mohawk ain’t goin’ NOWHERE! 😀

More crochet before you go:
The Crab Stitch Crochet Stitch + Video Tutorial
How to Size Crochet Beanies + Master Beanie Pattern
How to Crochet a Corner to Corner (C2C) Throw + Video Tutorial
How to Change Colors in Crochet
Why You Need an Emergency Crochet Kit + How to Make One
Felting Tutorial: How to Felt Wool (with or without a washing machine)


2 Comments