Home » Hook » Off the Grid Ear Warmer: Free Crochet Pattern
| | |

Off the Grid Ear Warmer: Free Crochet Pattern

This post may contain affiliate links, meaning that I may earn a small commission if you make a purchase. See our disclosure policy for more information.

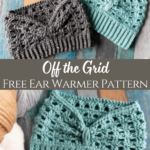
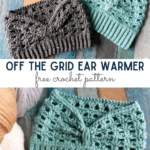
This new messy bun style ear warmer is the perfect accessory for chilly spring or fall days. Just enough to keep your ears warm and your hair from the wind, or when the ponytail is a mess and you just need to pop into the store for a quick ingredient for dinner. Let’s work up a gorgeous Off the Grid Ear Warmer today!

Off the Grid Ear Warmer

Originally this pattern was only intended to be a unisex slouchy hat – The Grid Slouch. During the testing phase my lovely tester Clarissa brought up the option of making this a version for messy buns or an ear warmer. While that slouchy hat pattern is fabulous, I absolutely LOVE this version too! So glad she made me think outside the box. ♥

grid slouch hat crochet pattern

Find the free Grid Slouch pattern here.

On our daily walks lately I have needed a bit of warmth to cover my ears. It’s also nice to have a bit of style, too! 😉

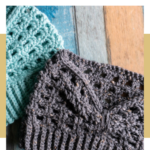
This pattern uses Snuggle Puff, a SUPER soft worsted weight yarn that feels like a cloud against your skin. Even better – this crochet ear warmer pattern uses less than ONE BALL of Snuggle Puff yarn! Note that the tweed version above is Wool of the Andes Tweed in “Flagstone Heather”. I do love this version, but with the wool it was a bit scratchy next to my face. This also uses less than one skein if you choose to use it.

snuggle puff yarn

Materials:

Snuggle Puff Yarn (“Hatchling” colorway)
-approx. 104 yards (less than one ball!)

Crochet hook in size H/5mm

Gauge:

17 Grid Stitches = 4” wide

Pattern Notes:

Pattern written using US terms.

BLO = Back Loop Only

Third Loop = The loop behind the top two loops when crocheting the Half Double Crochet Stitch

Band:

Start leaving a ~6” long tail…

Row 1: Ch-11, sc in 2nd ch from hook and in each to end. (10)

Rows 2 – 80: Ch-1, turn, sc in BLO of each st to end. (10)

Join band to form a circle without twisting.

Body:

Round 1: Ch-1, do not turn, hdc in each row end around. Join to first hdc. (80)

Round 2: Ch-1, turn, sc in the third loop of each hdc around. Join. (80)

Round 3: Ch-3 (counts as dc here and for remainder), turn, dc in next st, ch-2, sk-2 chs, * dc in next 2 sts, ch-2, sk-2 sts * repeat between * * around. Join to top of ch-3. (80)

Round 4: Ch-1, turn, sc in same as turning, ch-2, * sk-2 chs, sc in next 2 sts, ch-2 * repeat between * * around, sc in last st. Join to first sc. (80)

Round 5: Ch-3, turn, dc in next st, ch-2, sk-2 chs, * dc in next 2 sts, ch-2, sk-2 chs * repeat between * * around. Join top of ch-3. (80)

Rounds 6 – 11: alternate rows 4 & 5 (80)

Round 12: Ch-1, do not turn, hdc in first st. * hdc around ch-sp, hdc in next 2 sts * repeat between * * around. Do not join. (60)

Round 13: Do not turn, sc in third loop of each hdc around. (60) Do not join, fasten off and weave in ends.

Now that the ear warmer is as tall as it needs to be it’s time to cinch up the front. Using a length of yarn, insert a tapestry needle from the inside as pictured below.

Bring the yarn up over the top and back through the inside (my “cinch” is ~1.5″ tall), over and over again until you are happy with the width of the “cinch”. Then weave in the ends and you’re almost done!

Finally, using your yarn needle, sew the ribbing band together using the 6″ tail from the beginning. Weave in that yarn tail and you’re ready to rock and roll!

I hope you love this Off the Grid Ear Warmer. I love how quick it is, and how stylish it is, and how little yarn it uses. Please share a photo of yours with me in the Heart Hook Home Crochet Community on Facebook or by tagging @HeartHookHome across all social media. 😁

Off the Grid Ear Warmer

More free patterns:

Easiest Twisted Ear Warmer Crochet Pattern

Fur Crochet Cowl & Ear Warmer Patterns

Lattice Love Beanie Crochet Pattern (Infant – Large Adult)

Drop To It Beanie: Free Crochet Pattern

Aspen Dreams Slouchy Beanie: Free Crochet Pattern

Similar Posts

Leave a Reply

Your email address will not be published. Required fields are marked *

This site uses Akismet to reduce spam. Learn how your comment data is processed.

39 Comments

  1. How come there is no reply to the requests for a printer friendly version? I tried downloading it and it still doesn't allow me to print it.
    1. Hi Tina! I just use a single slip stitch to join the top of the band into a circle and go straight into working the body of the ear warmer. At the end, I will use my starting tail to sew up the remainder of the band...I like the mattress stitch.
  2. I just finished making this, and it was so fun to make. This is my first time making something like this. I will say though, unless I missed it somewhere, I don't see what size yarn I need to use. I used #4 Lion Brand Heartland yarn, and the 80 rows was like 20 rows too many. And the finished result was way too tall on my head that it just isn't going to work. I'm thinking I should have lessened the rows up to the top too. But I'm guessing my yarn just wasn't the right size. I did use an H hook like the pattern called for. Either way, I'll be trying this one again and see if taking a few rows off the top helps at all. Thank you for the free pattern! Note: This isn't meant to be a critique. I'm more or so putting this here in case others have similar issues and need a bit of reassurance to alter it if they need to.
    1. Hi Heidi, I'm about to try this pattern. I clicked on the hyperlink for the Materials (Snuggle Puff Yarn). I was able to get information for the yarn used there. I hope this helps.
  3. Hi Ashlea, I am making this beautiful pattern of yours "off the grid ear warmer". I am confused about what I am actually supposed to do on Round 2? sc in the third loop of each hdc around?? Please help:) Thx! michelle
    1. Hi Michelle! I have a tutorial for the hdc 3rd loop here: https://hearthookhome.com/third-loop-half-double-crochet-video-tutorial/
  4. I always have trouble with the ch 1. Does it count as a sitc stitch? On some tires it seems I need it to have 10 stitches, but in other ties, not. Help!
  5. I would like to know if I can use the same pattern And make the band smaller. 80 lows is too big for me head. Can I make 65 or 70 and still follow the pattern. Thank you for your assistance
  6. Hi, I am in total agreement with the ladies, love your heart, and passion for this wonderful, beautiful craft. I don't always want to spend the extra money on a specialty yarn so am curious if most of your projects can be worked up in any different yarns? Thank you!
    1. Hi Paulette! You can absolutely substitute the yarn, as long as it is the same weight as the pattern calls for.
    1. Sorry! that was supposed to be a reply to the commenter, Michelle Murphy. I would be nice to see what it looks like on. It looks like a great pattern but often, I need to see what it looks like on a person to determine if I am making it correctly. Thanks for your hard work and all the effort it took to make and photograph your work!
  7. Could I see a close up picture of the step where we stitch in the 3rd loop of the hdc? I am having a difficult time understanding what that is.
    1. Hi Lesa! I have a tutorial for crocheting in the 3rd loop which can be found here: https://hearthookhome.com/third-loop-half-double-crochet-video-tutorial/
    2. I believe there is a word or two missing. I think she meant to skip 2 stitches and single crochet around in the rest of the double crochet stitches.
      1. Hi Sandra! Where do you think I missed that wording? I looked through the pattern and don't see anything, but I could be wrong.
  8. I can’t believe there are 80 rows to start. That seems so huge! I also noticed you didn’t see the ends together. Was that just by choice?
    1. Sorry I saw you sewing it together but it doesn’t say that in the pattern after doing the brim.
      1. Hi Melissa! Yes, 80 rows sounds like a lot...but the brim should end up at approximately 20" around. The instructions to sew those ends together are at the end of the pattern...I just prefer to wait until the end to do it, but if you want to sew it sooner, you can. Hope this helps!
  9. I would love to see a photo with someone wearing the ear warmer. Can’t picture in my head what it should look like on!