Home » Hook » Easy Peasy Pullover Crochet Pattern (Sizes XS – 5XL)
| | | | | | | | | |

Easy Peasy Pullover Crochet Pattern (Sizes XS – 5XL)

This post may contain affiliate links, meaning that I may earn a small commission if you make a purchase. See our disclosure policy for more information.

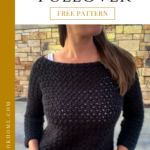
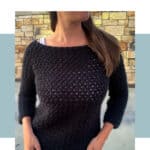
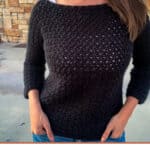
The Easy Peasy pullover is one of the most-loved free crochet patterns on Heart Hook Home. Perfect to wear in transitional weather seasons, and now UPDATED and available in sizes XS – 5XL, this sweater is quick to work up and stylish, too!

Easy Peasy Pullover free crochet pattern

Easy Peasy Pullover Crochet Pattern

This is a free crochet pattern.  If you would like to save/print the ad-free PDF version, that is available on Ravelry, or Etsy, or right here in the Heart Hook Home blog shop. Thank you for your support!

Materials:

Brava Worsted (or worsted weight yarn) – “Asphalt Heather” pictured
-approx. (675, 730, 830, 910, 1040, 1200, 1330, 1450, 1600) yards

Crochet hook in size 9 mm

Gauge: 10 sts x 9 rows = 4” square

Pattern Notes:

Pattern written using US terms.

The turning chain at the beginning of the row does not count as a stitch.

We are using the SUPER easy Lemon Peel stitch for this pattern. A video tutorial for this stitch can be found here.

Sizing:

(XS, S, M, L, XL, 2XL, 3XL, 4XL, 5XL) = up to (30”, 34”, 38”, 42”, 46”, 50”, 54”, 58”, 62”) bust

Pattern:

Make two…

Row 1: Ch-(39, 43, 49, 53, 59, 63, 69, 73, 79), sc in 2nd ch from hook, dc in next * sc in next, dc in next * repeat between * * to end. (38, 42, 48, 52, 58, 62, 68, 72, 78)

Rows 2 through (28, 28, 28, 28, 28, 24, 24, 24, 24): Ch-1, turn * sc in next, dc in next * repeat between * * to end. (38, 42, 48, 52, 58, 62, 68, 72, 78)

Row (29, 29, 29, 29, 29, 25, 25, 25, 25) increase row: Ch-1, turn, (sc, dc) in each of first two sts, * sc in next, dc in next * repeat between * * to last 2 sts, (sc, dc) in each of last two sts. (42, 46, 52, 56, 62, 66, 72, 76, 82)

Rows (30, 30, 30, 30, 30, 26, 26, 26, 26) through (31, 31, 31, 31, 31, 27, 27, 27, 27): repeat row 2 (42, 46, 52, 56, 62, 66, 72, 76, 82)

Row (32, 32, 32, 32, 32, 28, 28, 28, 28): repeat increase row (46, 50, 56, 60, 66, 70, 76, 80, 86)

Rows (33, 33, 33, 33, 33, 29, 29, 29, 29) through (34, 34, 34, 34, 34, 30, 30, 30, 30): repeat row 2 (46, 50, 56, 60, 66, 70, 76, 80, 86)

Row (35, 35, 35, 35, 35, 31, 31, 31, 31): repeat increase row (50, 54, 60, 64, 70, 74, 80, 84, 90)

Rows (36, 36, 36, 36, 36, 32, 32, 32, 32) through (37, 37, 37, 37, 37, 33, 33, 33, 33): repeat row 2 (50, 54, 60, 64, 70, 74, 80, 84, 90)

Row (38, 38, 38, 38, 38, 34, 34, 34, 34): repeat increase row (54, 58, 64, 68, 74, 78, 84, 88, 94)

*Sizes XS, S, M, L, XL – Place a stitch marker in the first and last stitch of this row for easier seaming later.

Sizes XS, S, M, L, and XL ONLY:

Rows (39, 39, 39, 39, 39) through (48, 48, 49, 50, 52) repeat row 2 (54, 58, 64, 68, 74)

Fasten off leaving a long tail for seaming and jump to construction below.

Sizes 2XL, 3XL, 4XL, 5XL ONLY:

Rows (35, 35, 35, 35) through (36, 36, 36, 36): repeat row 2 (78, 84, 88, 94)

Row (37, 37, 37, 37): repeat increase row (82, 88, 92, 98)

Rows (38, 38, 38, 38) through (54, 56, 58, 59): repeat row 2 (82, 88, 92, 98)

*Place a stitch marker in the first and last stitch of row 38 for easier seaming later.

Fasten off leaving a long tail for seaming and jump to construction below.

Construction:

Lay two sides on top of one another and, using the Mattress Stitch, sew front and back together on left and right from bottom edge to row 38 (where the stitch markers are). Leave long enough tails that you can cinch up any holes under the arms after adding the sleeves.

Sew the top (shoulders) together from the outside in, using the Mattress Stitch, for (15, 17, 20, 22, 25, 29, 32, 34, 37) stitches on each side. This should leave 24 (all sizes) stitches open on front and back (for 48 stitches total) for the neck opening.

Sleeves:

Attach at the base of the armhole.

Row 1: Ch-1, * sc in next space, dc in next space * repeat between * * around. ( Note: try to have (13, 14, 15, 16, 18, 21, 22, 24, 26) stitches at the halfway mark – when you reach the shoulder seam). Join to top of first sc. (26, 28, 30, 32, 36, 42, 44, 48, 52)

Rows 2 – 28: (or until desired length is reached): Ch-1, turn, * sc in next st, dc in next st * repeat between * * around. Join to top of first sc. (26, 28, 30, 32, 36, 42, 44, 48, 52)

Row 29: Ch-1, turn, sc in each st around. (26, 28, 30, 32, 36, 42, 44, 48, 52)

Fasten off and weave in ends using the Invisible Join. Repeat the process for the other sleeve.

Bottom/Finishing:

Attach yarn at either bottom side seam.

Row 1: Ch-1, sc in same st and in each st around. Join to top of first sc. (76, 84, 96, 104, 116, 124, 136, 144, 156)

Rows 2 – 3: Ch-1, turn, sc in each st around. (76, 84, 96, 104, 116, 124, 136, 144, 156)

That’s it! I love this updated version so much, and I hope you do, too! ♥

When finished with the Easy Peasy Pullover crochet pattern, be sure to tag me using @HeartHookHome on Twitter and Instagram, and share a photo in the Heart Hook Home Crochet Community on Facebook! I hope you love your pullover as much as I do!

Easy Peasy Pullover free crochet pattern

More free crochet patterns:

Easy Breezy Lightweight Summer Vest Pattern

Four-Hour Fall Sweater Free Crochet Pattern

Marigold Sling Bag Free Crochet Pattern

Basic V-Neck Crochet Sweater: Free Pattern in Sizes XS – 5XL

Similar Posts

Leave a Reply

Your email address will not be published. Required fields are marked *

This site uses Akismet to reduce spam. Learn how your comment data is processed.

124 Comments

  1. Why is my sweater so short? I used the correct yarn and hook, gauge is correct but the sweater is much shorter than in your photos. Also, do you have final size dimensions for the panels? That would be helpful. And do you recommend blocking when assembled or prior to assembly?
  2. What on earth is this pattern?! Was it tested in the larger sizes? I've already had to adjust the "instructions" for the neck hole - I may not have graded in maths, but with 62 sts at the end of row 1, then 25 each side plus 24 for the neck... that isn't 62. It's 73. And the armholes are past my waist. I'm going to have to pull out the bottom and adjust the sides. Very glad I held out on buying the paid version.
    1. Hi! This pattern was tested for all sizes...it sounds like maybe you are sewing your front and back panels together upside down? The 2 pieces are worked from the bottom up, so your last row for each panel (74 stitches) would be where you sew for your shoulders and neck opening (25 sts per shoulder and 24 open sts for the neck is 74). And the sleeve opening would be from where I suggest placing a stitch marker at row 38 up to row 52. I hope this clears things up for you!
  3. Hi Ashlea, I love your patterns, your lives and your beautiful yarn wall :). My question was answered in the comments I read, but it may be helpful to others if you added a note that this is made from the bottom up, and maybe add if a longer tunic style is wanted, that extra rows should be added prior to the increase rounds. Just my two cents. I greatly appreciate that you offer so many free patterns. As with everything else these days, the cost of crocheting has gotten expensive, and it used to be easy to find free patterns, and now it seems the average cost is $6-12 each. So any designer that provides well written, extremely stylish and FREE patterns definitely is appreciated. Thank you. I know how much work is involved in the process, I’ve tried it myself lol.
  4. Hey Ashlea, I’m new in the crocheting world and I was wondering if there was an alternative stitch you can suggest. The lemon peel stitch hates me. As simple as it is, I get caught up in the sc and dc changes. I know, it’s sad.
    1. Hi Jacqui, it took me a few rows to get the hang of it too. When you recognize the visual pattern, it will make it easier to identify what stitch goes where on the next row. That's when this stitch becomes fun. Honest! After your first row of alternating single/double, a visible pattern will form. Chain one and turn. You will skip that first chain ( it's not counted as a stitch;) the first plunge into that row is your first counted stitch. Look closely at the row you just did. You will have a rollercoaster top edging. XxXxXxXxXx The rule I follow is if it's a tall stitch X you will make a single crochet, if it’s shorter x, that's going to be a double. Try not to overthink it, just follow the rhythm as you stitch (tall, short, tall, short or single, double, single, double). Continue to the end of the row, chain one and turn. Sometimes I'd get confused when I would start the next row, so I would look at that rollercoaster about 6 stitches in and identify each stitch as a single, double, single, double backing right up to that pesky first stitch. You will be whipping out projects and might even enjoy your favorite audio books while you’re doing it! This stitch works up beautifully and very quick. I'd suggest you put a stitch marker at the beginning of each row because for me, it's impossible to differentiate the rows once you fabric starts taking shape. This is a sturdy "fabric" when you use a smaller diameter hook. Just changing your hook diameter and type of yarn changes the drape but not the simplicity of joining the pieces together. I mastered it on the kitty couches I make because it's dense, smooth, not "holey", not immediately identifiable as a crochet stitch and pieces together perfectly. Bunches of gratitude going to Ashlea and Heart Hook Home for this really spiffy pattern and instructions. It's a pleasure to work this beauty up. Sorry to say I do not subscribe to any social media; it cuts into my hobby time. I will check back here often and looking forward to checking out the other goodies you have on your website. Blessings; and may all your tangles be easy to solve! "Bluejay"
  5. Do you plan to update the Ravelry pattern to this version? I bought it previously but it’s not showing updated like the Four Hour Sweater was.
    1. Hi Kelly! I am so sorry! I did update on Ravelry, but forgot to send the update notification to previous purchasers. Thank you for bringing this to my attention...it has been fixed and you should be able to update now.
  6. Hi i have started the 50in chest as i wanted it loose after the increase the width has gone to 60in !!!!!! Can you advise as the 50in was the maximum i wanted and the sweater is only half way up the front/ back done
  7. I’m making this for my friend who’s had breast cancer and no reconstruction so is pretty much flat chested. I think the increases at row 27 are for enlarging for the bust line. If so, do I just not do the increases? Please advise. Thanks.
  8. I had purchase the Easy Peasy Pullover and was wondering if the pattern on Ravelry is going to be updated? Thanks
    1. Hi Sharon! Yes, the pattern on Ravelry was updated as well...if you had purchased prior to 11/23/2021, then you should be able to update. If you have any issues, please email support@hearthookhome.com and we'll get it straightened out. =)
  9. I'm wondering if it would be possible to do a "foundation lemon peel" instead of just a foundation chain. Like one foundation sc and then one foundation dc, etc. Has anyone tried it?
    1. Hi Carol, The foundation chain lends itself to the pattern. Alternate the single/double just like the pattern. In your next row be sure to alternate a single on top of a double; a double on top of the single, mimicking the pattern. You're off to the races!
  10. Since the sleeves start on the sides of the front and back panels there's no actual stitches. A general stitch count would be very helpful because the double crochet stitches could allow for two stitches to go into them.
  11. The link to “here” does not work for me. If you’re making for someone else you can get helpful sizing information here. It takes me to a page that says: Safari cannot open this page because too many redirect occurred. Can you tell me where I can find the information about the sizing information.
    1. Sounds like you need to clear your browser cache and cookies. The redirect goes to a page for Woman Size Charts on a website called: Craft Yarn Council craftyarncouncil.com The page you want to find is under Standards. Hover over it and a drop down menu will appear. Under the area titled General select Standard Body Measurements/Sizing. On that page scroll down a bit and on the right side of the page is another menu titled Industry Standards. There you will see the hyperlink for the page Woman Size Chart. This is the page the 'here' link is supposed to redirect you to. Hope this helps.
  12. I love all of your patterns!!! I want to try them.all... made my husband the adult version if the classroom sweater! He's gotten so many compliments!! Younare so tented! Love this sweater! I like my sweaters a bit longer... would I just add a couple extra rows before doing the finishing row?
    1. Hi Julie! Thank you! I am so glad you enjoy the patterns =) This sweater is worked from the bottom up, so you would add rows in the rows 2-27 section. With that said, I am in the process of updating this pattern to include more specific stitch counts for sizes and such and that should be done soon...
  13. Love the sweater. Two things, I noticed that the dark blue one seems to have a wide band at the bottom that doesn't seem to be included in the instructions. I like the way that looks, is it just single crochet? Also how hard would it be to make it as a cardigan?
    1. Hi Doris! Yes, the bottom band is just single crochet...I did a couples extra rows of it on the blue sweater.
  14. After two crochet rows what started as a 22” foundation chain row (plus one stitch) is now 29”. Is this supposed to happen or should it be the same length until I hit row 28? If it is supposed to be around 22” still what did I do wrong and how can I fix it? Thank you!