Fat Bottom Bag: Free Crochet Pattern
This post may contain affiliate links, meaning that I may earn a small commission if you make a purchase. See our disclosure policy for more information.


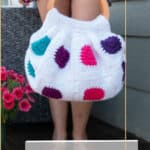
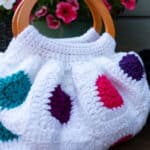
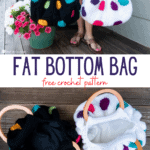
One pattern I’ve been dying to try my hand at crocheting is a fat bottom bag made from Granny Squares. This free crochet bag pattern is fun, super versatile, and oh-so chic! Grab your hooks and let’s make a fat bottom bag together!

Fat Bottom Bag Crochet Pattern

I’ve been sitting on a 24-pack assortment of Brava Mini Skeins for a while now. They have been begging to be made into something fun and useful, and that is exactly what this pattern calls for. And now, the adorable little baby skeins can be purchased individually or as a set.


Fat bottom bags are constructed from one large rectangle. You could make a rectangle with virtually any crochet stitch you like, but I wanted to incorporate these adorable Brava Mini skeins because of how vibrant and complimenting the colors are to one another. Oh, the possibilities!


Pick four of your favorite mini skein colors and one complementing color (either two full size Brava worsted skeins or one ginormous Brava 500 skein) and you’ll be all set!


Using these Brava Mini skeins, we’ll make an assortment of solid granny squares that are bright, fun, and cheery. Then we’ll assemble them into one large rectangle, we’ll add an optional fabric lining, then cinch up the sides and sew on some handles. Aren’t these just so fun?! I love them and I hope you do, too!


Get the ad-free, printable PDF version of this pattern on Ravelry, Etsy, or right here on the Heart Hook Home blog shop! Thank you!
Materials:
(4) Brava Mini Skeins
*available as a 24-pk assortment here (<< best value!)
Brava worsted in complementing color (approx. 350 yards, or 2 regular size skeins)
Crochet hook in size I/5.5mm
Handles (like these)
Optional (recommended) lining – (1) Fabric Fat Quarter or piece of fabric at least 18″ x 21″
Because of the nature of acrylic yarn (it will stretch out over time) I lined my bags with corresponding fabric. One Fat Quarter should be the perfect size to line yours, and it is totally worth the time!


Pattern Notes:
Pattern written using US terms.
We use the Mattress Stitch to sew the squares together.
Tr = Treble Crochet (tutorial here)
Each Solid Granny Square should be approximately 4″ square.
If you need help reading a crochet pattern, make sure you head over here and check out this detailed post.

Pattern:
Make 20 squares total, five of each of the four different colors.
Round 1: Using contrasting color, make a magic circle, ch-2, 10dc in circle. Join to top of first dc. (10)
Round 2: Ch-2, 2dc in each st around. Join to top of first dc using main color. (20)
Round 3: Ch-2, * dc in next 4 sts, (2dc, Tr, 2dc) in next st * repeat between * * 3 more times. Join to top of first dc. (36)
Round 4: Ch-2, dc in next 6 sts, (2dc, Tr, 2dc) in next st. * dc in next 8 sts, (2dc, tc, 2dc) in next * repeat between * * 2 more times. Dc in remaining 2 sts. Fasten off using Invisible Join. (52)
Decide on the arrangement of your squares, then sew all 20 squares together using the Mattress Stitch, 4 wide and 5 tall.
Tip! I find it helpful to take a photo of the squares once you get the arrangement you like, so you don’t forget!
Wanna save this for later?


Once you’ve sewn all of your squares into one large rectangle, it’s time to start making it into the actual fat bottom bag.
Border:
Attach in top right corner of narrow side with front facing as pictured below…
Sc 14 sts across each square around entire rectangle, placing 3sc in each corner st. Join to top of first sc. Do NOT fasten off.
*should have 56 sts on both short sides and 70 sts on each long side.


Cut fabric to size, and including a ½” seam allowance, fold back edge and iron so that you have a nice clean edge to sew into. Pin into place.


Sew fabric lining to “wrong side” of the crocheted rectangle, being careful not to sew the crochet stitches shut so you can crochet into them in the next portion.
Strap:
Where still attached (along the shorter edge of the rectangle as pictured and with front facing)…

Row 1: Ch-1, sc2tog, * sc in next, sc2tog * repeat between * * to end. (37)
Row 2: Ch-1, turn, sc in first st, * sc2tog, sc in next * repeat between * * to end. (25)
Row 3: Ch-1, turn, sc in first st, * sc2tog, sc in next * repeat between * * to end. (17)
Rows 4 – 12: Ch-1, turn, sc in each st to end. (17)
Row 13: Ch-1, turn, 2sc in first, * sc in next, 2sc in next * repeat between * * to end. (26)
Do not fasten off if possible. If you do fasten off the first “strap” leave a very long tail for decreasing on the long edge of the rectangle. (Enough to crochet 5 rows of decreasing… it may be easier to pull from the opposite end of the same skein.)

Attach the opposite short edge top corner (right side facing) and crochet the same 13 rows as before. Again, do not fasten off if possible.
Where still attached, (either side) rotate to work down the side of the bag…
Row 1: Ch-1, sc 13 times down “strap” rows. Sc2tog 35 times across bag body, sc 13 up “strap” rows. (61)
Row 2: Ch-1, turn, sc in each st to end. (61)
Row 3: Ch-1, turn, sc in next 13 sts, sc2tog 17 times, sc in next st. Sc in remaining 13 sts. (44)
Row 4: Ch-1, turn, sc in each st to end. (44)
Row 5: Ch-1, turn, sc in next 13 sts, sc2tog 9 times, sc in remaining 13 sts. (35)
Fasten off first side leaving long enough tail to sew strap around handle.
Complete the same 5 rows on the other side. Do NOT fasten off the second side. Rotate work and sc in each st around the entire bag, placing 3 sts in each corner st. Fasten off leaving a long enough tail for sewing the second handle to the bag.

Line up the strap around the wooden handle and sew into place. I used those 13 stitches that formed the “strap” rows and pinned it into place with a stitch marker while sewing. Weave in all of your ends and you are finished!
More for you:
Girl’s Best Friend Crossbody Purse: Free Crochet Pattern
Classic Coin Purse Free Crochet Pattern + Video Tutorial


3 Comments