Hibernation Hoodie CHILD Sizes
This post may contain affiliate links, meaning that I may earn a small commission if you make a purchase. See our disclosure policy for more information.


Have I mentioned that I am absolutely, 100% in LOVE with the Hibernation Hoodie?! I’ve decided to make the CHILD sizes of this pattern free crochet patterns. Scaled-down versions of the adult Hibernation Hoodie so you can make one for yourself, and then another one for your little one. ♥

Hibernation Hoodie Child Sizes
I don’t know that I’ve ever been more in love with a design. I love the collar on this hoodie pattern, I love the front pocket, the hood, and I LOVE the feel of that glorious Hygge yarn.


Find the pattern for the adult Hibernation Hoodie here, and the printable version of the kids’ sizes on Ravelry or Etsy.
Materials:
Red Heart Hygge yarn recommended (see notes below for yarn substitutions)
-approx. 400 yards for 6/9 M
-approx. 500 yards for 12/18 M
-approx. 565 yards for 2/3T
-approx. 920 yards for 4/5T
-approx. 1050 yards for 6/8
-approx. 1150 yards for 8/10
-approx. 1400 yards for 12/14
Crochet hook in size 7mm (pointier the better)
Gauge: 10 sts x 14.5 rows = 4” square
Pattern Notes:
Pattern written in US terms.
This pattern uses front post/back post crochet stitches. See a written and video tutorial for this stitch here.
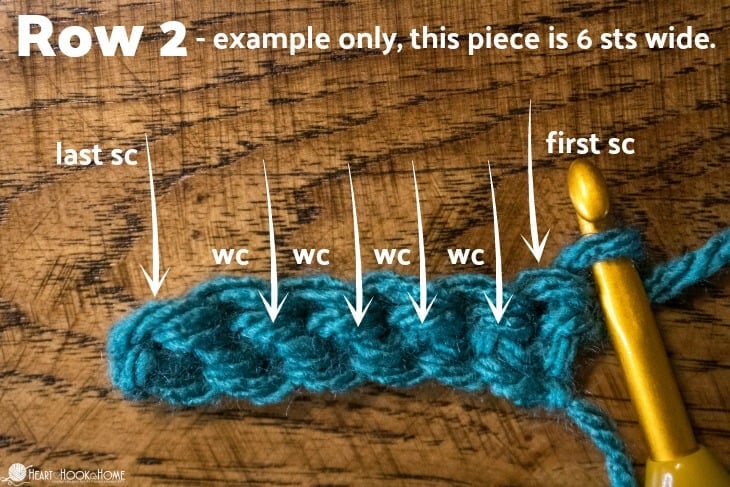
Waistcoat stitch (wc) Similar to the single crochet, except you go into the post of the stitch from the previous row instead of the top of the stitch.
Make sure you stay LOOSE as you work!! It makes going into the stitch easier the following row. Measure periodically to make sure you’re on track.
Watch the Waistcoat Stitch tutorial before you start.
Place first sc of the row in the very first st. Place first wc st in very next post. End row with sc in last st, skipping last post. (for clarification, see photos of first stitch and last stitch placement)
Get the ad-free printable version of this pattern on Ravelry or Etsy.
If you need help reading a crochet pattern, make sure you head over here and check out this detailed post.
Yarn substitutions
This pattern calls for Red Heart Hygge yarn, a size 5/Bulky weight yarn. Because this yarn is so much softer than a traditional bulky weight yarn, I find that it is very pliable and amazingly comfortable to wear. If you use a different bulky weight yarn, that WILL work, but you may find the finished product to be a bit stiff. This stiffness will get better with laundering the hoodie, or you could opt to use a worsted weight yarn instead. Note that the gauge is the same whether you are using worsted weight OR the Hygge (bulky weight/size 5) yarn. That being said, if worsted weight is used in substitution for the Hygge/bulky weight, you may need a bit more of it.

Pattern Photos
 Where to wc2tog on “front”.
 Back and front completed, ready for sewing.
 Sewing the shoulder seam using the mattress stitch.
 Starting the hood.
 Finished hood, before sewing shut.
 Starting row 1 of the “hood edging”
 End of row 1 of “hood edging”.
 End of row 2 “hood edging”.
 Slip stitching along the “flat edge” in hood edging.
 Finished hood edging, ready to be sewn shut.
 Sewing hood edging shut. Be sure to close up any holes.
 Crocheting the pocket.
 Position and sew pocket into place.
Bear Ear pattern (optional):
Round 1: Magic circle. 4sc in circle. (4)
Round 2: Ch-1, turn, 2wc in each st. (8)
Round 3: Ch-1, turn, sk very first st, * wc in next, 2wc in next * repeat between * * two more times, wc in last. (10)
Round 4: Ch-1, turn, sk very first st, * wc in next 2 sts, 2wc in next * repeat between * * two more times, wc in last. (13)
Rounds 5 – 7: Ch-1, turn, wc in each st to end. (13)
Fasten off leaving long enough tail for sewing to head.
Place ears ~3 sts in from hood edging, and ~6 rows down from hood center.

Hoodie Patterns:
6/9M Hoodie


6/9M Back:
Row 1: Ch-29, Sc in 2nd ch from hook and in each to end. (28)
Rows 2 – 19: Ch-1, turn, Sc in first st, Wc in next 26 sts, Sc in last. (28)
*should be ~11.25” wide*
Row 20: Ch-1, turn, sl st in first 3 sts. Wc in next 22 sts. (Leave last 3 sts unworked) (22)
Rows 21 – 35: Ch-1, turn, Sc in first st, Wc in next 20 sts, Sc in last. (22)
Fasten off with tail long enough to sew shoulders later.
6/9M Front:
Row 1: Ch-28, Sc in 2nd ch from hook and in each to end. (27)
Rows 2 – 18: Ch-1, turn, Sc in first st, Wc in next 25 sts, Sc in last. (27)
*should be ~10.75” wide*
Separate into left & right:
Row 19: Ch-1, turn, sc in first, wc in next 11 sts. (12)
Row 20: Ch-1, turn, wc2tog, wc in 9 sts. Sc in last. (11)
Row 21 – 35: Ch-1, turn, sc in first, wc in 9 sts. Sc in last. (11)
Turn work (so that what you have already completed is on the left) and attach in first/far right st from row 18. Complete “front” again to mirror other side, leaving 3 sts in between the left & right sides.
Sew the front to back at shoulders using the Mattress Stitch. Starting at the outside, sew top seam for 5 sts on each front to corresponding 5 sts on back. This will leave 6 unsewn sts on both fronts and 12 unsewn sts along the back for a total of 24 sts around neck opening. Do not weave in ends from sewing shoulders! We’ll use those tails to sew up any holes when done.
Hood:
Attach at either side of neck opening…
Row 1: Ch-1, sc in first st, wc in next 5 sts. Sc2tog (in the 2 sts at shoulder seam). Wc in each of 12 sts along back. Sc2tog (in the 2 sts at the shoulder seam), wc in next 5 sts, sc in last. (26)
Row 2: Ch-1, turn, sc in first, wc in next 5 sts. Sc in each side of sc2tog from last row. Wc in next 12 sts, sc in each side of sc2tog from last row. Wc in next 5 sts, sc in last. (28)
*should be ~11.2” wide*
Rows 3 – 24: Ch-1, turn, sc in first, wc in each st around, sc in last. (28)
Row 25: Ch-1, turn, sc in first, wc in 11 sts, wc2tog, wc2tog. Wc in 11 sts, sc in last. (26)
Row 26: Ch-1, turn, sc in first, wc in 10 sts, wc2tog, wc2tog. Wc in 10 sts, sc in last. (24)
Fasten off leaving long enough tail to sew hood shut.
Sew Side Seams:
Lay front to back and line up sides. Starting at bottom, sew row for row up to the row where you slip stitched – row 22 – going into the TOP of the stitches instead of the sides. Make sure that the remaining # of rows is equal on front and back. These two sides, along with the flat portion, will make up the complete armhole.
Hood edging:
Attach at bottom right of neck opening.
Row 1: Ch-1, wc in each st across flat edge. (3 sts so far) Turn to work up row ends.
* Sc in next 2 sts, Sc2tog * repeat between * * 9 more times, Sc in next 3 sts. (hood center – 37 sts total so far) Repeat between * * 10 times. Join to first Sc with sl st. (67)
*if there is a small hole where you joined, that’s okay. We’ll sew it together when we’re done.
Row 2: Turn work so you’re looking at the inside. Ch-1, bphdc around very first st (the last Sc2tog from the previous row) * fphdc around next, bphdc around next * repeat between * * 30 more times. Do not join. (this side will remain loose until finished and sewn) (63)
Row 3: Ch-1, turn, fphdc around very first post. * bphdc around next, fphdc around next * repeat between * * 30 more times. (63)
Row 4: Sl st in next open st along flat edge. Turn work so you’re looking at the inside. Ch-1, bphdc around very first st * fphdc around next, bphdc around next * repeat between * * 30 more times. Do not join. (this side will remain loose until finished and sewn) (63)
Row (5): Ch-1, turn, sc in each st around. (63) Fasten off leaving decent size tail for sewing. Position edging so the entirety overlaps and sew sturdily into place as pictured.
Sleeves:
Working from cuff up…
Foundation: Ch-(17). Join to first st w/o twisting chain.
Round 1: Ch-1, Sc in same and in each st around. Join with sl st. (17)
Round 2: Ch-1, turn, Wc in very first st, Wc in each st around. Join to first wc with sl st. (17)
Round 3: Ch-1, turn, Wc in very first st, Wc in each st around, 2wc in last st. Join with sl st. (18)
Round 4: repeat round 2 (18)
Round 5: Ch-1, turn, 2wc in first st, wc in each st around. Join with sl st. (19)
Round 6: repeat round 2 (19)
Round 7: repeat round 3 (20)
Rounds 8 – 15: repeat rounds 4 – 7 2x (end w/ 24 sts)
Round 16: repeat round 2 (24)
Round 17: repeat round 5 (25)
Round 18 – 20: repeat round 2 (25)
Fasten off leaving long tail for sewing sleeve to opening.
To attach sleeves:
Line up sleeve seam with center of armhole. Use st markers to hold it in place in several places around while you sew the two pieces together using the Mattress Stitch.
Once sleeves are attached, add ribbing to bottom cuffs by attaching yarn at seam…
Row 1: Ch-1, * fphdc around next, bphdc around next * repeat between * * around. Fphdc around last, join to top of first fphdc with sl st. (17)
Row 2: Ch-1, turn, * bphdc around next, fphdc around next * repeat between * * around. Bphdc around last, join to top of first bphdc with sl st. (17)
Row 3: Ch-1, turn, Sc in each st around. Join with Invisible Join. Weave in all ends.
Pocket:
Row 1: Ch-13. Sc in 2nd ch from hook and in each to end. (12)
Rows 2 – 6: Ch-1, turn, Sc in first st, Wc in next 10 sts, Sc in last. (12)
Row 7: turn, sl st in first 2 sts, wc2tog, wc in next 4 sts, wc2tog leaving 2 sts unworked. (6)
Rows 8 – 10: Ch-1, turn, Sc in first st, Wc in next 4 sts, Sc in last. (6)
Pocket side ribbing (where still attached):
Turn work clockwise to work into row ends.
Row 1: Ch-1, hdc in same. * fphdc around row end, bphdc around next * repeat between * * 1 more time. Fphdc around next, hdc in top of last st. (7)
Fasten off. Attach yarn at other side, in the first st from row 7 of pocket. Repeat ribbing to mirror other side. When finished, sc across top edge. Fasten off leaving long enough tail for sewing pocket to front.
Position pocket ~3 rows up from bottom hem. Play around with placement, pin into place, and sew together sturdily.
Bottom ribbing:
Attach yarn at either bottom seam…
Row 1: Ch-1, * fphdc around next, bphdc around next * repeat between * * around. Fphdc around last, join to top of first fphdc with sl st. (55)
Row 2: Ch-1, turn, * bphdc around next, fphdc around next * repeat between * * around. Bphdc around last, join to top of first bphdc with sl st. (55)
Row 3: Ch-1, turn, Sc in each st around. Join with Invisible Join.
Weave in ALL ends and you are done!
~~~~~~~~~~~~~~~~~~~~~~~~~~~~~~
12/18M Hoodie


12/18M Back:
Row 1: Ch-31, Sc in 2nd ch from hook and in each to end. (30)
Rows 2 – 25: Ch-1, turn, Sc in first st, Wc in next 28 sts, Sc in last. (30)
*should be ~12” wide*
Row 26: Ch-1, turn, sl st in first 2 sts. Wc in next 26 sts. (Leave last 2 sts unworked) (26)
Rows 27 – 40: Ch-1, turn, Sc in first st, Wc in next 24 sts, Sc in last. (26)
Fasten off with tail long enough to sew shoulders later.
12/18M Front:
Row 1: Ch-31, Sc in 2nd ch from hook and in each to end. (30)
Rows 2 – 27: Ch-1, turn, Sc in first st, Wc in next 28 sts, Sc in last. (30)
*should be ~12” wide*
Separate into left & right:
Row 28: Ch-1, turn, sc in first, wc in next 12 sts. (13)
Row 29: Ch-1, turn, wc2tog, wc in 10 sts, sc in last. (12)
Row 30 – 40: Ch-1, turn, sc in first, wc in 10 sts, sc in last. (12)
Turn work (so that what you have already completed is on the left) and attach in first/far right st from row 27. Complete “front” again to mirror other side, leaving 4 sts in between the left & right sides.
Sew the front to back at shoulders using the Mattress Stitch. Starting at the outside, sew top seam for 5 sts on each front to corresponding 5 sts on back. This will leave 7 unsewn sts on both fronts and 15 unsewn sts along the back for a total of 29 sts around neck opening. Do not weave in ends from sewing shoulders! We’ll use those tails to sew up any holes when done.
Hood:
Attach at either side of neck opening…
Row 1: Ch-1, sc in first st, wc in next 6 sts. Sc2tog (in the 2 sts at shoulder seam). Wc in each of 15 sts along back. Sc2tog (in the 2 sts at the shoulder seam), wc in next 6 sts, sc in last. (31)
Row 2: Ch-1, turn, sc in first, wc in next 6 sts. Sc in each side of sc2tog from last row. Wc in next 15 sts, sc in each side of sc2tog from last row. Wc in next 6 sts, sc in last. (33)
*should be ~13.2” wide*
Rows 3 – 27: Ch-1, turn, sc in first, wc in each st around, sc in last. (33)
Row 28: Ch-1, turn, sc in first, wc in 14 sts, wc3tog. Wc in 14 sts, sc in last. (31)
Row 29: Ch-1, turn, sc in first, wc in 12 sts, wc2tog, wc, wc2tog. Wc in 12 sts, sc in last. (29)
Fasten off leaving long enough tail to sew hood shut.
Sew Side Seams:
Lay front to back and line up sides. Starting at bottom, sew row for row up to the row where you slip stitched – row 26 – going into the TOP of the stitches instead of the sides. Make sure that the remaining # of rows is equal on front and back. These two sides, along with the flat portion, will make up the complete armhole.
Hood edging:
Attach at bottom right of neck opening.
Row 1: Ch-1, wc in each st across flat edge. (4 sts so far) Turn to work up row ends.
* Sc in next 2 sts, Sc2tog * repeat between * * 9 more times, Sc in next 3 sts. (hood center – 37 sts total so far) Repeat between * * 10 times. Join to first Sc with sl st. (67)
*if there is a small hole where you joined, that’s okay. We’ll sew it together when we’re done.
Row 2: Turn work so you’re looking at the inside. Ch-1, bphdc around very first st (the last Sc2tog from the previous row) * fphdc around next, bphdc around next * repeat between * * 30 more times. Do not join. (this side will remain loose until finished and sewn) (63)
Row 3: Ch-1, turn, fphdc around very first post. * bphdc around next, fphdc around next * repeat between * * 23 more times. (63)
Row 4: Sl st in next open st along flat edge. Turn work so you’re looking at the inside. Ch-1, bphdc around very first st * fphdc around next, bphdc around next * repeat between * * 23 more times. Do not join. (this side will remain loose until finished and sewn) (63)
Row (5): Ch-1, turn, sc in each st around. (63) Fasten off leaving decent size tail for sewing. Position edging so the entirety overlaps and sew sturdily into place as pictured.
Sleeves:
Working from cuff up…
Foundation: Ch-(19). Join to first st w/o twisting chain.
Round 1: Ch-1, Sc in same and in each st around. Join with sl st. (19)
Round 2: Ch-1, turn, Wc in very first st, Wc in each st around. Join to first wc with sl st. (19)
Round 3: Ch-1, turn, Wc in very first st, Wc in each st around, 2wc in last st. Join with sl st. (20)
Round 4: repeat round 2 (20)
Round 5: repeat round 2 (20)
Round 6: repeat round 3 (21)
Rounds 7 – 24: repeat the three round sequence (round 2, round 2, round 3) 6x (27 sts)
Round 25: repeat round 2 (27)
Fasten off leaving long tail for sewing sleeve to opening.
To attach sleeves:
Line up sleeve seam with center of armhole. Use st markers to hold it in place in several places around while you sew the two pieces together using the Mattress Stitch.
Once sleeves are attached, add ribbing to bottom cuffs by attaching yarn at seam…
Row 1: Ch-1, * fphdc around next, bphdc around next * repeat between * * around. Fphdc around last, join to top of first fphdc with sl st. (19)
Row 2: Ch-1, turn, * bphdc around next, fphdc around next * repeat between * * around. Bphdc around last, join to top of first bphdc with sl st. (19)
Row 3: Ch-1, turn, Sc in each st around. Join with Invisible Join. Weave in all ends.
Pocket:
Row 1: Ch-19. Sc in 2nd ch from hook and in each to end. (18)
Rows 2 – 6: Ch-1, turn, Sc in first st, Wc in next 16 sts, Sc in last. (18)
Row 7: turn, sl st in first 4 sts, wc in next 10 sts, leaving 4 sts unworked. (10)
Rows 8 – 14: Ch-1, turn, Sc in first st, Wc in next 8 sts, Sc in last. (10)
Pocket side ribbing (where still attached):
Turn work clockwise to work into row ends.
Row 1: Ch-1, hdc in same. * fphdc around row end, bphdc around next * repeat between * * 3 more times. Fphdc around next, hdc in top of last st. (9)
Fasten off. Attach yarn at other side, in the first st from row 6 of pocket. Repeat ribbing to mirror other side. When finished, sc across top edge. Fasten off leaving long enough tail for sewing pocket to front.
Position pocket ~5 rows up from bottom hem. Play around with placement, pin into place, and sew together sturdily.
Bottom ribbing:
Attach yarn at either bottom seam…
Row 1: Ch-1, * fphdc around next, bphdc around next * repeat between * * around. Fphdc around last, join to top of first fphdc with sl st. (59)
Row 2: Ch-1, turn, * bphdc around next, fphdc around next * repeat between * * around. Bphdc around last, join to top of first bphdc with sl st. (59)
Row 3: Ch-1, turn, Sc in each st around. Join with Invisible Join.
~~~~~~~~~~~~~~~~~~~~~~~~~~~~~~
2/3T Hoodie
2/3T Back:
Row 1: Ch-34, Sc in 2nd ch from hook and in each to end. (33)
Rows 2 – 28: Ch-1, turn, Sc in first st, Wc in next 31 sts, Sc in last. (33)
*should be ~12.5” wide*
Row 29: Ch-1, turn, sl st in first 3 sts. Wc in next 27 sts. (Leave last 3 sts unworked) (27)
Rows 30 – 43: Ch-1, turn, Sc in first st, Wc in next 25 sts, Sc in last. (27)
Fasten off with tail long enough to sew shoulders later.
2/3T Front:
Row 1: Ch-31, Sc in 2nd ch from hook and in each to end. (30)
Rows 2 – 30: Ch-1, turn, Sc in first st, Wc in next 28 sts, Sc in last. (30)
*should be ~12” wide*
Separate into left & right:
Row 31: Ch-1, turn, sc in first, wc in next 12 sts. (13)
Row 32: Ch-1, turn, wc2tog, wc in 10 sts, sc in last. (12)
Row 33 – 43: Ch-1, turn, sc in first, wc in 10 sts, sc in last. (12)
Turn work (so that what you have already completed is on the left) and attach in first/far right st from row 30. Complete “front” again to mirror other side, leaving 4 sts in between the left & right sides.
Sew the front to back at shoulders using the Mattress Stitch. Starting at the outside, sew top seam for 5 sts on each front to corresponding 5 sts on back. This will leave 7 unsewn sts on both fronts and 17 unsewn sts along the back for a total of 31 sts around neck opening. Do not weave in ends from sewing shoulders! We’ll use those tails to sew up any holes when done.
Hood:
Attach at either side of neck opening…
Row 1: Ch-1, sc in first st, wc in next 6 sts. Sc2tog (in the 2 sts at shoulder seam). Wc in each of 17 sts along back. Sc2tog (in the 2 sts at the shoulder seam), wc in next 6 sts, sc in last. (33)
Row 2: Ch-1, turn, sc in first, wc in each st around, sc in last. (33)
*should be ~13.2” wide*
Rows 3 – 32: Ch-1, turn, sc in first, wc in each st around, sc in last. (33)
Row 33: Ch-1, turn, sc in first, wc in 14 sts, wc3tog. Wc in 14 sts, sc in last. (31)
Row 34: Ch-1, turn, sc in first, wc in 12 sts, wc2tog, wc, wc2tog. Wc in 12 sts, sc in last. (29)
Fasten off leaving long enough tail to sew hood shut.
Sew Side Seams:
Lay front to back and line up sides. Starting at bottom, sew row for row up to the row where you slip stitched – row 29 – going into the TOP of the stitches instead of the sides. Make sure that the remaining # of rows is equal on front and back. These two sides, along with the flat portion, will make up the complete armhole.
Hood edging:
Attach at bottom right of neck opening.
Row 1: Ch-1, wc in each st across flat edge. (4 sts so far) Turn to work up row ends.
* Sc in next, Sc2tog, Sc2tog * repeat between * * 8 more times, Sc in next st. (hood center – 32 sts total so far) Repeat between * * 9 times. Join to first Sc with sl st. (59)
*if there is a small hole where you joined, that’s okay. We’ll sew it together when we’re done.
Row 2: Turn work so you’re looking at the inside. Ch-1, bphdc around very first st (the last Sc2tog from the previous row) * fphdc around next, bphdc around next * repeat between * * 26 more times. Do not join. (this side will remain loose until finished and sewn) (55)
Row 3: Ch-1, turn, fphdc around very first post. * bphdc around next, fphdc around next * repeat between * * 26 more times. (55)
Row 4: Sl st in next open st along flat edge. Turn work so you’re looking at the inside. Ch-1, bphdc around very first st * fphdc around next, bphdc around next * repeat between * * 26 more times. Do not join. (this side will remain loose until finished and sewn) (55)
Row 5: repeat row 3 (55)
Row (6): Sl st in flat edge. Turn work so you’re looking at the inside. Ch-1, Sc in each st around. (55) Fasten off leaving decent size tail for sewing. Position edging so the entirety overlaps and sew sturdily into place as pictured.
Sleeves:
Working from cuff up…
Foundation: Ch-(19). Join to first st w/o twisting chain.
Round 1: Ch-1, Sc in same and in each st around. Join with sl st. (19)
Round 2: Ch-1, turn, Wc in very first st, Wc in each st around. Join to first wc with sl st. (19)
Round 3: Ch-1, turn, Wc in very first st, Wc in each st around, 2wc in last st. Join with sl st. (20)
Round 4: repeat round 2 (20)
Round 5: repeat round 2 (20)
Round 6: repeat round 3 (21)
Rounds 7 – 30: repeat the three round sequence (round 2, round 2, round 3) 8x (29 sts)
Rounds 31 – 38: repeat round 2 (29)
Fasten off leaving long tail for sewing sleeve to opening.
To attach sleeves:
Line up sleeve seam with center of armhole. Use st markers to hold it in place in several places around while you sew the two pieces together using the Mattress Stitch.
Once sleeves are attached, add ribbing to bottom cuffs by attaching yarn at seam…
Row 1: Ch-1, * fphdc around next, bphdc around next * repeat between * * around. Fphdc around last, join to top of first fphdc with sl st. (19)
Row 2: Ch-1, turn, * bphdc around next, fphdc around next * repeat between * * around. Bphdc around last, join to top of first bphdc with sl st. (19)
Row 3: repeat row 1
Row 4: Ch-1, sc in each st around. Join with Invisible Join. Weave in all ends.
Pocket:
Row 1: Ch-19. Sc in 2nd ch from hook and in each to end. (18)
Rows 2 – 8: Ch-1, turn, Sc in first st, Wc in next 16 sts, Sc in last. (18)
Row 9: turn, sl st in first 4 sts, wc in next 10 sts, leaving 4 sts unworked. (10)
Rows 10 – 16: Ch-1, turn, Sc in first st, Wc in next 8 sts, Sc in last. (10)
Pocket side ribbing (where still attached):
Turn work clockwise to work into row ends.
Row 1: Ch-1, hdc in same. * fphdc around row end, bphdc around next * repeat between * * 3 more times. Fphdc around next, hdc in top of last st. (11)
Row 2: Ch-1, hdc in same. * bphdc around next, fphdc around next * repeat between * * 3 more times. Bphdc around next, hdc in top of last st. (11)
Fasten off. Attach yarn at other side, in the first st from row 8 of pocket. Repeat ribbing to mirror other side. When finished, sc across top edge. Fasten off leaving long enough tail for sewing pocket to front.
Position pocket ~5 rows up from bottom hem. Play around with placement, pin into place, and sew together sturdily.
Bottom ribbing:
Attach yarn at either bottom seam…
Row 1: Ch-1, * fphdc around next, bphdc around next * repeat between * * around. Fphdc around last, join to top of first fphdc with sl st. (61)
Row 2: Ch-1, turn, * bphdc around next, fphdc around next * repeat between * * around. Bphdc around last, join to top of first bphdc with sl st. (61)
Rows 3 – 4: repeat rows 1 & 2
Row 5: Ch-1, turn, Sc in each st around. Join with Invisible Join.
Weave in ALL ends and you are done!
~~~~~~~~~~~~~~~~~~~~~~~~~~~~~~
4/5T Hoodie
4/5T Back:
Row 1: Ch-34, Sc in 2nd ch from hook and in each to end. (33)
Rows 2 – 42: Ch-1, turn, Sc in first st, Wc in next 31 sts, Sc in last. (33)
*should be ~13.25” wide*
Row 43: Ch-1, turn, sl st in first 3 sts. Wc in next 27 sts. (Leave last 3 sts unworked) (27)
Rows 44 – 59: Ch-1, turn, Sc in first st, Wc in next 25 sts, Sc in last. (27)
Fasten off with tail long enough to sew shoulders later.
Wanna save this for later?
4/5T Front:
Row 1: Ch-33, Sc in 2nd ch from hook and in each to end. (32)
Rows 2 – 41: Ch-1, turn, Sc in first st, Wc in next 30 sts, Sc in last. (32)
*should be ~12.75” wide*
Separate into left & right:
Row 42: Ch-1, turn, sc in first, wc in next 13 sts. (14)
Row 43: Ch-1, turn, wc2tog, wc in 11 sts, sc in last. (13)
Row 44 – 59: Ch-1, turn, sc in first, wc in 11 sts, sc in last. (13)
Turn work (so that what you have already completed is on the left) and attach in first/far right st from row 41. Complete “front” again to mirror other side, leaving 4 sts in between the left & right sides.
Sew the front to back at shoulders using the Mattress Stitch. Starting at the outside, sew top seam for 6 sts on each front to corresponding 6 sts on back. This will leave 7 unsewn sts on both fronts and 15 unsewn sts along the back for a total of 29 sts around neck opening. Do not weave in ends from sewing shoulders! We’ll use those tails to sew up any holes when done.
Hood:
Attach at either side of neck opening…
Row 1: Ch-1, sc in first st, wc in next 6 sts. Sc2tog (in the 2 sts at shoulder seam). Wc in each of 15 sts along back. Sc2tog (in the 2 sts at the shoulder seam), wc in next 6 sts, sc in last. (31)
Row 2: Ch-1, turn, sc in first, wc in next 6 sts. Sc in each side of sc2tog from last row. Wc in next 15 sts, sc in each side of sc2tog from last row. Wc in next 6 sts, sc in last. (33)
*should be ~13.2” wide*
Rows 3 – 37: Ch-1, turn, sc in first, wc in each st around, sc in last. (33)
Row 38: Ch-1, turn, sc in first, wc in 14 sts, sc3tog. Wc in 14 sts, sc in last. (31)
Row 39: Ch-1, turn, sc in first, wc in 12 sts, sc2tog, sc, sc2tog. Wc in 12 sts, sc in last. (29)
Fasten off leaving long enough tail to sew hood shut.
Sew Side Seams:
Lay front to back and line up sides. Starting at bottom, sew row for row up to the row where you slip stitched – row 43 – going into the TOP of the stitches instead of the sides. Make sure that the remaining # of rows is equal on front and back. These two sides, along with the flat portion, will make up the complete armhole.
Hood edging:
Attach at bottom right of neck opening.
Row 1: Ch-1, wc in each st across flat edge. (4 sts so far) Turn to work up row ends. * Sc in next, Sc2tog, Sc2tog * repeat between * * 10 more times, Sc in next st. (hood center – 38 sts total so far) Repeat between * * 11 times. Join to first sc with sl st. (71)
*if there is a small hole where you joined, that’s okay. We’ll sew it together when we’re done.
Row 2: Turn work so you’re looking at the inside. Ch-1, bphdc around very first st (the last Sc2tog from the previous row) * fphdc around next, bphdc around next * repeat between * * 32 more times. Do not join. (this side will remain loose until finished and sewn) (67)
Row 3: Ch-1, turn, fphdc around very first post. * bphdc around next, fphdc around next * repeat between * * 32 more times. (67)
Row 4: Sl st in next open st along flat edge. Turn work so you’re looking at the inside. Ch-1, bphdc around very first st * fphdc around next, bphdc around next * repeat between * * 32 more times. Do not join. (this side will remain loose until finished and sewn) (67)
Row 5: repeat row 3 (67)
Row (6): Sl st in flat edge. Turn work so you’re looking at the inside. Ch-1, Sc in each st around. (67) Fasten off leaving decent size tail for sewing. Position edging so the entirety overlaps and sew sturdily into place as pictured.
Sleeves:
Working from cuff up…
Foundation: Ch-(17). Join to first st w/o twisting chain.
Round 1: Ch-1, Sc in same and in each st around. Join with sl st. (17)
Round 2: Ch-1, turn, Wc in very first st, Wc in each st around. Join to first wc with sl st. (17)
Round 3: Ch-1, turn, Wc in very first st, Wc in each st around, 2wc in last st. Join with sl st. (18)
Round 4: repeat round 2 (18)
Round 5: repeat round 2 (18)
Round 6: repeat round 3 (19)
Rounds 7 – 30: repeat the three round sequence (round 2, round 2, round 3) 7x (26 sts)
Rounds 31 – 44: repeat round 2 (26)
Fasten off leaving long tail for sewing sleeve to opening.
To attach sleeves:
Line up sleeve seam with center of armhole. Use st markers to hold it in place in several places around while you sew the two pieces together using the Mattress Stitch, going into the TOP of the stitches instead of the row edges. (see photos)
Once sleeves are attached, add ribbing to bottom cuffs by attaching yarn at seam…
Row 1: Ch-1, * fphdc around next, bphdc around next * repeat between * * around. Fphdc around last, join to top of first fphdc with sl st. (17)
Row 2: Ch-1, turn, * bphdc around next, fphdc around next * repeat between * * around. Bphdc around last, join to top of first bphdc with sl st. (17)
Row 3: repeat row 1
Row 4: Ch-1, sc in each st around. Join with Invisible Join. Weave in all ends.
Pocket:
Row 1: Ch-21. Sc in 2nd ch from hook and in each to end. (20)
Rows 2 – 10: Ch-1, turn, Sc in first st, Wc in next 18 sts, Sc in last. (20)
Row 11: turn, sl st in first 4 sts, wc in next 12 sts, leaving 4 sts unworked. (12)
Rows 12 – 20: Ch-1, turn, Sc in first st, Wc in next 10 sts, Sc in last. (12)
Pocket side ribbing (where still attached):
Turn work clockwise to work into row ends.
Row 1: Ch-1, hdc in same. * fphdc around row end, bphdc around next * repeat between * * 5 more times. Fphdc around next, hdc in top of last st. (15)
Row 2: Ch-1, hdc in same. * bphdc around next, fphdc around next * repeat between * * 3 more times. Bphdc around next, hdc in top of last st. (15)
Fasten off. Attach yarn at other side, in the first st from row 10 of pocket. Repeat ribbing to mirror other side. When finished, sc across top edge. Fasten off leaving long enough tail for sewing pocket to front.
Position pocket ~7 rows up from bottom hem. Play around with placement, pin into place, and sew together sturdily.
Bottom ribbing:
Attach yarn at either bottom seam…
Row 1: Ch-1, * fphdc around next, bphdc around next * repeat between * * around. Fphdc around last, join to top of first fphdc with sl st. (65)
Row 2: Ch-1, turn, * bphdc around next, fphdc around next * repeat between * * around. Bphdc around last, join to top of first bphdc with sl st. (65)
Rows 3 – 4: repeat rows 1 & 2
Row 5: Ch-1, turn, Sc in each st around. Join with Invisible Join.
Weave in ALL ends and you are done!
~~~~~~~~~~~~~~~~~~~~~~~~~~~~~~
6/8 Hoodie
6/8 Back:
Row 1: Ch-36, Sc in 2nd ch from hook and in each to end. (35)
Rows 2 – 46: Ch-1, turn, Sc in first st, Wc in next 33 sts, Sc in last. (35)
*should be ~14” wide*
Row 47: Ch-1, turn, sl st in first 3 sts. Wc in next 29 sts. (Leave last 3 sts unworked) (29)
Rows 48 – 63: Ch-1, turn, Sc in first st, Wc in next 27 sts, Sc in last. (29)
Fasten off with tail long enough to sew shoulders later.
6/8 Front:
Row 1: Ch-36, Sc in 2nd ch from hook and in each to end. (35)
Rows 2 – 45: Ch-1, turn, Sc in first st, Wc in next 33 sts, Sc in last. (35)
*should be ~14” wide*
Separate into left & right:
Row 46: Ch-1, turn, sc in first, wc in next 14 sts. (15)
Row 47: Ch-1, turn, wc2tog, wc in 12 sts, sc in last. (14)
Row 48 – 63: Ch-1, turn, sc in first, wc in 12 sts, sc in last. (14)
Turn work (so that what you have already completed is on the left) and attach in first/far right st from row 51. Complete “front” again to mirror other side, leaving 5 sts in between the left & right sides.
Sew the front to back at shoulders using the Mattress Stitch. Starting at the outside, sew top seam for 7 sts on each front to corresponding 7 sts on back. This will leave 7 unsewn sts on both fronts and 15 unsewn sts along the back for a total of 29 sts around neck opening. Do not weave in ends from sewing shoulders! We’ll use those tails to sew up any holes when done.
Hood:
Attach at either side of neck opening…
Row 1: Ch-1, sc in first st, wc in next 6 sts. Sc2tog (in the 2 sts at shoulder seam). Wc in each of 15 sts along back. Sc2tog (in the 2 sts at the shoulder seam), wc in next 6 sts, sc in last. (31)
Row 2: Ch-1, turn, sc in first, wc in next 6 sts. Sc in each side of sc2tog from last row. Wc in next 15 sts, sc in each side of sc2tog from last row. Wc in next 6 sts, sc in last. (33)
*should be ~13.2” wide*
Rows 3 – 37: Ch-1, turn, sc in first, wc in each st around, sc in last. (33)
Row 38: Ch-1, turn, sc in first, wc in 14 sts, sc3tog. Wc in 14 sts, sc in last. (31)
Row 39: Ch-1, turn, sc in first, wc in 12 sts, sc2tog, sc, sc2tog. Wc in 12 sts, sc in last. (29)
Fasten off leaving long enough tail to sew hood shut.
Sew Side Seams:
Lay front to back and line up sides. Starting at bottom, sew row for row up to the row where you slip stitched – row 53 – going into the TOP of the stitches instead of the sides. Make sure that the remaining # of rows is equal on front and back. These two sides, along with the flat portion, will make up the complete armhole.
Hood edging:
Attach at bottom right of neck opening.
Row 1: Ch-1, wc in each st across flat edge. (5 sts so far) Turn to work up row ends. * Sc in next, Sc2tog, Sc2tog * repeat between * * 10 more times, Sc in next st. (hood center – 38 sts total so far) Repeat between * * 11 times. Join to first sc with sl st. (72)
*if there is a small hole where you joined, that’s okay. We’ll sew it together when we’re done.
Row 2: Turn work so you’re looking at the inside. Ch-1, bphdc around very first st (the last Sc2tog from the previous row) * fphdc around next, bphdc around next * repeat between * * 32 more times. Do not join. (this side will remain loose until finished and sewn) (67)
Row 3: Ch-1, turn, fphdc around very first post. * bphdc around next, fphdc around next * repeat between * * 32 more times. (67)
Row 4: Sl st in next open st along flat edge. Turn work so you’re looking at the inside. Ch-1, bphdc around very first st * fphdc around next, bphdc around next * repeat between * * 32 more times. Do not join. (this side will remain loose until finished and sewn) (67)
Row 5: repeat row 3 (67)
Row (6): Sl st in flat edge. Turn work so you’re looking at the inside. Ch-1, Sc in each st around. (67) Fasten off leaving decent size tail for sewing. Position edging so the entirety overlaps and sew sturdily into place as pictured.
Sleeves:
Working from cuff up…
Foundation: Ch-(17). Join to first st w/o twisting chain.
Round 1: Ch-1, sc in same and in each st around. Join with sl st. (17)
Round 2: Ch-1, turn, Wc in very first st, Wc in each st around. Join to first wc with sl st. (17)
Round 3: Ch-1, turn, Wc in very first st, Wc in each st around, 2wc in last st. Join with sl st. (18)
Round 4: repeat round 2 (18)
Round 5: repeat round 2 (18)
Round 6: repeat round 3 (19)
Rounds 7 – 36: repeat the three round sequence (round 2, round 2, round 3) 10x (29 sts)
Rounds 37 – 46: repeat round 2 (29)
Fasten off leaving long tail for sewing sleeve to opening.
To attach sleeves:
Line up sleeve seam with center of armhole. Use st markers to hold it in place in several places around while you sew the two pieces together using the Mattress Stitch, going into the TOP of the stitches instead of the row edges. (see photos)
Once sleeves are attached, add ribbing to bottom cuffs by attaching yarn at seam…
Row 1: Ch-1, * fphdc around next, bphdc around next * repeat between * * around. Fphdc around last, join to top of first fphdc with sl st. (21)
Row 2: Ch-1, turn, * bphdc around next, fphdc around next * repeat between * * around. Bphdc around last, join to top of first bphdc with sl st. (21)
Row 3: repeat row 1
Row 4: Ch-1, sc in each st around. Join with Invisible Join. Weave in all ends.
Pocket:
Row 1: Ch-21. Sc in 2nd ch from hook and in each to end. (20)
Rows 2 – 10: Ch-1, turn, Sc in first st, Wc in next 18 sts, Sc in last. (20)
Row 11: turn, sl st in first 4 sts, wc in next 12 sts, leaving 4 sts unworked. (12)
Rows 12 – 20: Ch-1, turn, Sc in first st, Wc in next 10 sts, Sc in last. (12)
Pocket side ribbing (where still attached):
Turn work clockwise to work into row ends.
Row 1: Ch-1, hdc in same. * fphdc around row end, bphdc around next * repeat between * * 3 more times. Fphdc around next, hdc in top of last st. (13)
Row 2: Ch-1, hdc in same. * bphdc around next, fphdc around next * repeat between * * 3 more times. Bphdc around next, hdc in top of last st. (13)
Fasten off. Attach yarn at other side, in the first st from row 8 of pocket. Repeat ribbing to mirror other side. When finished, sc across top edge. Fasten off leaving long enough tail for sewing pocket to front.
Position pocket ~7 rows up from bottom hem. Play around with placement, pin into place, and sew together sturdily.
Bottom ribbing:
Attach yarn at either bottom seam…
Row 1: Ch-1, * fphdc around next, bphdc around next * repeat between * * around. Fphdc around last, join to top of first fphdc with sl st. (71)
Row 2: Ch-1, turn, * bphdc around next, fphdc around next * repeat between * * around. Bphdc around last, join to top of first bphdc with sl st. (71)
Rows 3 – 4: repeat rows 1 & 2
Row 5: Ch-1, turn, Sc in each st around. Join with Invisible Join.
Weave in ALL ends and you are done!
~~~~~~~~~~~~~~~~~~~~~~~~~~~~~~
8/10 Hoodie
8/10 Back:
Row 1: Ch-41, Sc in 2nd ch from hook and in each to end. (40)
Rows 2 – 49: Ch-1, turn, Sc in first st, Wc in next 38 sts, Sc in last. (40)
*should be ~16” wide*
Row 50: Ch-1, turn, sl st in first 3 sts. Wc in next 34 sts. (Leave last 3 sts unworked) (34)
Rows 51 – 70: Ch-1, turn, Sc in first st, Wc in next 32 sts, Sc in last. (34)
Fasten off with tail long enough to sew shoulders later.
8/10 Front:
Row 1: Ch-41, Sc in 2nd ch from hook and in each to end. (40)
Rows 2 – 52: Ch-1, turn, Sc in first st, Wc in next 38 sts, Sc in last. (40)
*should be ~16” wide*
Separate into left & right:
Row 53: Ch-1, turn, Sc in first, Wc in next 16 sts. (17)
Row 54: Ch-1, turn, Wc2tog, Wc in 14 sts, Sc in last. (16)
Row 55 – 70: Ch-1, turn, Sc in first, Wc in 14 sts, Sc in last. (16)
Turn work (so that what you have already completed is on the left) and attach in first/far right st from row 52. Complete “front” again to mirror other side, leaving 6 sts in between the left & right sides.
Sew the front to back at shoulders using the Mattress Stitch. Starting at the outside, sew top seam for 8 sts on each front to corresponding 8 sts on back. This will leave 8 unsewn sts on both fronts and 18 unsewn sts along the back for a total of 34 sts around neck opening. Do not weave in ends from sewing shoulders! We’ll use those tails to sew up any holes when done.
Hood:
Attach at either side of neck opening…
Row 1: Ch-1, Sc in first st, Wc in next 6 sts. Sc2tog (in the 2 sts at shoulder seam). Wc in each of 18 sts along back. Sc2tog (in the 2 sts at the shoulder seam), Wc in next 6 sts, Sc in last. (34)
Rows 2 – 41: Ch-1, turn, Sc in first, Wc in each st around, Sc in last. (34)
*should be ~14.5” wide*
Row 42: Ch-1, turn, Sc in first, Wc in 14 sts, Sc2tog, Sc2tog. Wc in 14 sts, sc in last. (32)
Row 43: Ch-1, turn, Sc in first, Wc in 13 sts, Sc2tog, Sc2tog. Wc in 13 sts, Sc in last. (30)
Row 44: Ch-1, turn, Sc in first, Wc in 12 sts, Sc2tog, Sc2tog. Wc in 12 sts, Sc in last. (28)
Fasten off leaving long enough tail to sew hood shut.
Sew Side Seams:
Lay front to back and line up sides. Starting at bottom, sew row for row up to the row where you slip stitched – row 50 – going into the TOP of the stitches instead of the sides. Make sure that the remaining # of rows is equal on front and back. These two sides, along with the flat portion, will make up the complete armhole.
Hood edging:
Attach at bottom right of neck opening.
Row 1: Ch-1, Wc in each st across flat edge. (6 sts so far) Turn to work up row ends. * Sc in next, Sc2tog, Sc2tog * repeat between * * 11 more times, Sc in next st. (hood center – 42 sts total so far) Repeat between * * 12 times. Join to first Sc with sl st. (79)
*If there is a small hole where you joined, that’s okay. We’ll sew it together when we’re done.
Row 2: Sl st in next open st along flat edge. Turn work so you’re looking at the inside. Ch-1, Bphdc around very first st (the last Sc2tog from the previous row) * Fphdc around next, Bphdc around next * repeat between * * 32 more times. Do not join. (this side will remain loose until finished and sewn) (73)
Row 3: Ch-1, turn, Fphdc around very first post. * Bphdc around next, Fphdc around next * repeat between * * 32 more times. (73)
Rows 4 – 7: Repeat rows 2 & 3 (73)
Row 8: Sl st in flat edge. Turn work so you’re looking at the inside. Ch-1, Sc in each st around. (73) Fasten off leaving decent size tail for sewing. Position edging so the entirety overlaps and sew sturdily into place as pictured.
Sleeves:
Working from cuff up…
Foundation: Ch-(19). Join to first st w/o twisting chain.
Round 1: Ch-1, Sc in same and in each st around. Join with sl st. (19)
Rounds 2 – 4: Ch-1, turn, Wc in very first st, Wc in each st around. Join to first wc with sl st. (19)
Round 5: Ch-1, turn, Wc in very first st, Wc in each st around, 2Wc in last st. Join with sl st. (20)
Round 6: repeat round 2 (20)
Round 7: repeat round 2 (20)
Round 8: repeat round 5 (21)
Rounds 9 – 41: repeat the three round sequence (round 2, round 2, round 5) 11x (32 sts)
Rounds 42 – 59: repeat round 2 (32)
Fasten off leaving long tail for sewing sleeve to opening.
To attach sleeves:
Line up sleeve seam with center of armhole. Use st markers to hold it in place in several places around while you sew the two pieces together using the Mattress Stitch, going into the TOP of the stitches instead of the row edges. (see photos)
Once sleeves are attached, add ribbing to bottom cuffs by attaching yarn at seam…
Row 1: Ch-1, * Fphdc around next, Bphdc around next * repeat between * * around. Fphdc around last, join to top of first Fphdc with sl st. (19)
Row 2: Ch-1, turn, * Bphdc around next, Fphdc around next * repeat between * * around. Bphdc around last, join to top of first Bphdc with sl st. (19)
Row 3: repeat row 1
Row 4: Ch-1, Sc in each st around. Join with Invisible Join. Weave in all ends.
Pocket:
Row 1: Ch-27. Sc in 2nd ch from hook and in each to end. (26)
Rows 2 – 10: Ch-1, turn, Sc in first st, Wc in next 24 sts, Sc in last. (26)
Row 11: turn, sl st in first 6 sts, Wc in next 14 sts, leaving 6 sts unworked. (14)
Rows 12 – 22: Ch-1, turn, Sc in first st, Wc in next 12 sts, Sc in last. (14)
Pocket side ribbing (where still attached):
Turn work clockwise to work into row ends.
Row 1: Ch-1, Hdc in same. * Fphdc around row end, Bphdc around next * repeat between * * 7 more times. Fphdc around next, Hdc in top of last st. (19)
Row 2: Ch-1, Hdc in same. * Bphdc around next, Fphdc around next * repeat between * * 7 more times. Bphdc around next, Hdc in top of last st. (19)
Fasten off. Attach yarn at other side, in the first st from row 10 of pocket. Repeat ribbing to mirror other side. When finished, Sc across top edge. Fasten off leaving long enough tail for sewing pocket to front.
Position pocket ~8 rows up from bottom hem. Play around with placement, pin into place, and sew together sturdily.
Bottom ribbing:
Attach yarn at either bottom seam…
Row 1: Ch-1, * Fphdc around next, Bphdc around next * repeat between * * around. Fphdc around last, join to top of first Fphdc with sl st. (79)
Row 2: Ch-1, turn, * Bphdc around next, Fphdc around next * repeat between * * around. Bphdc around last, join to top of first Bphdc with sl st. (79)
Rows 3 – 4: repeat rows 1 & 2
Row 5: Ch-1, turn, Sc in each st around. Join with Invisible Join.
Weave in ALL ends and you are done!
~~~~~~~~~~~~~~~~~~~~~~~~~~~~~~
12/14 Hoodie
12/14 Back:
Row 1: Ch-46, Sc in 2nd ch from hook and in each to end. (45)
Rows 2 – 66: Ch-1, turn, Sc in first st, Wc in next 43 sts, Sc in last. (45)
*should be ~18” wide*
Row 67: Ch-1, turn, sl st in first 4 sts. Wc in next 37 sts. (Leave last 4 sts unworked) (37)
Rows 68 – 87: Ch-1, turn, Sc in first st, Wc in next 35 sts, Sc in last. (37)
Fasten off with tail long enough to sew shoulders later.
12/14 Front:
Row 1: Ch-41, Sc in 2nd ch from hook and in each to end. (40)
Rows 2 – 69: Ch-1, turn, Sc in first st, Wc in next 38 sts, Sc in last. (40)
*should be ~16” wide*
Separate into left & right:
Row 70: Ch-1, turn, sc in first, wc in next 16 sts. (17)
Row 71: Ch-1, turn, wc2tog, wc in 14 sts, sc in last. (16)
Row 72 – 87: Ch-1, turn, sc in first, wc in 14 sts, sc in last. (16)
Turn work (so that what you have already completed is on the left) and attach in first/far right st from row 69. Complete “front” again to mirror other side, leaving 6 sts in between the left & right sides.
Sew the front to back at shoulders using the Mattress Stitch. Starting at the outside, sew top seam for 9 sts on each front to corresponding 9 sts on back. This will leave 7 unsewn sts on both fronts and 19 unsewn sts along the back for a total of 33 sts around neck opening. Do not weave in ends from sewing shoulders! We’ll use those tails to sew up any holes when done.
Hood:
Attach at either side of neck opening…
Row 1: Ch-1, sc in first st, wc in next 6 sts. Sc2tog (in the 2 sts at shoulder seam). Wc in each of 19 sts along back. Sc2tog (in the 2 sts at the shoulder seam), wc in next 6 sts, sc in last. (35)
Rows 2 – 41: Ch-1, turn, sc in first, wc in each st around, sc in last. (35)
*should be ~14” wide*
Row 42: Ch-1, turn, sc in first, wc in 15 sts, sc3tog. Wc in 15 sts, sc in last. (33)
Row 43: Ch-1, turn, sc in first, wc in 14 sts, sc2tog, sc2tog. Wc in 14 sts, sc in last. (32)
Row 44: Ch-1, turn, sc in first, wc in 13 sts, sc2tog, sc2tog. Wc in 13 sts, sc in last. (30)
Fasten off leaving long enough tail to sew hood shut.
Sew Side Seams:
Lay front to back and line up sides. Starting at bottom, sew row for row up to the row where you slip stitched – row 67 – going into the TOP of the stitches instead of the sides. Make sure that the remaining # of rows is equal on front and back. These two sides, along with the flat portion, will make up the complete armhole.
Hood edging:
Attach at bottom right of neck opening.
Row 1: Ch-1, wc in each st across flat edge. (6 sts so far) Turn to work up row ends.
* Sc in next, Sc2tog, Sc2tog * repeat between * * 11 more times, Sc in next st. (hood center – 42 sts total so far) Repeat between * * 12 times. Join to first sc with sl st. (79)
*if there is a small hole where you joined, that’s okay. We’ll sew it together when we’re done.
Row 2: Sl st in next open st along flat edge. Turn work so you’re looking at the inside. Ch-1, bphdc around very first st (the last Sc2tog from the previous row) * fphdc around next, bphdc around next * repeat between * * 32 more times. Do not join. (this side will remain loose until finished and sewn) (73)
Row 3: Ch-1, turn, fphdc around very first post. * bphdc around next, fphdc around next * repeat between * * 32 more times. (73)
Rows 4 – 7: repeat rows 2 & 3 (73)
Row 8: Sl st in flat edge. Turn work so you’re looking at the inside. Ch-1, Sc in each st around. (73) Fasten off leaving decent size tail for sewing. Position edging so the entirety overlaps and sew sturdily into place as pictured.
Sleeves:
Working from cuff up…
Foundation: Ch-(21). Join to first st w/o twisting chain.
Round 1: Ch-1, Sc in same and in each st around. Join with sl st. (21)
Rounds 2 – 4: Ch-1, turn, Wc in very first st, Wc in each st around. Join to first wc with sl st. (21)
Round 5: Ch-1, turn, Wc in very first st, Wc in each st around, 2wc in last st. Join with sl st. (22)
Round 6: repeat round 2 (22)
Round 7: repeat round 2 (22)
Round 8: repeat round 5 (23)
Rounds 9 – 44: repeat the three round sequence (round 2, round 2, round 5) 12x (35 sts)
Rounds 45 – 65: repeat round 2 (35)
Fasten off leaving long tail for sewing sleeve to opening.
To attach sleeves:
Line up sleeve seam with center of armhole. Use st markers to hold it in place in several places around while you sew the two pieces together using the Mattress Stitch.
Once sleeves are attached, add ribbing to bottom cuffs by attaching yarn at seam…
Row 1: Ch-1, * fphdc around next, bphdc around next * repeat between * * around. Fphdc around last, join to top of first fphdc with sl st. (21)
Row 2: Ch-1, turn, * bphdc around next, fphdc around next * repeat between * * around. Bphdc around last, join to top of first bphdc with sl st. (21)
Row 3: repeat row 1
Row 4: Ch-1, sc in each st around. Join with Invisible Join. Weave in all ends.
Pocket:
Row 1: Ch-33. Sc in 2nd ch from hook and in each to end. (32)
Rows 2 – 10: Ch-1, turn, Sc in first st, Wc in next 30 sts, Sc in last. (32)
Row 11: turn, sl st in first 6 sts, wc in next 20 sts, leaving 6 sts unworked. (20)
Rows 12 – 24: Ch-1, turn, Sc in first st, Wc in next 18 sts, Sc in last. (20)
Pocket side ribbing (where still attached):
Turn work clockwise to work into row ends.
Row 1: Ch-1, hdc in same. * fphdc around row end, bphdc around next * repeat between * * 3 more times. Fphdc around next, hdc in top of last st. (17)
Row 2: Ch-1, hdc in same. * bphdc around next, fphdc around next * repeat between * * 3 more times. Bphdc around next, hdc in top of last st. (17)
Fasten off. Attach yarn at other side, in the first st from row 8 of pocket. Repeat ribbing to mirror other side. When finished, sc across top edge. Fasten off leaving long enough tail for sewing pocket to front.
Position pocket ~7 rows up from bottom hem. Play around with placement, pin into place, and sew together sturdily.
Bottom ribbing:
Attach yarn at either bottom seam…
Row 1: Ch-1, * fphdc around next, bphdc around next * repeat between * * around. Fphdc around last, join to top of first fphdc with sl st. (85)
Row 2: Ch-1, turn, * bphdc around next, fphdc around next * repeat between * * around. Bphdc around last, join to top of first bphdc with sl st. (85)
Rows 3 – 4: repeat rows 1 & 2
Row 5: Ch-1, turn, Sc in each st around. Join with Invisible Join.
Weave in ALL ends and you are done!
I sincerely hope you love this pattern, and be sure to share photos of your finished hoodies with me by tagging @HeartHookHome on Instagram and Twitter, and by sharing in the Heart Hook Home Crochet Community on Facebook when you’re done! ♥
More free patterns for kids:
It’s Shawl Good Crochet Pattern CHILD Size
Child Size Blanket Cardigan – Free Crochet Pattern


43 Comments