Home » Hook » Crochet Tips & Tutorials » Tutorials » Crochet Stitch Tutorials » How to Crochet the Bobblet Stitch
| | |

How to Crochet the Bobblet Stitch

This post may contain affiliate links, meaning that I may earn a small commission if you make a purchase. See our disclosure policy for more information.

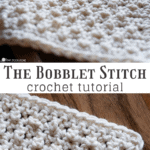
The Bobblet Stitch in crochet is a fun way to add texture to your work. This stitch would be great for baby blankets, afghans, hats, and more!

Bobblet Crochet Stitch tutorial

Crochet Bobblet Stitch Tutorial

How to crochet the Bobblet Stitch

One of my favorite aspects of this stitch is the tiny little “bobbles” or “bobblets” it makes. While the full bobble stitch is nice as well, the bobblet gives a much more subtle effect. Even better, this stitch set uses just two crochet techniques: the single crochet and the chain stitch.

textured crochet stitches

Crocheting the Bobblet stitch is quite easy. Let’s learn this new stitch!

How to make a Bobblet Stitch

1. Chain an even number of stitches.

2. Single crochet in the 2nd chain from the hook and in each chain to end.

3. Chain one, turn your work. Single crochet in the first stitch.

4. Extra Extended Single Crochet (eesc) in the next stitch. See below for step-by-step.

Insert hook in next stitch and pull up a loop.

Chain two.

Yarn over, pull through both loops on hook. Extra Extended Single Crochet made!

5. Single crochet in the next st.

6. Alternate between eesc and sc to the end of the row. You should end with one regular single crochet.

7. Chain one and turn, single crochet in each stitch to the end of the row.

8. Chain one and turn. Single crochet in the first TWO stitches. (this offsets the bobblets)

9. Alternate eesc and single crochet to the end of the row.

10. Single crochet in the last stitch. This should leave you with two single crochets on each end of the row.

11. Chain one and turn, single crochet in each stitch to the end of the row.

12. Start back at row 3.

Repeat rows 3, 4, 5, and 6 in order until piece is as tall as you like.

how to make bobblet crochet stitch

When made correctly, each bobblet row should be offset from the one above and below it.

Helpful Tip: You’ll want to make sure to pop the chain-2 out (toward you) when creating the following single crochet. See the video below for more clarification.

Bobblet Stitch Video:

If, for some reason, you would rather watch this video on YouTube, you can find it here.

Bobblet crochet stitch tutorial

Don’t these make the cutest little crochet stitch? I hope you found this technique enjoyable to crochet, and that you’ll use it in a project soon! What will you make with the Bobblet Stitch?

Bobblet Stitch crochet tutorial

More fun crochet stitches:

How to Crochet the Rice Stitch

Linked Double Crochet Stitch Tutorial

How to Crochet the Thicket (Suzette) Stitch

Bead Stitch Crochet Tutorial

Argyle Shell Crochet Stitch Tutorial

Similar Posts

Leave a Reply

Your email address will not be published. Required fields are marked *

This site uses Akismet to reduce spam. Learn how your comment data is processed.

15 Comments

  1. You do a great job explaining & taking photos that make sense of stitch steps. One of the best tutorial writers I’ve come across! Sometimes it’s easy to get confused with the more complex stitches though, because you swap randomly from putting the corresponding pic after the words, to putting the words after the picture. So I find myself wondering which step an illustration is supposed to be showing. In this tutorial, it swaps at step 4, swaps back at 6, and swaps back again at 12. It would be suuuuuper helpful if the words *always* came first and the corresponding illustrations were below them. I eventually figure out what’s going on, because I am dogged and understand stitch mechanics and pattern structure at a base level. People who are newer to crochet or who aren’t able to deconstruct patterns and stitches visually in their mind may have a tougher time though. I hope this comment/suggestion is taken in the spirit it is intended — a instruction manual writer and crochet enthusiast who wants to help you achieve an even better product … which helps lots of crocheters and myself. ;-D <3
    1. I am always a fan of acrylic yarns for blankets...there is usually a very wide color selection, it is washable, and pretty economical which is nice for a large project such as a blanket.
  2. I've been using this stitch for a blanket but it is growing wider on one side and narrower on the other side. I've checked and I haven't picked up any stitches. Any idea what is going wrong?
    1. May be a matter of tension changing. If you aren’t using stitch markers, I highly recommend placing one in the first stitch of each row. You end up with a marker at each side, and really really helps you keep sure to put the last stitch in the *correct* place. Even an experienced hooker can lose sight of the top of that prior row stitch. That can set you off at an angle & make a wonky shape.
  3. I am going tonight” try “ to use this stitch on a beanie I want to make for a baby. I thinking would look so cute. Not sure how to go about it but I’ll figure it out eventually lol
  4. Thank you for the so cute pattern! Your directions were awesome but the pictures were stunning!!! You did a great job,
  5. Thank you Ashley, This is a cute little stitch? I just finished up a large project and am now set on a couple of baby blankets. I'm going to try and use this stitch for that. I can't wait!!!
  6. Thank you Ashlea for the free pattern and the video tutorial! I'm going to make a scarf with this stitch today. I think it will work up quickly and be fun!