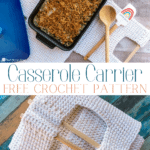
Casserole Carrier: Free Crochet Pattern
This post may contain affiliate links, meaning that I may earn a small commission if you make a purchase. See our disclosure policy for more information.


Are you headed to a get together soon? Taking a dish to a pot luck, or to the family Thanksgiving dinner? Then you, my friend, need a crocheted casserole carrier and I’ve got the perfect pattern!

Casserole Carrier Crochet Pattern
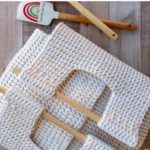
This casserole carrier is super sturdy, it’s chic, functional, and easy to crochet, too! Use this carrier to take your favorite 9 x 13 casserole dish to your next gathering. Wow your friends and family not only with your delicious food, but your crochet skills as well!

All you need to know is how to crochet the Thermal stitch. This stitch is a variation of single crochet and is great for crochet projects that need to be dense, or ones that you’ll use in the kitchen. Because of the double thickness of the stitch, it repels heat (if using as a pot holder for instance), or helps to retain heat (as seen in this casserole carrier pattern).


This is the eleventh and second-to-last of the 2021 Crochet Household Series patterns. I have loved making this series so much and I hope you have enjoyed crocheting them along with me as well! Here are the other patterns in the series, with links to each pattern below:

Crochet Pan Protectors Pattern (Small, Medium, Large, X-Large)
Llama Dusting Mitt: Free Crochet Pattern
Hanging Baskets: Free Crochet Pattern
Free Crochet Coozie Cover Pattern
Outdoor Table Mat: Free Crochet Pattern
Quick & Easy Microwave Bowl Cozy Crochet Pattern
How to Make a Fruit Hammock: Free Crochet Pattern
Plastic Bag Holder and Dispenser: Free Crochet Pattern
Drawstring Cosmetics Bag: Free Crochet Pattern

This casserole carrier pattern is intended to be used for carrying 9 x 13 baking dishes. Isn’t it fancy?!


We are holding two strands of yarn together throughout this pattern, and I think a stash busting of your cotton yarn remnants would be a gorgeous use of yarn! They don’t even have to be all the same brand/color. Since we are double stranded and using a double thickness stitch, the Thermal stitch, the color changes would be so fun!
I think I may try it with a 8 x 8 baking dish and see what I think. If I do that, I’ll update this post.
Materials:
100% Cotton yarn (Dishie cotton used in “White” and “Swan”)
-approx. 1300 yards total
Crochet hook in size 7mm
(2) 1/2″ dowel rods (or wooden spoons if the handles are long enough)
(3) 3/4″ Magnetic snap closures
Gauge:
10 sts x 20 rows = 4” square
Pattern Notes:
Pattern written in US terms.
The ch-1 at the beginning of each row does NOT count as a stitch.
BLO = Back Loop Only
We are holding two strands of cotton yarn together for the entirety of this pattern. Paired with the sturdiness of the stitch this makes for a SUPER sturdy casserole carrier!
We are crocheting a big rectangle, then adding space for the handles, then adding some flaps.
Does that sound easy? Because it really is. Grab your hook and let’s get started!
Grab the ad-free, printable PDF version of this pattern on Ravelry, Etsy, or right here in the Heart Hook Home blog shop!
If you need help reading a crochet pattern, make sure you head over here and check out this detailed post.
Carrier Pattern:
Hold two strands of yarn together for the duration of this pattern…
Row 1: Ch-33, sc in blo in 2nd ch from hook and in ch to end. (32)
Rows 2 – 76: Ch-1, turn, thermal st across. (32)
Handle number one:
Row 77: Ch-1, turn, thermal in first 10 sts only. (10)
Rows 78 – 96: Ch-1, turn, thermal in each st to end. (10)
Row 97: Ch-1, turn, finish off thermal st by going into all three (or 6) loops. (10)
Fasten off leaving long enough tail for sewing shut.
Looking so that the “handle number one” is to your right, leave 12 sts open and attach in next st.

Handle number two:
Wanna save this for later?
Row 77: Ch-1, thermal in each st to end. (10)
Rows 78 – 96: Ch-1, turn, thermal in each st to end. (10)
Row 97: Ch-1, turn, finish off thermal st by going into all three (or 6) loops. (10)
Fasten off leaving long enough tail for sewing shut.
Second side:
On other side of rectangle, attach to start the opposite side of the carrier.

Go only through the back half of the foundation row. (We’ll use the front half on the next row for the thermal stitch.)
Row 1: Ch-1, thermal in each st to end. (32)


Rows 2 – 28: Ch-1, turn, thermal st across. (32)
Handle number one:
Row 29: Ch-1, turn, thermal in first 10 sts only. (10)
Rows 30 – 48: Ch-1, turn, thermal in each st to end. (10)
Row 49: Ch-1, turn, finish off thermal st by going into all three (or 6) loops. (10)
Fasten off leaving long enough tail for sewing shut.
Looking so that the “Handle number one” is to your right, leave 12 sts open and attach in next st.
Handle number two:
Row 29: Ch-1, Thermal in each st to end. (10)
Rows 30 – 48: Ch-1, turn, thermal in each st to end. (10)
Row 49: Ch-1, turn, finish off thermal st by going into all three (or 6) loops. (10)
Fasten off leaving long enough tail for sewing shut.
Sewing the handles shut:
Fold each of the 4 flaps down and sew into tubes. If you’re also using 1/2″ dowel rods you’ll want to sew about 11 rows down from the top edge.


Side Flaps on Main Body:
Make two, again holding two strands of yarn together…
Leave a ~40” tail for sewing later.
Row 1: Ch-29, sc in blo in 2nd ch from hook and in ch to end. (28)
Rows 2 – 54: Ch-1, turn, thermal st across. (28)
Row 55: Ch-1, turn, finish off thermal st by going into all three (or 6) loops. (28)
Fasten off.


Position the two flaps so that they line up directly opposite each other, with one side lining up to the foundation row of the main rectangle as pictured.
Pin in place using stitch markers and sew securely using the beginning tail to the main rectangle using a tapestry needle. If you have a favorite 9 x 13 casserole dish that you use, I recommend pulling it out to make sure your snap placement is sufficient for your specific casserole dish. Weave in all ends securely.

Magnetic Snaps:
Position the magnetic snaps directly opposite each other, so that when you close them they’ll attach.

Sew the snaps into place with needle and thread. Insert your dowel rods (or wooden spoon handles if long enough – like these) and voila!
You’re ready to take your favorite casserole to the party in style!
More household crochet patterns:
How to Make a Fruit Hammock: Free Crochet Pattern
Brick Stitch Cloth: Free Crochet Pattern in Three Sizes
Houseplant Clippings Plant Hanger Crochet Pattern


11 Comments