Home » Hook » Crochet Tips & Tutorials » How to Size Crochet Beanies + Master Beanie Pattern

How to Size Crochet Beanies + Master Beanie Pattern

This post may contain affiliate links, meaning that I may earn a small commission if you make a purchase. See our disclosure policy for more information.

Beanies are the bane of my existence. Okay, that might be a tad harsh BUT you can’t tell me there’s not a learning curve when it comes to crocheting beanies and the sizing of them. There are countless patterns out there. We’re talking different sizes, different stitches, different yarn, different hooks, different fits (slouchy or tight) etc etc etc. We could go on for hours but instead let’s talk about this new basic master beanie pattern that you can use to make just about any kind of hat.

How to size crocheted beanies

How to Size Crochet Hats + Master Beanie Pattern

How am I going to create a master beanie pattern, you ask? Simply by knowing when to stop increasing and when to stop adding length. We can use this method with single crochet, half double crochet, double crochet or just about any other crochet stitch or pattern. Knowing this allows you to make a beanie based on your own personal tension, hook size, and head size. Cool, right?

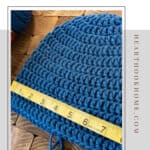
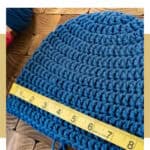
When you crochet beanies from the top down and you stop increasing, that doesn’t necessarily mean that the hat won’t continue to widen for a few rows. It will take several rows after stopping the increases before it begins to really straighten out on the sides. So, we have a handy dandy chart that tells you when to stop increasing so you don’t end up with a fruit bowl or worse: a lamp shade.

How to Size Crochet Hats + Master Beanie PatternIf you are making for a toddler, you will want to stop increasing when the width of the hat reaches about 6”. Use the guide above as a general rule of thumb. Check the width of your beanie after every round. When you get the crown of the hat about as wide as suggested, simply stop increasing. If you stop increasing at 6″ and have 50 sts in that round, you would continue making 50 st rows until you reach the desired length. In this case about 6″.

How to crochet the perfect beanie

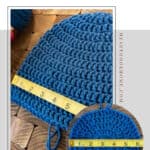
For this basic beanie, we are going to start with a magic circle, then double crochet 10 times into the circle. With each row we’ll add 10 more stitches so that row 2 has 20 stitches, row 3 has 30 stitches and following that line, row 7 would have 70 stitches. You dig?

Row 1 = 10 sts
Row 2 = 20 sts
Row 3 = 30 sts
Row 4 = 40 sts
Row 5 = 50 sts
Row 6 = 60 sts
Row 7 = 70 sts
…etc until width is reached.

master beanie pattern

Wanna save this for later?

We'll email this post to you, so you can come back to it when you're ready.

New to reading crochet patterns? You’ll want to read this article before you get started. Remember to check your width after each row, and when desired crown size is reached, simply continue crocheting the same number of stitches in each row until you reach desired length. For example, I know that my head is as wide as 70 sts. Once I finish row 7 I’ll continue each row with 70 stitches until the hat is about 8″ tall. Fasten off and weave in ends.

Blue example of the Master Beanie crochet pattern with a yellow measuring tape.

Master Beanie Pattern for increasing:

Row 1: Magic Circle, 10 dc in circle. Join to top of first dc with sl st. (10)
Row 2: Ch-2, 2dc in each st around. Join to top of first dc with sl st. (20)
Row 3: Ch-2 *dc in next st, 2dc in next* repeat around. Join to top of first dc with sl st. (30)
Row 4: Ch-2 *dc in next 2 sts, 2dc in next* repeat around. Join to top of first dc with sl st. (40)
Row 5: Ch-2 *dc in next 3 sts, 2dc in next* repeat around. Join to top of first dc with sl st. (50)
Row 6: Ch-2 *dc in next 4 sts, 2dc in next* repeat around. Join to top of first dc with sl st. (60)
Row 7: Ch-2 *dc in next 5 sts, 2dc in next* repeat around. Join to top of first dc with sl st. (70)

Blue example of the Master Beanie crochet pattern with a yellow measuring tape.

Need more help? There are thousands and thousands of hookers (including myself!) that would be happy to help in the Heart Hook Home Crochet Community group on Facebook. Join us!


More crochet tips and tricks:

Easy Peasy 30-Minute Beanie Crochet Pattern
How to Crochet a Corner to Corner (C2C) Throw + Video Tutorial
Yarn Hacks Every Crocheter and Knitter Needs to Know
Why You Need an Emergency Crochet Kit + How to Make One
How to Make a Magic Circle for Crocheting in the Round
Use Industrial Clips for Yarn Bobbins in Crochet and Knitting


Similar Posts

Leave a Reply

Your email address will not be published. Required fields are marked *

This site uses Akismet to reduce spam. Learn how your comment data is processed.

230 Comments

  1. I have noticed you don't monetize your page, don't waste your traffic, you can earn additional bucks every month because you've got hi quality content. If you want to know how to make extra bucks, search for: Mrdalekjd methods for $$$
  2. Do the "chain 2"s at the beginning of each round count as the first DC in that first stitch, or do I still put 2 DC in the first stitch next to the beginning chain 2 ? Thank you! :)
      1. So what am I doing wrong if I stop increasing a toddler hat at 6inches and my hat turns out to be almost 24 inches around? I used a #4 weight with a g hook and did 2 rows of dc and one row of sc. I don’t understand what I am doing wrong?
        1. Are you joining into that chain 2 or skipping it and joining into the first regular DC? If you’re joining into the chain 2,you’re adding a stitch each round I believe. What you want to do is skip it and join into the first DC. That little chain 2 that you skipped, is helping to fill in the gap caused by the join, therefore making the seam less noticeable.
          1. Hi Andrea, maybe I'm blind, however I didn't see you mention that in your pattern, that's important to know! Hi Paige, you explained that very well, Thank you! I was wondering about that! It's much clearer now to me, Thanks!
          2. Hi Ashlea, Sorry I typed the wrong name (Andrea)! I don't see a way to edit my comment. Thank you so much sharing your pattern! I really appreciate it. Laurie, that's a great question, I was wondering the same thing. Most people do count it as the first DC, I was too. Thanks for answering Laurie's question, Ashlea and Paige, it helps me to understand the instructions a lot better.
          3. You’re very welcome Jane. This idea was so confusing to me as well when I first heard of it, and I was fortunate to have a friend help. I wanted to explain further, the way I have been doing it and using this pattern above. When making the original 10 DC into the magic ring, don’t chain. Just slip stitch to join into the ring, and then make 10DC. Second row, we’re to put 2DC into each of those ten DCs. So, join to that first DC, and make a chain 2over it. Then into that very same DC stitch, make your increase (2 DC). Then go around each of the remaining 9. Then to join, just skip that chain 2 as if it’s just attached to the dc next to it (or pretend it’s not there). Join into that first DC and make another chain 2. This row calls for only 1 DC into the first stitch, and 2 in the second, all the way around. That first DC goes into the same first dc you joined into. Same stitch. I hope that makes sense! I love it because I always struggle when I join, trying to join into the chain. It’s great skipping it as it’s easier to join into a real stitch.
          4. Actually if you do want to chain into the magic ring, you certainly can, but it’s not a stitch, so you need to make 10 actual DCs a season well. Then when you come around, skip the chain and join to the first DC. I just don’t bother with it in that first row as I’m not really sure what the real” rules are!
  3. By about the third round of increasing dcs it starts to look like a frilly doilly with what seems like too many stitches and I can't work out what I'm doing wrong :0
  4. HI Thank you for chart! I'm following a beanie hat pattern with shells and when I'm finished crocheting the crown part following the pattern my circle isn't 5 inches it's only 4.5 and I'm already using a K hook! This pattern is for 3 to 6 month baby. What can I do to make it come out the right size? Thank you Debbie
  5. Hi, Really wanted measurements for different ages so l could make different pattern beanies, I'm a beginner but seem to be doing ok l dont know if that is because I've knitted most of my life. Now 62 empty nester and ready to take on the challenge. I'm really disappointed there's not more video tutorial for tops as I'd really love to make myself something in all the years of knitting l never managed to make myself anything. l dont want a double or treble top I'd like a little bit pattern in this. Any Suggestions?
  6. I've started this pattern three different times, and each time I get to the point of increasing leangth and not width, it just keeps becoming a bigger circle, as if it's a pot holder and not a hat. What am I doing wrong?
    1. Hi Katie! I think you might be stopping the increasing too late. What size are you making, and what are the measurements when you stop increasing?
  7. Thank you - the mystery for beanie making has now been removed. Eveyrone in the family has one that fits - yaaay! (and I have two)
    1. Thank you for this pattern. I crochet for 40 years but never crochet a beanie. I am struggling to get my beanie right. I don' t join in the slip st but the 1 st and still my beanie looks like a doilie. Can you please tell me what I do wrong. I stop increasing at 60 sts but still it lies flat at 5 rows further. Any help will be appreciated.
  8. I love your hat sizing chart and use it with all sorts of patterns to make sure my beanies are the right size! Would you mind if I put the image of your sizing chart on my blog? I have written up my own teddy bear beanie pattern but since I refer to your sizing chart when I create a pattern, I would love to show it to my viewers. I will definitely be putting the link to this post on the blog so that people will come here and use your great advice :)
  9. I love this! Thanks for breaking down the basic beanie principles. Who has time to crochet swatches to figure out if your yarn and crochet style will match the pattern size.
  10. Very cute hat! I have one question though. Are you counting the chain as a stitch? Usually a pattern say to count the first chain 2 or 3 as the first double crochet in the row. This pattern doesn't seem to work out that way for me. Thanks! And happy hooking!
  11. Hi Ashlea again, Was wondering if you may be aware of the ECA program. I am ECA - E-Commerce Associate at TripleClicks.com and have started my own Global Online Store. Below is the link, it maybe of interest to you.
  12. Hi Ashlea, At Last!!! I have been searching in Pinterest for hours and days for someone to have the basics to all sizes of the BEANIE. As I have lots leftovers of yarns I am hoping to get a start to do Beanies for the Breast Cancer Ladies at a local Health Centre - Tennyson Centre, in South Australia. Thank you again for sharing!! Regards, MYO Crafts
  13. Thanks for all the tips above. Hats are my fave to make. I find that most every pattern seem to be worked a few times to get the right size bc we all have different tendions, which can cause problems with dozing. The chart is really going to help me !
  14. Every time I add another row, it increases the crown width by 1inch. (So row 3 is 3.5in, row 4 is 4.5in, row 5 is 5.5 in, etc). How do I make a toddler size with only 6in in crown width? If I add another row the crown width will go from 5.5in to 6.5in.
  15. This is so helpful. I have to wear a hat after a rather botched scalp biopsy and like to make a basic beanie , add on several inches and fold back , then pin a stunning brooch on the top of the folded back band. Sizing has always been so problematical but now I have all I need to know for a perfect result. Thank you so much.
  16. Jhi? I have been crocheting for years but I can't get this beanie to work. I'm up to 70 stitches but it looks more like a doily than a hat. It's round and flat. What am I doing wrong. Thanks for your help
    1. Hi Ronnie, Are you starting to decrease when you get to 70 sts? It should start tapering down after a few rows. If not, let me know.
  17. I just love how clear and fun your instructions are. I have read A LOT of crocheting blogs and I found yours by going down the rabbit hole if clicking an associated link. So glad I did. I am inspired and tickled by your experience and enthusiasm. Looking forward to more postings and emails.
  18. thank you so much ! this is what I was looking for long time,because I can't be without making a new beanie any size... thanks from good old Europe, Ernestine
  19. Great advice...I am looking to knit a Toddler size messy/bun hat with #5 yarn. Could I use this same technique? Instead of magic circle, I would chain 10 and do 10 hdc in the ring to make the hole for the bun or ponytail, then continue to increase following the instructions for the right age. What do you think?
  20. Patricia, it's good to know I'm not the only crocheter with not a single hat I'd be proud to wear in public. It's embarrassing. I'm hoping my hat humiliation is over now, and I won't have to blame my "homemade" hat on a random friend! Lol
  21. They say the hook size determines the hat size. I'm new at this do don't know. Please advise hook size for a child size hat 6.5. Thank you Alma
    1. Hook size will determine the size of the stitch. A smaller hook will mean more rows to reach desired measurements while a larger hook will take fewer rows. A smaller hook will give a tighter look while a larger hook will give a more open look. Hope this helps.
      1. It is not based on the hook size but the measurement of the hat. so as long as your product reaches the measurements of the chart you will achieve the right fit of the hat.
    1. I need help please. My beanie is 6 inches I stop increasing at 60 sts. Now my beanie height is 4 inches and it looks like a salad bowl. I need the beanie height to be 6.5 inches but the way it looks now it will fit my own head. Please any help will be appreciated. Never done a beanie before.
  22. This is just for what I have been looking. It will be invaluable and eliminate poorly fitting beanies. Thank you!
  23. This is a really great tutorial and one I will refer to when I try to make hats again - they usually turn out lopsided and either too big or too small. To this day I still don't have a crochet hat that I can proudly wear outside the house :P Thanks for sharing!
  24. Thank you so much for all your help in crochet stitches etc. you have made it so easy for me to do more projects that I couldn't do before and love making new things for my family and friends!
    1. I get 30 sts on row 3, but end up with 44 sts on row 4, if I repeat all the way around. Are we supposed to stop increasing at a certain point to get a total of 40? And 50, etc? Have been crocheting for 50 years, so I'm not new at reading patterns, but following this pattern simply does not come out as stated. What am I doing wrong? Will appreciate advice!
    2. I'm so sorry! Just realized what mistake I was making! Thank you for posting the size/measurement chart. It will be most helpful as I crochet hats for chemo patients and the homeless.