
The Frankie Cowl: Cowled Triangle Shawl
This post may contain affiliate links, meaning that I may earn a small commission if you make a purchase. See our disclosure policy for more information.


It’s a shawl, it’s a cowl, it’s a fabulous fall accessory for all! The Frankie is a free crochet pattern for a cowled triangle shawl, is so much fun to crochet, and adds just the right amount of warmth on a cold winter day. Let’s make a Frankie Cowl together!
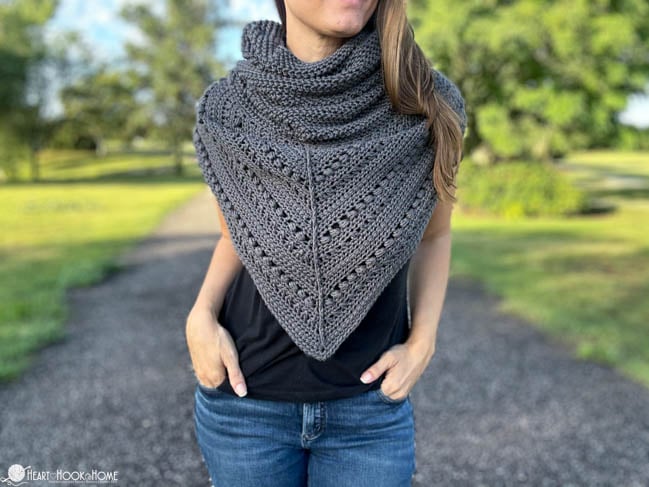
The Frankie Cowl

This super chic, super fun cowled triangle scarf pattern is a mash-up of two of my other accessory crochet patterns, Mae’s Shawl and the Herringstone Cowl. These two patterns have been combined into this fabulous fall accessory. A true “Frankenstein” of sorts, so we’re naming her the Frankie!


This cowled triangle scarf pattern is great for when you just need a bit of something to layer on for extra warmth. The cowl portion of the Frankie is also tall enough to use as a head covering if needed. You could even add a drawstring to the top section of the cowl for added warmth!

You could, of course, make this cowled shawl with a solid colored yarn, perhaps something neutral that could pair with all of your favorite sweaters or jackets. I love it!
Grab the ad-free, printable PDF for this pattern on Ravelry, Etsy, or right here in the Heart Hook Home blog shop!

Materials:
DK/#3 weight yarn- approximately 970 yds
–Lion Brand Mandala Bonus Bundle used in “Yeti” colorway
Crochet hook in size J/6mm
Gauge:
After row 6 triangle should measure approximately 7” wide across the top and 4” down center.
Difficulty:
This pattern is not particularly difficult to crochet, but it does require counting and knowledge of all basic (and some advanced) crochet stitches. Links to necessary stitch tutorials are included below.
If you need help reading a crochet pattern, make sure you head over here and check out this detailed post.

Pattern Notes/Special Stitches:
Bead = Bead Stitch (tutorial here)
Ldc = Linked Double Crochet (tutorial here)
Crossed Double Crochet (tutorial here)
Hdc = Half Double Crochet (tutorial here)
Hhdc = Herringbone Half Double Crochet (tutorial here)
DcIncUp = Increase at top point. 2Dc in next st, Fpdtr around center st 2 rows down, 2dc in same st as first dc. See clear, step-by-step photos for this particular stitch in Mae’s Chevron pattern. The tutorial photos will differ slightly as they have only 1 dc before and after fpdtr and here we are doing 2 dc before and after fpdtr.
I find it extremely helpful to mark the center-most stitch of each row of the triangle shawl portion with a stitch marker.
Beginning Ch-3 DOES count as a stitch…Ch-1 DOES NOT count as a stitch.
Even numbered rows are “right side”.

Wanna save this for later?
Now that we’ve got our yarn and hook ready, let’s begin!
Triangle Shawl Pattern:
Row 1: Magic Circle, 7hdc in circle. (7)
Row 2: Ch-3, (counts as dc) turn, Dc in first st. Ldc in next 2 sts, 5dc in next st. Ldc in next 2 sts, 2dc in last st. (13)
Row 3: Ch-1, (does not count as st) turn, 2hdc in first st, hdc in each st to center st, 5hdc in next. Hdc in each st to end, 2hdc in last. (19)
Row 4: Ch-3 (counts as dc), turn, dc in first st. * Bead, sk st * repeat between * * to center st. DcIncUp (see pattern notes). Repeat between * * down other side. 2dc in last st. (25)
Row 5: repeat row 3 (31)
Row 6: Ch-3, turn, dc in first st. * (sk next st, dc in next, dc in skipped st) * repeat between * * to center st. DcIncUp. Repeat between * * down other side. 2dc in last st. (37)
Row 7: repeat row 3 (43)
Row 8: Ch-3, (counts as dc) turn, dc in first st. Ldc to center st. DcIncUp. Ldc down other side. 2dc in last st. (49)
Rows 9 – 26: Repeat rows 3 – 8 three more times
Rows 27 – 30: Repeat rows 3 – 6
*Shawl should measure approximately 36” wide and 21” tall. If not, continue adding rows until it does.*
Row 31: Ch-1 and turn, 2 hdc in first st, hdc in each st to center st, 3 hdc in next. Hdc in each st to end, 2hdc in last.
Do not fasten off.

We will now work along the top side of the shawl to create a base for the hooded cowl. Where still attached, Ch-1 and sc 126 times evenly across the top of the shawl (2 sc per row end and 2 sc in center)

Hooded Cowl Pattern:
Work in a continuous spiral with no joining or turning (if desired, use a stitch marker to denote the first stitch of each row).
Round 1: Hhdc in first sc and in each st around. (126)
Rounds 2 – 47: Hhdc in each st around. (126)
*Cowl should measure approximately 17” tall…if not continue adding rows*
Finishing up: sl st in next 3 sts. Fasten off and weave in all ends.
I hope you enjoyed crocheting this cowled shawl and that you love wearing it even more! Please share a photo with me by tagging @HeartHookHome on all social media and in the Heart Hook Home Crochet Community on Facebook.
More free accessory crochet patterns:
The Easiest Crochet Cowl: Free Crochet Pattern
The Herringstone Cowl: Free Cowl Crochet Pattern
Mae’s Shawl: Free Triangle Shawl Crochet Pattern
Scrumptious Scoodie: Hooded Scarf Free Crochet Pattern


I love it, just finished one for a Xmas gift! ☺️ thanks
Yayyy! I am so glad you enjoyed the pattern!
Do the paid versions include the stitch count to each center stitch in each row?
No, but each row increases by 6 sts, so 3 sts per side.
Hi Ashlea. I’d love to make one or two of the Frankie’s. Is there a way to make the front shorter…like a bandana length? At first glance, seems like you need the length in front to get the width needed at the neckline, but I’m no designer, by a long shot, so I need your expertise.
Thanks. I’ve been following you for years!!
Hi Carol! If you remove 2 sts from the increase point, that should shorten that V up a bit. So, where it says to put 5 sts in that center point stitch, you would do 3 sts…and when doing the DcIncUp it would be “Dc in next st, Fpdtr around center st 2 rows down, dc in same st as first dc”.
I believe there is an error in this pattern on the triangle shawl part- I followed the “chain 3, DC in first stitch” to start each non-HDC row, but in the end the shawl was bell shaped instead of a triangle, and I had to frog it all. I’m redoing with an additional stitch to start the row (ie chain 3, 2 DC in first stitch) and the shape is coming out right.
The model here looks pretty petite and I want mine to fit like it does on her. I am plus size. Should I just add extra rows? Thank you. Its a beautiful pattern.
Love this idea but I’m a plus sized woman. What would you do to make this bigger? Weight 4 yarn and go up a hook size or two?
@ Heather, one way to make this for yourself you can measure from shoulder to shoulder times that by two and add two inches, and then measure from the bottom of your neck (front) to the bottom of your thigh. Another option is to keep adding rows until you get to your desired size.
I love your patterns! I love your videos even more. Will this pattern have a video ?
Hi I was wondering if you were going to do a video.
I hope you can do a video tutorial for this project.
I am excited to try this pattern. My sister did it and it is beautiful. Thank you for sharing.
I hope you love it!
Hello. This is a beautiful pattern and I’m excited to start. Thank you for sharing! I’m a little hung up on the second row already, though. My switch count is 11, not 13. The LDC is only one stitch it states, but if I did two to match the stitch count I won’t have enough stitches to work with. Is the MR supposed to be 9 HDC instead of 7 to start?