Use Industrial Clips for Yarn Bobbins in Crochet and Knitting
This post may contain affiliate links, meaning that I may earn a small commission if you make a purchase. See our disclosure policy for more information.


This weekend I went to visit my sister in Illinois. We spent the entire weekend with friends crocheting/knitting, eating good food, drinking a few drinks, crocheting some more, grilling out, and then crocheting a little more. It was glorious. I don’t think I touched my computer for three entire days. It felt scandalous.
Us group of ladies has a combined nearly thirty years of yarn needlework experience between us. As I was finishing up my son’s Power Rangers blanket, they mentioned that my bobbins were a really neat idea. These old things? I thought these were common knowledge; these bobbins of mine.
Bobbins are quite handy tools when working with yarn. Most notably when you are changing colors often, as in the Power Rangers graphgan blanket I am finishing for my son. At some points I had TWELVE different strands of yarn coming off of my project simultaneously.
*waves fist in air cursing the Crochet Gods*
As you can imagine, that many strands of yarn involves much aggravation and confusion (which naturally paves the way to a few curse words) and then there are the tangled yarn ends to sort and weave in… Ugh.
Enter the life-altering bobbins!
Whether you are crocheting or knitting, these bobbins will change your life. Okay, maybe that’s a little dramatic but then again, you just never know.

Using Industrial Clips for Yarn Bobbins in Crochet and Knitting
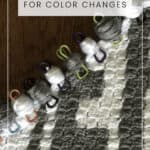
I personally use industrial steel coated safety clips like these instead of actual “yarn bobbins“. These are the perfect size and you get FIFTY of them at a fraction of the cost AND these clip onto your project instead of just hanging there! #winning

By looking a few rows ahead on your pattern, you will be able to approximate how much yarn you’ll need to wind around each bobbin as you work. On my Power Rangers blanket, I used the C2C (corner to corner) method which means that I am creating a series of blocks stacked together to make a design or spell a word. I know that each block takes approximately 20” of yarn, so I can guesstimate how much to wrap around my bobbin as I go along.

Wanna save this for later?
Three blocks of that color coming next? Wind just a bit. Looking at a whole bunch of blocks coming up in that particular color? Wrap that bobbin to maximum capacity!

Wrap it up!
In my experience the yarn stays put the best when I start by winding perpendicular to the bobbin a few times, then turning slightly to one side (45° angle) and wrap several times, then turn the opposite (45° angle) direction to continue winding. You’ll be surprised how much yarn you can fit on one single bobbin!

While working the Power Rangers blanket I was able to fit enough yarn on one bobbin to crochet the next 25 squares. TWENTY-FIVE squares!
Awesome!
These bobbins help to keep yarn ends from tangling, allowing you to turn your work without the dreaded turning of ALL of your yarn. How much faster you’ll be! If you normally pull just a bit out and let it float around before using it, this will quite possibly revolutionize the way you crochet or knit.
It’s a yarn revolution y’all!
Do you have another yarn hack I need to know about? Let me know in the comments and I’ll get it tested and posted!
See more crochet and yarn tips and tricks:
How to Weave in Yarn Ends {So They Don’t Come Out}
Crochet Tip: How to Create a Straight {Invisible} Seam When Crocheting in the Round
How to Crochet a Classic Granny Square
Finger Burn? You Need a Finger Cuff for Crochet
9 Tips for Traveling with Crochet
The Difference Between Knitting and Crocheting & Master Your Tension


51 Comments