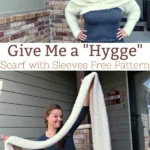
Give Me a Hygge: Scarf with Sleeves Free Crochet Pattern
This post may contain affiliate links, meaning that I may earn a small commission if you make a purchase. See our disclosure policy for more information.

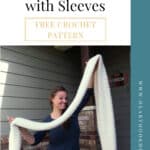

If there’s one thing I love in the fall it’s chunky scarves. I love big, warm scarves because I love to feel all wrapped up and cozy. This new crochet pattern for a Scarf with Sleeves using Red Heart’s Hygge yarn is simply perfection.


Hygge Scarf with Sleeves
This scarf is long. It is wide. It is plush, and cozy, and warm. THIS SCARF HAS SLEEVES!! It is also my new favorite piece of clothing. ♥ I decided to name it the “Give Me a Hygge” scarf because of the way you pronounce the yarn: Hoo-gah. Give me a HOO-GAH!
 yarn")
Do you watch the weekly LIVE videos on the Heart Hook Home Facebook page? If you don’t, you should watch the video where I modeled – or tried to model! LOL! – this new pattern last week. It. Was. Hilarious.

I promise that by this week’s live video time (always at 7:00 pm CST and always on Thursdays), I will have mastered the art of wearing this beautiful scarf. To wear this scarf you can wrap it around the back of your body OR the front, then insert your arms into the sleeves and settle the scarf into place around your shoulders. Play around with how you want to wear it.
This pattern uses the Lemon Peel stitch, a remarkably mindless and repetitive stitch that works up super quickly with this bulky weight yarn. I love the bulky size of this Red Heart Hygge yarn, the texture is to die for, and the feel of the fabric when worked up? FABULOUS!!

I asked my Mom to model the scarf after my step-sister’s baby shower this weekend, and she is just as beautiful as ever! ♥ Thank you, Mom!


Materials:
Red Heart Hygge Yarn (Pearl colorway shown)
-approx. 840 yards for “one size”
-approx. 1350 yards for “plus size”
Crochet hook in size K/6.5mm
Yarn Needle
Pattern Notes:
Pattern written in US terms.
If you need help reading a crochet pattern, make sure you head over here and check out this detailed post.
Place first st of each row in same as turning.
The Plus Size of the pattern has been added below!
Finished Dimensions:
approx. 98” x 20” for “one size”
approx. 112″ x 21″ for “plus size”
Gauge:
10 Lemon Peel sts x 8 rows = 4” square
Get the ad-free printable version of this pattern on Ravelry or Etsy. Thank you!
Hygge One Size Pattern:
Row 1: Ch-37, sc in 2nd ch from hook. * dc in next ch, sc in next ch * repeat across, dc in last ch. (36)
Rows 2 – 12: Ch-1, turn, * sc in next, dc in next * to end. (36)
Row 13: Ch-2, turn, (dc, sc) in first * dc in next, sc in next * repeat across, (dc, sc) in last. (38)
Rows 14 – 16: Ch-2, turn, * dc in next, sc in next * repeat to end. (38)
Row 17: Ch-1, turn, (sc, dc) in first * sc in next, dc in next * repeat across, (sc, dc) in last. (40)
Rows 18 – 20: Ch-1, turn, * sc in first, dc in next * repeat to end. (40)
Row 21: repeat row 13 (42)
Rows 22 – 24: Ch-2, turn, * dc in first, sc in next * repeat to end. (42)
Row 25: repeat row 17 (44)
Rows 26 – 28: Ch-1, turn, * sc in first, dc in next * repeat to end. (44)
Row 29: repeat row 13 (46)
Rows 30 – 126: Ch-2, turn, * dc in next, sc in next * repeat to end. (46)
*if on gauge, it should measure ~63” here
Row 127: Ch-1, turn, sc2tog. * dc in next, sc in next * repeat across, dc2tog in last 2 sts. (44)
Rows 128 – 130: repeat row 26 (44)
Row 131: ch-2, turn, dc2tog. * sc in next, dc in next * repeat across, sc2tog in last 2 sts. (42)
Row 132- 134: repeat row 30 (42)
Row 135: repeat row 127 (40)
Rows 136 – 138: repeat row 26 (40)
Row 139: repeat row 131 (38)
Rows 140 – 142: repeat row 30 (38)
Row 143: repeat row 127 (36)
Row 144 – 155: repeat row 26 (36)
Cuffs:
Lay out scarf. On each end, fold to create sleeve and overlap by 10 stitches. Hold the place with stitch markers and count your stitches. You should have 26 sts total around the opening, 10 of which you will be working through both sides of the fabric. The width should be about 5.5” – 6” across at row one of the cuff. Insert your hook through both sides of the fabric where overlapped to start. (see photo)

Row 1: Sc in same st and across those 10 overlapped sts. Sc around entire opening. Join to top of first sc with sl st. (26)
Row 2: ch-1, turn, sc in each st around. Join to top of first sc w/ sl st. (26)
Row 3: Ch-1, turn, sc2tog, sc in each st around. Join to top of first sc w/ sl st. (25)
Rows 4 – 10: repeat row 2 (25)
Wanna save this for later?
Row 11: Ch-1, turn, sc in all but last 2 sts, sc2tog. Join to top of first sc w/sl st.(24)
Row 12 – 14: repeat row 2 (24)
Row 15: repeat row 3 (23)
Row 16 – 18: repeat row 2 (23)
Row 19: repeat row 11 (22)
Row 20 – 27: repeat row 2 (22)
Complete the sleeve (One Size):
Lay out the sleeve (one at a time) so that the fabric naturally gets wider, like a sleeve would. Measure up from the first row of the cuff until you reach 10″ high. You want the width at the “top” of the sleeve to be about 7” across. Use a stitch marker to mark the place where the pieces intersect and to keep two pieces from separating as you sew.

Using your remaining yarn, sew from the cuff up those 10” on the sleeve. Flip the sleeve inside out and sew that inside flap closed as well. Weave in all ends. Do the same to the other side.
Hygge Plus Size Pattern:
Row 1: Ch-43, sc in 2nd ch from hook. * dc in next ch, sc in next ch * repeat across, dc in last ch. (42)
Rows 2 – 12: Ch-1, turn, * sc in next, dc in next * to end. (42)
Row 13: Ch-2, turn, (dc, sc) in first * dc in next, sc in next * repeat across, (dc, sc) in last. (44)
Rows 14 – 16: Ch-2, turn, * dc in next, sc in next * repeat to end. (44)
Row 17: Ch-1, turn, (sc, dc) in first * sc in next, dc in next * repeat across, (sc, dc) in last. (46)
Rows 18 – 20: Ch-1, turn, * sc in first, dc in next * repeat to end. (46)
Row 21: repeat row 13 (48)
Rows 22 – 24: Ch-2, turn, * dc in first, sc in next * repeat to end. (48)
Row 25: repeat row 17 (50)
Rows 26 – 28: Ch-1, turn, * sc in first, dc in next * repeat to end. (50)
Row 29: repeat row 13 (52)
Rows 30 – 158: Ch-2, turn, * dc in next, sc in next * repeat to end. (52)
*if on gauge, it should measure ~79” here
Row 159: Ch-1, turn, sc2tog. * dc in next, sc in next * repeat across, dc2tog in last 2 sts. (50)
Rows 160 – 162: repeat row 26 (50)
Row 163: ch-2, turn, dc2tog. * sc in next, dc in next * repeat across, sc2tog in last 2 sts. (48)
Row 164 – 166: repeat row 30 (48)
Row 167: repeat row 159 (46)
Rows 168 – 170: repeat row 26 (46)
Row 171: repeat row 163 (44)
Rows 172 – 174: repeat row 30 (44)
Row 175: repeat row 159 (42)
Row 176 – 187: repeat row 26 (42)
Cuffs:
Lay out scarf. On each end, fold to create sleeve and overlap by 10 stitches. Hold the place with stitch markers and count your stitches. You should have 32 sts total around the opening, 10 of which you will be working through both sides of the fabric. The width should be about 6.5” – 7” across at row one of the cuff. Insert your hook through both sides of the fabric where overlapped to start. (see photo)
Row 1: Sc in same st and across those 10 overlapped sts. Sc around entire opening. Join to top of first sc with sl st. (32)
Row 2: ch-1, turn, sc in each st around. Join to top of first sc w/ sl st. (32)
Row 3: Ch-1, turn, sc2tog, sc in each st around. Join to top of first sc w/ sl st. (31)
Rows 4 – 10: repeat row 2 (31)
Row 11: Ch-1, turn, sc in all but last 2 sts, sc2tog. Join to top of first sc w/sl st.(30)
Row 12 – 14: repeat row 2 (30)
Row 15: repeat row 3 (29)
Row 16 – 18: repeat row 2 (29)
Row 19: repeat row 11 (28)
Row 20 – 27: repeat row 2 (28)
Complete the sleeve (Plus Size):
Lay out the sleeve (one at a time) so that the fabric naturally gets wider, like a sleeve would. Measure up from the first row of the cuff until you reach 10″ high. You want the width at the “top” of the sleeve to be about 9” across. Use a stitch marker to mark the place where the pieces intersect and to keep two pieces from separating as you sew.
Finishing touch (both sizes):
Attach yarn in the corner of the sleeve opening (where the underarm will be) and sc in each row end allll the way to the other end, then up the other side. Join to first sc and weave in all ends.

That is it! Isn’t this easier than it looks?! Now all we need to do is to practice wearing it! Ha! I hope you love this pattern!
Get the ad-free printable version of this pattern on Ravelry or Etsy. Thank you!
More free patterns:
Texting Gloves Free Crochet Pattern (child, adult small, adult large)
Life’s a Beach Bag: Free Beach Bag Crochet Pattern
Chunky Housecoat Free Crochet Pattern
Straight Up EASY Vertical Stripes Sweater Free Crochet Pattern
Four-Hour Fall Sweater Free Crochet Pattern


72 Comments