Life’s a Beach Bag: Free Beach Bag Crochet Pattern
This post may contain affiliate links, meaning that I may earn a small commission if you make a purchase. See our disclosure policy for more information.
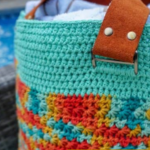


I’ve been having nightmares dreams about designing a beach bag crochet pattern. For weeks now I have crocheted, frogged, crocheted some more, started again, abandoned, and then returned to the hook to crochet yet another draft of a beach bag. I must say that I think I hit beach bag crochet pattern gold with this beauty: the Life’s a Beach Bag crochet pattern!

Life’s a Beach Bag
This beach bag features super chic leather straps secured with rivets. If you aren’t interested in leather straps, I have also included instructions to crochet the strap and add the bag. Seriously, I couldn’t pick my favorite photos for this post, so I included a bunch! Needless to say, I. LOVE. It!!!


Materials:
Cotton yarn in two contrasting colors
-approx 750 yards total (about 500 in variegated, 240 in solid)
*Crafter’s Secret cotton in Desert Gold and Ocean used
Crochet hook in size G/4mm
Crochet hook in size H/5mm
Stitch markers

If adding leather straps:
Leather strip 1-½” wide, 42” long for medium, 60” for large
*I found these much cheaper in-store – or use an old, long belt!
Dual Rivet set (like this)
(4) 1-½” Buckles (like this )
*again, much cheaper in-store

If adding crocheted straps:
You will need additional yarn in solid color.
Notes:
For the bottom and top of the bag we are working in spirals, NOT joining at the end of each row.
For the body of the bag we are joining and turning to create the star stitch.
Pattern written using US terms.
Get the ad-free printable PDF on Ravelry here. Thank you!
If you need help reading a crochet pattern, make sure you head over here and check out this detailed post.
See the VIDEO tutorial below!

Finished Dimensions:
18” wide and 16” tall.
Pattern:
Starting with the G/4mm hook and solid color
Row 1: Ch-54. 3hdc in 2nd ch from hook. hdc in each to end. 6hdc in last. Working up opposite side of chain, hdc in each st to end, 3hdc in beg st. (114) Work in spiral using stitch markers to mark first st of row.
Row 2: 2hdc in next 3 sts, hdc in next 51 sts, 2hdc in next 6 sts, hdc in next 51 sts, 2hdc in each of last 3 sts. (126)
Row 3: 2hdc in next 6 sts, hdc in next 51 sts. 2hdc in next 12 sts, hdc in next 51 sts, 2hdc in each of last 6 sts. (150)

Row 4 – 10: hdc in each st around. (150) do not turn


With contrasting color AND the H/5mm hook join to top of first hdc. See photos for clarification.
Row 11: Ch-3, pull up a loop in 2nd, front loop of 3rd, back loop of 3rd, first actual st and next st. (see 1st photo below, 6 loops on hook). Yarn over, pull through all loops. Ch-1. * Pull up a loop in center of last star st, side of last star st, bottom of star st (same as last loop of the previous star), in next st and next st. (6 loops on hook). Yarn over, pull through all loops. Ch-1. * Repeat between * * around. (see photo of last star st below) Sc in same as last st. Join to top of first star st. (75 star sts)

Pull up a loop in each of these FIVE places so that you have a total of SIX loops on your hook.

Wanna save this for later?


Row 12: ch-1, turn, 2 hdc in center of each star st. Join to top of first hdc with sl st. (150)


Row 13: Ch-3, turn, pull up a loop in 2nd, front loop of 3rd, back loop of 3rd, first actual st and next st. (6 loops on hook). Yarn over, pull through all loops. Ch-1. * Pull up a loop in center of last star st, side of last star st, bottom of star st (same as last loop of the previous star), in next st and next st. (6 loops on hook). Yarn over, pull through all loops. Ch-1. * Repeat between * * around. Sc in same as last st. Join to top of first star st. (75 Star sts)
Repeat rows 12 & 13 twelve times.
Repeat row 12. (14 complete rows of star stitches)
Top of bag:
With base color AND the G/4mm hook
Row 1: Ch-1, turn. Hdc in each st around. Do not join. Work in spiral using stitch markers to mark first st of row.
Rows 2 – 3: hdc in each st around.
If using leather straps:
Lay bag flat and position stitch markers where the buckles will go. Each buckle will be crocheted around (the bottom bar) to secure. Each buckle gets 8 sts. Mark them with stitch markers where you would like the buckle to be. I did 30 sts in between each buckle, 8 sts for each buckle, 29 sts from outside of one buckle to outside of next (around side of bag).
For example: 30+30+8+8+8+8+29+29 = 150 sts total

Row 4: Hdc in each st around, going around the bottom bar of the buckle for each of those 8 sts as shown. Continue with bag top. (If adding crocheted straps, crochet this row as a solid hdc row.)


Row 5 – 9: Hdc in each st around.
Row 10: Sc in each st around. Fasten off and weave in ends.
To add leather straps:
See a complete tutorial for Double Cap Rivets here. Cut leather strip in half so that you have two 21” strips (or 30” strips for longer straps). Insert end of leather strap into buckle and, on a hard surface (we used a spare piece of wood on the floor of the garage), create rivet holes with tool. Insert your rivets (long side on the “right” side of the bag, flat side on the “inside” of the bag) and secure with mallet and tool. Be careful not to twist the strap as you secure the other end. Do this to all four buckles. You’re done!

If using crocheted straps:
NOTE! Your strap will be more sturdy and stretch less if you carry and crochet around another strand of yarn.
Row 1: Leaving a long tail for securing strap to bag, ch-101 (or longer if you want longer straps), sc in 2nd ch from hook and in each to end. (100)
Rows 2 – 8: Ch-1, turn, sc in each st to end.
Fasten off leaving long tail for sewing this end to bag.
Position ends perpendicular to bag and several inches down. Using the tail, sew a square making sure to secure end of strap thoroughly. You’re done!
VIDEO Tutorial for Life’s a Beach Bag

I hope you just love your Life’s a Beach Bag! If you like this post, I think you’ll love these:
Cold Shoulder Swimsuit Cover Up Crochet Pattern
Sunday Ballet Slippers Free Crochet Pattern
The Hedonist’s Housecoat: Free Crochet Housecoat Pattern (Medium, One-Size and Plus Size)
Hair Towel with a Twist {FREE Crochet Pattern}
The Bee’s Knees Face Cloth: Small Face Cloth Free Crochet Pattern
Sweet Summertime Lightweight Hooded Vest: Free Crochet Pattern


32 Comments