How to C2C Crochet IN ROUNDS (step-by-step)
This post may contain affiliate links, meaning that I may earn a small commission if you make a purchase. See our disclosure policy for more information.


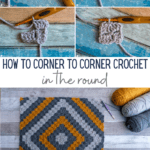
Do you love Corner to Corner Crochet? Perhaps you’ve tried it in the past, didn’t love it, and are ready to give it another go? This method of crocheting C2C in rounds is absolutely game changing. Grab your hook and let’s learn how to Corner to Corner Crochet in Rounds!

Corner to Corner Crochet Worked In Rounds
Everyone from beginner level crochet to expert is sure to love this technique of corner to corner crochet. If you have traditional C2C experience… even better! There are so many reasons I enjoy this method, and I just know that once you give it a try you’ll be addicted too!
Make sure to check out the video tutorial below, and share with your crochet friends if you find it helpful!

In traditional C2C we start in one corner, grow the piece until it is as wide as we like, then we start decreasing to mirror the first half.

This is easy and fun, which is why C2C is loved by so many crocheters around the world, BUT when worked in rounds it is even easier than that! No measuring or math required, and finishing off the square itself is also optional!
Keep reading friend… it’s just getting good! 😉
What I love the most about C2C worked in rounds is that you start at the center (much like a Classic Granny Square) and work your way out, building on to each side of the square in equal parts. Simply keep going until the piece is as large as you like, or until you run out of yarn.
This technique works wonderfully for baby blankets. Start at the center, work your way out until the square measures about 36″, then add a border – or don’t! I kind of like the way it looks without finishing off the square. The uneven edges lend a border-like appearance, which is even more pronounced when crocheted in a contrasting color.
This piece is only about 14″, but isn’t that contrast lovely?

What’s different about regular C2C and C2C worked in rounds?
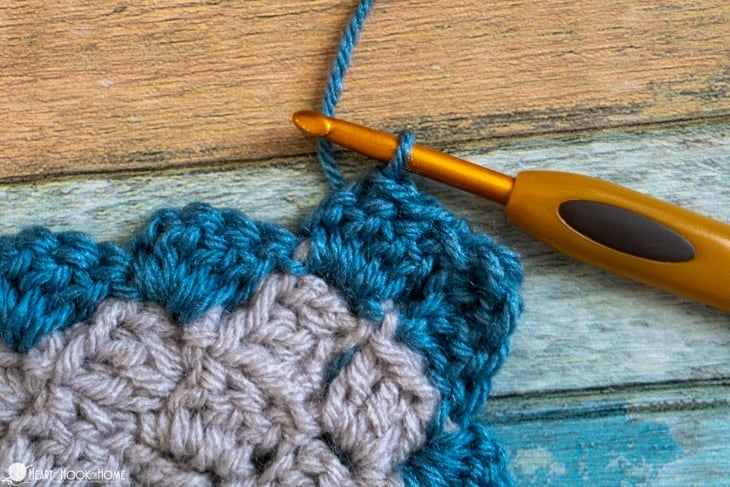
The main difference between traditional corner to corner crochet and C2C in the round is how you start and end each round, and how you rotate the work to continue around the square.
With any kind of C2C crochet you’ll use the chain at the beginning of each block as a base around which to crochet the following row of blocks. See what I mean in the video tutorial below.
Corner to corner crochet worked in rounds is one big square. The beauty of it is that we are essentially making FOUR squares all at once, all connected.
So instead of doing this and seaming for what feels like hours…

We’re doing it all at once, so it looks like this – with NO seaming required! 🌟

Mind = blown!
Why start at the center when crocheting a blanket?
Center-out crocheted blankets are perfect if you are not sure if you have enough yarn to follow a specific pattern, you’re not sure how large you want the piece to be, or if you just want a mindless project to work on while watching TV with the family.
Is C2C crochet difficult?
No! This is one of the first techniques I mastered when I first learned to crochet. This is a great way to practice holding your yarn, your tension, and consistency in your stitches.
Does corner to corner crochet use more yarn?
The short answer is no. C2C is actually thought to use less yarn than other crochet stitches.
How to C2C in Rounds:
Materials:
Any yarn with corresponding hook size
*worsted weight yarn & H/5mm hook pictured
Pattern Notes:
Pattern written using US terms.
If you need help reading a crochet pattern, make sure you head over here and check out this detailed post.
Each round adds four new blocks total, one block per side.
As with traditional Corner to Corner crochet, each regular block/square should be made up of three double crochet stitches.
The final/top block of each side should be 4 sts wide. The 4th double crochet will be used to create the first block of the next square side.
Keep increasing until desired size is reached. See “how to measure” below.
Scroll down to watch the full VIDEO tutorial below, or on YouTube.
Grab the ad-free, printable PDF of this tutorial (including DOZENS of photos) on Etsy or right here in the Heart Hook Home Blog Shop!
Written C2C in Rounds Pattern (no photos):
Round 1: Ch-6, dc in 3rd ch from hook and in each ch to end. * Rotate clockwise. Ch-2, 4dc around 4th dc from last block made * repeat between * * one more time. Rotate clockwise. Ch-2, 3dc around 4th dc from last block made. Join to top of first block made. (4 blocks)
Round 2: Ch-5, turn, dc in 3rd ch from hook and in next 2 chs, * sl st to top of next block, ch-2, 4dc around ch-sp, rotate clockwise, ch-2, 3dc around 4th dc from last block made * repeat between * * two more times. Sl st to beg ch, ch-2, 3dc around ch-sp. Join to top of first block. (8 blocks)
Round 3: Ch-5, turn, dc in 3rd ch from hook and in next 2 chs, * sl st to top of next block, ch-2, 3dc around ch-sp, sl st to top of next block, ch-2, 4dc around ch-sp, Rotate clockwise, ch-2, 3dc around 4th dc from last block made * repeat between * * two more times. Sl st to top of next block, ch-2, 3dc around ch-sp, sl st to top of next block, ch-2, 3dc around final ch-sp. Join to top of first block made. (12 blocks)
Round 4: Ch-5, turn, dc in 3rd ch from hook and in next 2 chs, * sl st to top of next block, [ch-2, 3dc around ch-sp, sl st to top of next block] 2x, ch-2, 4dc around ch-sp, Rotate clockwise, ch-2, 3dc around 4th dc from last block made * repeat between * * two more times. Sl st to top of next block, [ch-2, 3dc around ch-sp, sl st to top of next block] 3x. (16 blocks)
Round 5: Ch-5, turn, dc in 3rd ch from hook and in next 2 chs, * sl st to top of next block, [ch-2, 3dc around ch-sp, sl st to top of next block] 3x, ch-2, 4dc around ch-sp, Rotate clockwise, ch-2, 3dc around 4th dc from last block made * repeat between * * two more times. Sl st to top of next block, [ch-2, 3dc around ch-sp, sl st to top of next block] 4x. (20 blocks)
Round 6: Ch-5, turn, dc in 3rd ch from hook and in next 2 chs, * sl st to top of next block, [ch-2, 3dc around ch-sp, sl st to top of next block] 4x, ch-2, 4dc around ch-sp, Rotate clockwise, ch-2, 3dc around 4th dc from last block made * repeat between * * two more times. Sl st to top of next block, [ch-2, 3dc around ch-sp, sl st to top of next block] 5x. (24 blocks)
Round 7: Ch-5, turn, dc in 3rd ch from hook and in next 2 chs, * sl st to top of next block, [ch-2, 3dc around ch-sp, sl st to top of next block] 5x, ch-2, 4dc around ch-sp, Rotate clockwise, ch-2, 3dc around 4th dc from last block made * repeat between * * two more times. Sl st to top of next block, [ch-2, 3dc around ch-sp, sl st to top of next block] 6x. (28 blocks)
Continue adding rounds until desired size is reached. Each round adds one block per side to the sequence established in the previous two rounds. Each round adds 4 blocks to the block total.
Decreasing (Written Pattern, no photos):
Decreasing Corner-to-Corner Crochet in the round is similar to decreasing traditional C2C. Scroll down to see the step-by-step detailed instructions (with photos).
Row 1: Turn work to the left so the working yarn is in front of the stitches. Skip first st, loosely sl st in next. Sl st in next st. * ch-2, 3dc around ch-sp, join to top of next block * repeat between * * until you run out of blocks.
Repeat row 1, removing one block per row until you have zero blocks remaining.
Detailed Instructions for C2C in the Round:
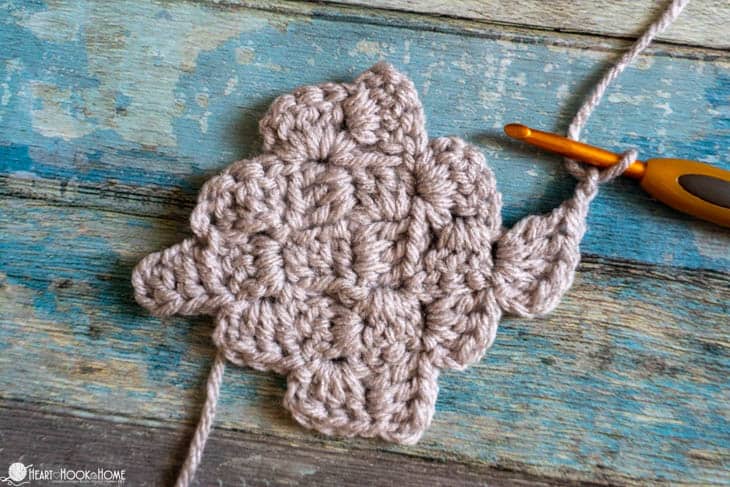
Round 1:
Step 1. Chain-6. Dc in the 3rd ch from hook and in each ch to end. (4 dcs so far = 1 block made)


Step 2. Rotate clockwise.

Step 3. Ch-2, 4dc around 4th dc from last block made.

Rotate and repeat the previous step one more time.

Step 4. Rotate clockwise. Ch-2, 3dc around 4th dc from last block made. Join to first block made.

First round complete! (4 blocks)
Round 2:
Step 1. Ch-5, turn, dc in 3rd ch from hook and in next 2 chs.


Step 2. Sl st to top of next block, ch-2, 4dc around ch-sp, rotate clockwise, ch-2, 3dc around 4th dc from last block made.


Repeat the previous step TWO more times.


Step 3. Sl st to beg ch, ch-2, 3dc around ch-sp. Join to top of first block.


Second round complete! (8 blocks)
Round 3:
Step 1. Ch-5, turn, dc in 3rd ch from hook and in next 2 chs, * sl st to top of next block.


Step 2. Ch-2, 3dc around ch-sp, sl st to top of next block, ch-2, 4dc around ch-sp.


Step 3. Rotate clockwise, ch-2, 3dc around 4th dc from last block made, sl st to top of next block. Ch-2, 3dc around ch-sp. Sl st to top of next block. Ch-2, 4dc around ch-sp.


Repeat step 3.


Step 4. Rotate clockwise, ch-2, 3dc around 4th dc from last block made, sl st to top of next block. Ch-2, 3dc around ch-sp. Sl st to top of next block. Ch-2, 3dc around ch-sp. Join to top of first block made.
Third round complete! (12 blocks)
Wanna save this for later?
Round 4:
Step 1: Ch-5, turn, dc in 3rd ch from hook and in next 2 chs, * sl st to top of next block.

Step 2: Ch-2, 3dc around ch-sp, sl st to top of next block.

Repeat Step 2 ONE more time.
Step 3: Ch-2, 4dc around ch-sp, Rotate clockwise.

Step 4: Ch-2, 3dc around 4th dc from last block made. Sl st to top of next block.
Step 5: Ch-2, 3dc around ch-sp, sl st to top of next block.

Repeat Step 5 ONE more time.
Repeat step 3.
Repeat step 4.
Repeat step 5 TWO times.
Repeat step 3.
Repeat step 4.
Repeat step 5 THREE times.

Round four complete! (16 blocks)
Round 5:
Step 1: Ch-5, turn, dc in 3rd ch from hook and in next 2 chs, * sl st to top of next block.
Step 2: Ch-2, 3dc around ch-sp, sl st to top of next block.
Repeat Step 2 TWO more times.
Step 3: Ch-2, 4dc around ch-sp, Rotate clockwise.
Step 4: Ch-2, 3dc around 4th dc from last block made. Sl st to top of next block.
Step 5: Ch-2, 3dc around ch-sp, sl st to top of next block.
Repeat Step 5 TWO more times.
Repeat step 3.
Repeat step 4.
Repeat step 5 THREE times.
Repeat step 3.
Repeat step 4.
Repeat step 5 FOUR times.

Round five complete! (20 blocks)
Round 6:
Step 1: Ch-5, turn, dc in 3rd ch from hook and in next 2 chs, * sl st to top of next block.
Step 2: Ch-2, 3dc around ch-sp, sl st to top of next block.
Repeat Step 2 THREE more times.
Step 3: Ch-2, 4dc around ch-sp, Rotate clockwise.
Step 4: Ch-2, 3dc around 4th dc from last block made. Sl st to top of next block.
Step 5: Ch-2, 3dc around ch-sp, sl st to top of next block.
Repeat Step 5 THREE more times.
Repeat step 3.
Repeat step 4.
Repeat step 5 FOUR times.
Repeat step 3.
Repeat step 4.
Repeat step 5 FIVE times.
Round six complete! (24 blocks)

Continue adding blocks in this method (adding one block per side) until the piece is as large as you like.
How to Measure C2C Crochet:
There are two ways to finish off the Corner to Corner in Rounds…
Stop when your piece gets to the desired size. This leaves the uneven edge and is finished as-is. To measure this way, lay the measuring tape side to side across the piece. The piece is finished!

Add the four corners to the piece. This gives straight edges to which you can easily add virtually any crochet border. To measure this way, lay the measuring tape diagonally across the piece. This will be the finished size after all four corners have been added.

When the piece is as large as you like, and if you plan to add the corners, it is time to start decreasing.
Decreasing C2C in Rounds:
Step 1. Turn work to the left so the working yarn is in front of the stitches.


Step 2. Skip first st, loosely sl st in next. Sl st in next st. (two sl sts total)

Step 3. Rotate to crochet up the blocks as normal. Step when you reach the top.

Step 4. Slip stitch to the ch-sp at the top of the next block.

Start over at step 1, removing one block per row until you have zero blocks remaining.


After slip stitching the final block to the top of the next block, turn and skip the first sl st. Sl st in the final two stitches. Fasten off.


How to Change Colors in Round C2C:
When changing colors in C2C worked in rounds, complete the final block of the round as normal. Slip stitch to the top of the next block using the new color of yarn. Tie a simple knot and continue crocheting as normal. Weave in those ends into their respective block colors when finished.


That’s it! Remember that you can grab the ad-free, printable PDF of this tutorial (including DOZENS of photos) on Etsy or right here in the Heart Hook Home Blog Shop! Thank you!
Watch the C2C VIDEO TUTORIAL:
If, for some reason, this video does not want to play for you you can also find it on YouTube here.
Once I get enough of my squares completed I will share that blanket and pattern with you. I am planning on making this a King Size, and hoping to get it done within the next few weeks! Not really looking forward to crocheting that border, so I’ll have to come up with something fun and that keeps our interest.

When you try this technique please be sure to tag @HeartHookHome and let me know what you think of it. I truly believe you’ll love it! Be sure to share a photo with me by tagging @HeartHookHome across all social media, and in the Heart Hook Home Crochet Community on Facebook!
More awesome crochet tutorials:
Lucet Fork Tutorial: Make Cord, Drawstring, Garland and More!
How to Crochet the Crocodile Stitch (Video Tutorial)
Half Double Crochet Spike Stitch Tutorial


13 Comments