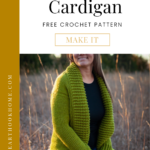
Tunisian Knit Short Row Cardi
This post may contain affiliate links, meaning that I may earn a small commission if you make a purchase. See our disclosure policy for more information.
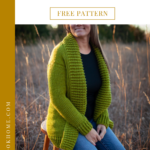
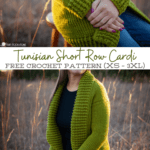
There’s something about a bangin’ collar that makes a crochet cardigan really stand out from the crowd. This NEW Tunisian Knit Short Row Cardi is exactly what the doctor ordered. Let’s make one with this free Tunisian crochet pattern!

Tunisian Knit Short Row Cardi Pattern
There really aren’t many wearable Tunisian crochet patterns available, which is a shame! Tunisian is such a fun way to crochet, almost a cross between knitting and crochet, and this Tunisian Knit Stitch looks exactly like knit at first glance.

I decided to use short rows for this collar because:
a.) I had never designed a pattern using short rows before.
and
b.) it’s FABULOUS!!
Crochet using short rows is a technique that is not as difficult as it looks. With plenty of photos and step-by-step instructions you’ll be a short row crocheting fool in no time! 😀


Materials:
Worsted weight yarn (Brava Worsted pictured)
-approx. 1500 yards for X-Small
-approx. 1650 yards for Small
-approx. 1825 yards for Medium
-approx. 1975 yards for Large
-approx. 2150 yards for X-Large
-approx. 2350 yards for 2XL
-approx. 2500 yards for 3XL
Tunisian Crochet hook in size L/8mm (read my Tunisian Hook Guide for help!)
Regular crochet hook in size K/6.5mm
Yarn needle
Gauge: 13 TKS stitches and 16 rows = 4” square
Pattern Notes:
Pattern written using US terms.
If you need help reading a crochet pattern, make sure you head over here and check out this detailed post.
For the tutorial photos, I am making the size MEDIUM.
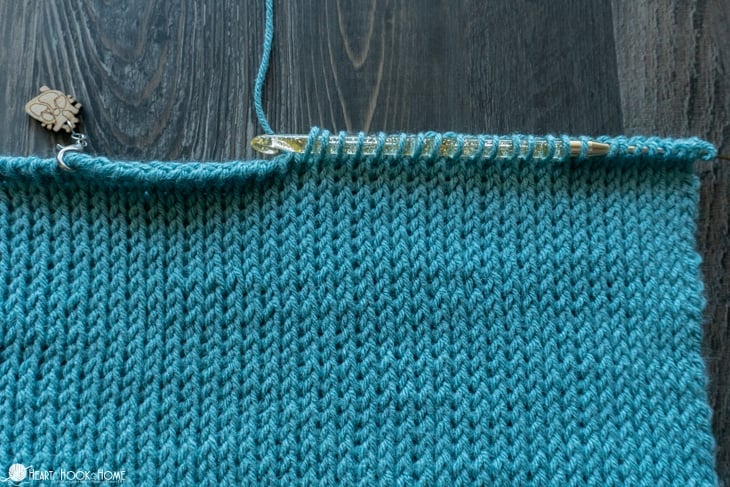
Tunisian Knit Stitch tutorial.
Edging is made with Front Post/Back Post stitches.
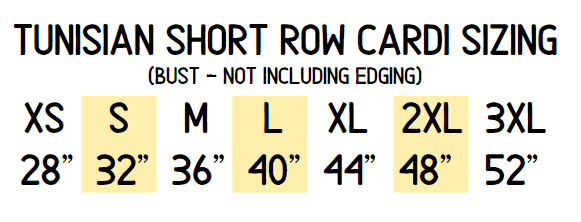
For sizing, the width should be slightly smaller than your bust.
The “backward pass” has been omitted from the pattern. Work the backward pass as normal for each row. (YO, pull through only the first – outside – loop, then YO pull through two, YO pull through two to end)
Sizes: (XS, S, M, L, XL, 2XL, 3XL)
This is not a particularly difficult pattern, but you will want to take your time on the collar. Take it one stitch at a time, and use the photos for reference if you get stuck. Please note that while this pattern was tested, I did not have testers for some of these sizes. I have, however, worked the math a million times and am positive everything is correct. Should you run into any issues, please shoot me an email so I can help troubleshoot!
Grab the ad-free, printable version of this pattern on Ravelry, Etsy, or in the Heart Hook Home shop. Thank you!
Pattern:
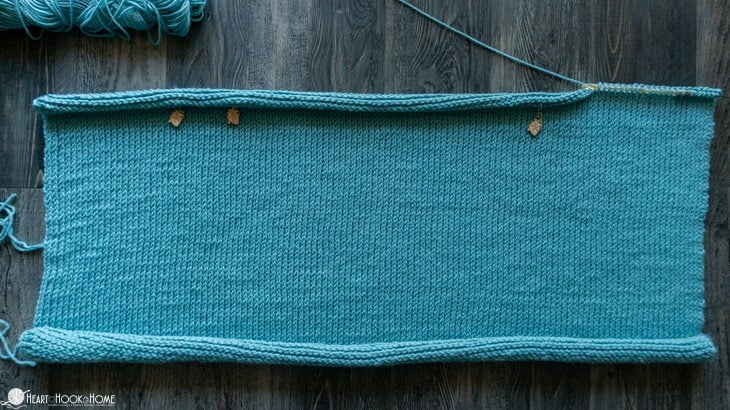
Row 1: Ch-(94, 106, 120, 132, 146, 160, 172) TSS in each st to end.
*Check width after ~15 rows. It should match the sizing chart above.
Rows 2 through (69, 70, 71, 71, 70, 69, 68): TKS in each st to end. (94, 106, 120, 132, 146, 160, 172)
Right arm panel:
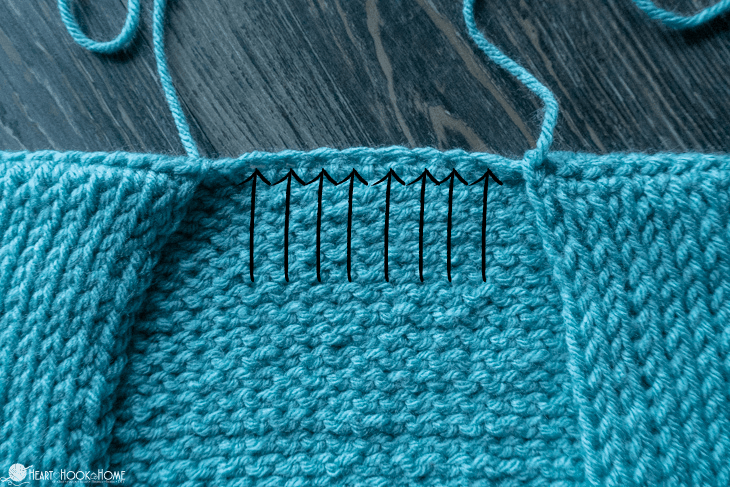
Row (70, 71, 72, 72, 71, 70, 69): (including loop already on hook as 1st st) TKS in (20, 21, 23, 25, 27, 28, 29) sts only.
Rows (71, 72, 73, 73, 72, 71, 70) through 90: TKS in each st to end. (20, 21, 23, 25, 27, 28, 29)
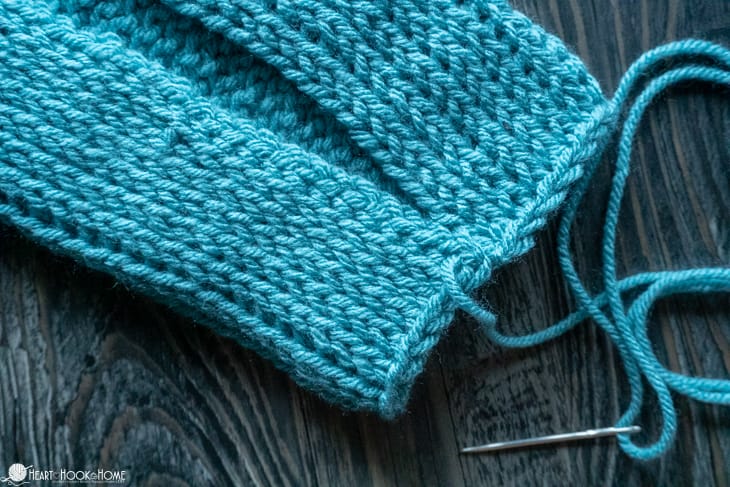
Row 91: Working into the center of each Knit stitch (as normal) sl st in each st across. Fasten off leaving a long tail for sewing shoulders.
Left arm panel:
Including the outermost stitch, count (20, 21, 23, 25, 27, 28, 29) sts in from the left and attach.

Row (70, 71, 72, 72, 71, 70, 69): TKS in (20, 21, 23, 25, 27, 28, 29) sts.
Rows (71, 72, 73, 73, 72, 71, 70) – 90: TKS in each st to end. (20, 21, 23, 25, 27, 28, 29)
Row 91: Working into the center of each Knit stitch (as normal) sl st in each st across. Fasten off.
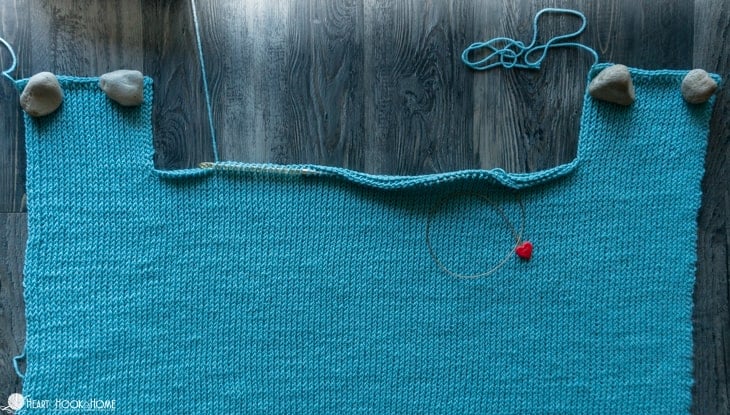
Center/back panel:
From where the “right panel” ended, leave (2, 6, 10, 12, 16, 21, 25) sts unworked to left and attach.
Row (70, 71, 72, 72, 71, 70, 69): TKS in (50, 52, 54, 58, 60, 62, 64) sts. This should leave (2, 6, 10, 12, 16, 21, 25) sts unworked on each side of the “center/back” for each “underarm”.

Rows (71, 72, 73, 73, 72, 71, 70) – 90: TKS in each st to end. (50, 52, 54, 58, 60, 62, 64)
Row 91: Working into the center of each Knit stitch (as normal) sl st in each st across. Fasten off leaving a long tail for sewing shoulders.
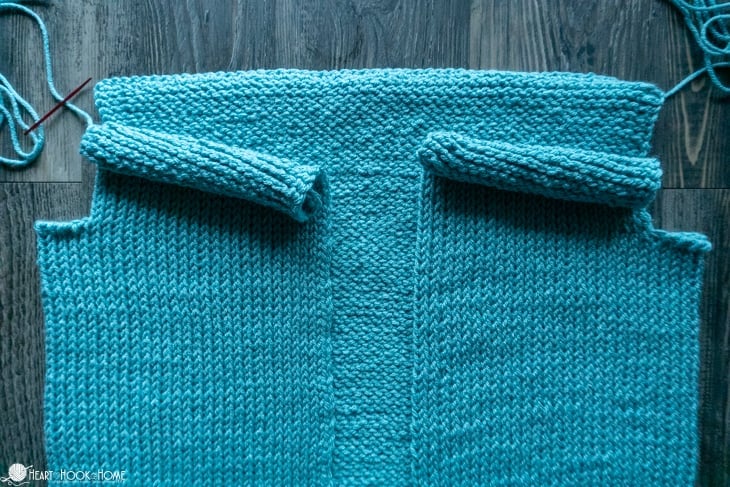
Fold two arm panels in and sew shoulders using the tails from above. This should leave (10, 10, 8, 8, 6, 6, 6) sts open for the “neck”.
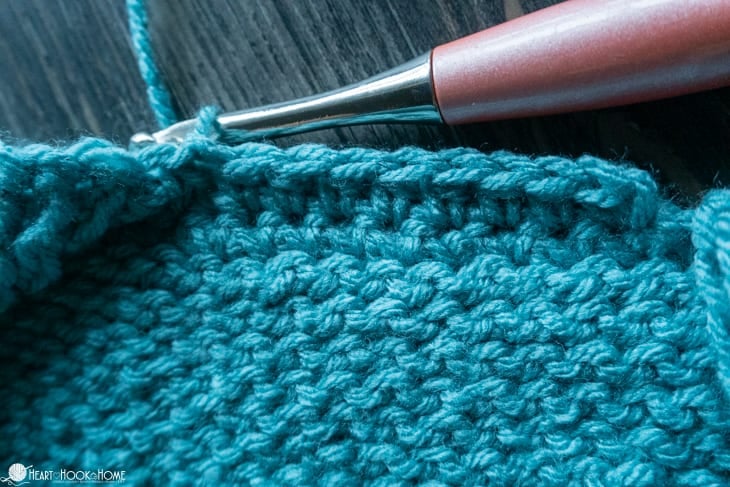
Bottom Edging:
Using the 6.5mm regular hook and looking at the “right side” of the bottom edge of the cardigan body, attach at bottom right corner.
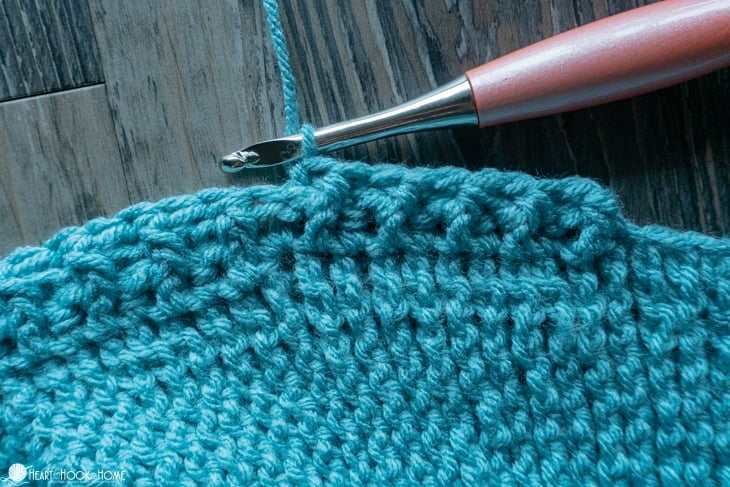
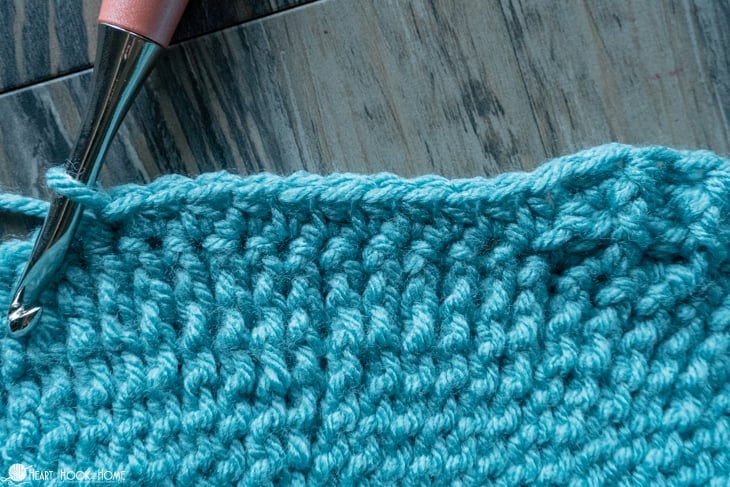
Row 1: Ch-1 (do not turn), * fphdc around next st, bphdc around next * repeat between * * to end. Fphdc around last st. (93, 105, 119, 131, 145, 159, 171)
Row 2: Ch-1, turn, * bphdc around next st, fphdc around next * repeat between * * to end. Bphdc around last st. (93, 105, 119, 131, 145, 159, 171)
Row 3: Ch-1, turn, * fphdc around next st, bphdc around next * repeat between * * to end. Fphdc around last st. (93, 105, 119, 131, 145, 159, 171)
Rows 4 – 7 (or as long as you like): Repeat rows 2 & 3 (93, 105, 119, 131, 145, 159, 171)
Row 8: repeat row 2. Fasten off.

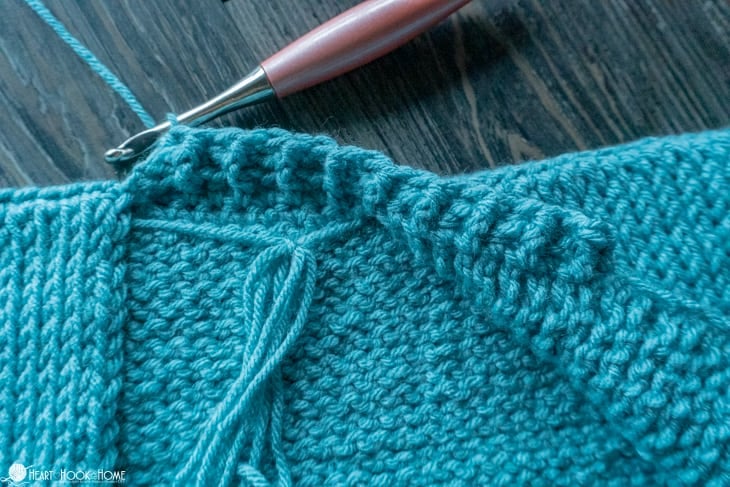
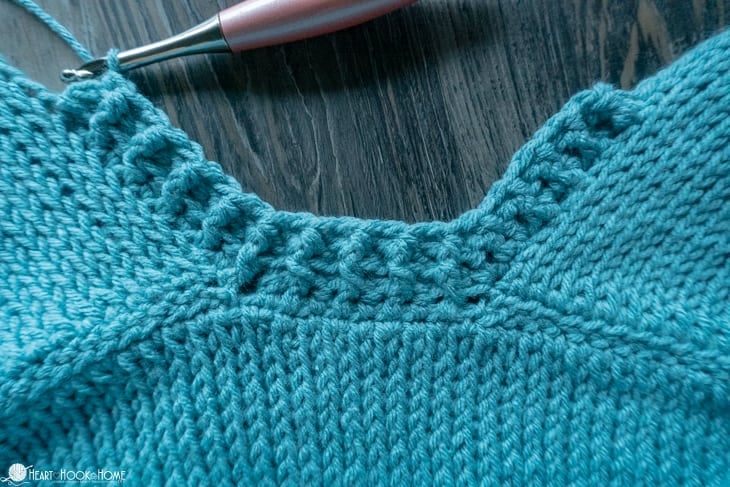
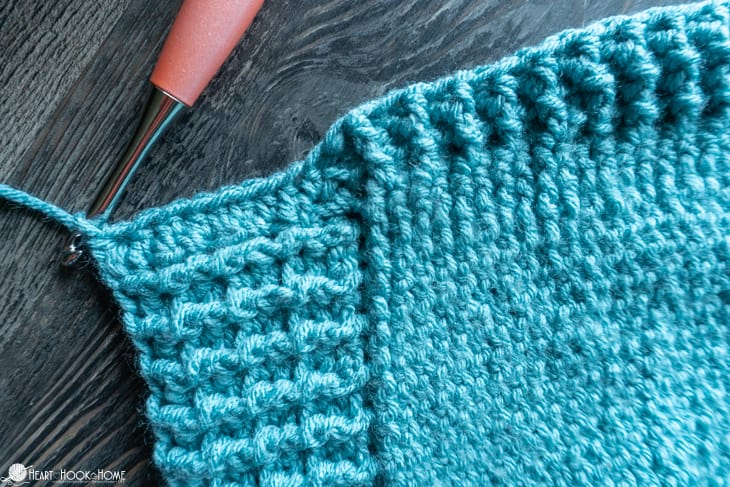
Inside Edging:
Using the 6.5mm regular hook and looking at the inside of the cardigan, attach at the far right “neck” stitch. Note: Do NOT count the sl sts as a stitch on the stitch counts!
Row 1: Ch-1, hdc in all (10, 10, 8, 8, 6, 6, 6) sts of the “neck”. Sl st to first “right” panel row end.

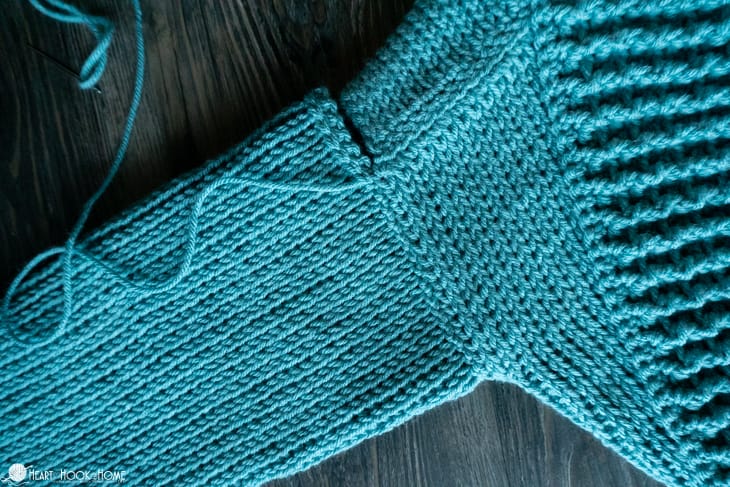
Row 2: Ch-1, turn, * Fphdc around first hdc, Bphdc around next. * repeat between * * in all (10, 10, 8, 8, 6, 6, 6) sts. Hdc in first 10 row ends of the “left” panel. Sl st to next row end. (20, 20, 18, 18, 16, 16, 16)
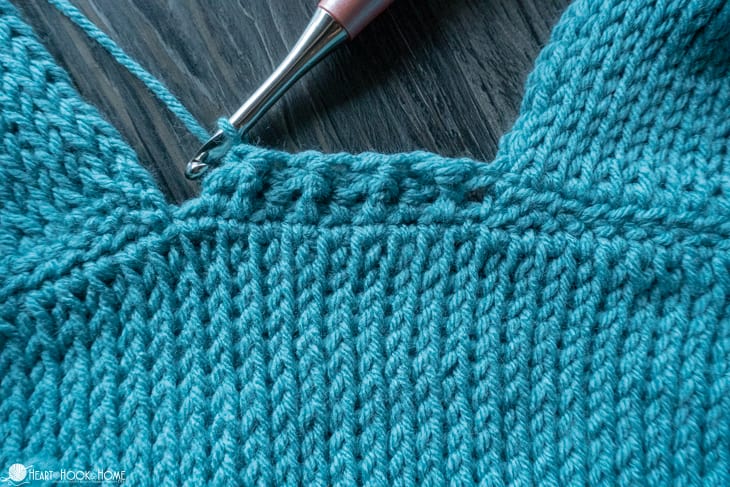
Row 3: Ch-1, turn, sk the sl st, Fphdc around first hdc, Bphdc around next. * Fphdc around next, Bphdc around next * repeat between * * for all (20, 20, 18, 18, 16, 16, 16) sts. Starting with the same as where you sl st last time, Hdc in next 10 row ends of the “right” panel. Sl st to next row end. (30, 30, 28, 28, 26, 26, 26)

Row 4: Ch-1, turn, sk the sl st, Fphdc around first hdc, Bphdc around next. * Fphdc around next, Bphdc around next * repeat between * * for all (30, 30, 28, 28, 26, 26, 26) sts. Starting with the same as where you sl st last time, Hdc in next 10 row ends of the “right” panel. (see photo) Sl st to next row end. (40, 40, 38, 38, 36, 36, 36)

Row 5: Ch-1, turn, sk the sl st, Fphdc around first hdc, Bphdc around next. * Fphdc around next, Bphdc around next * repeat between * * for all (40, 40, 38, 38, 36, 36, 36) sts. Starting with the same as where you sl st last time, Hdc in next 10 row ends of the “right” panel. Sl st to next row end. (50, 50, 48, 48, 46, 46, 46)

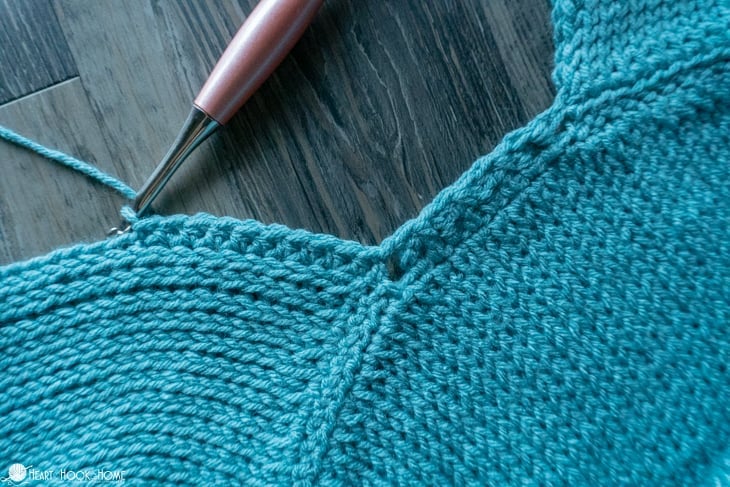
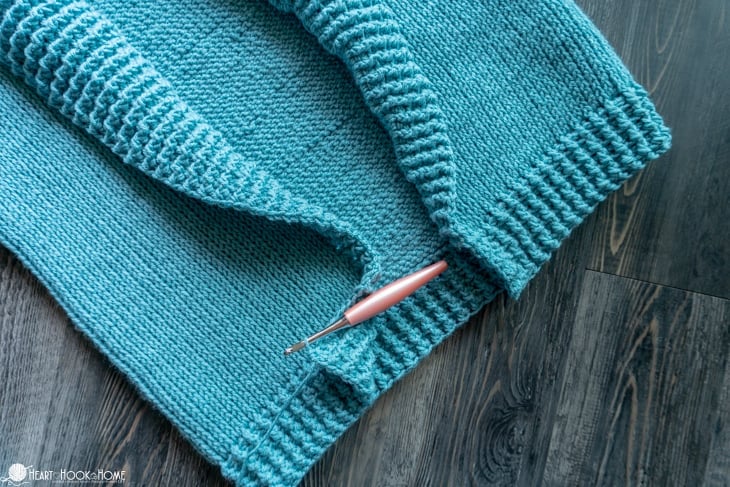
Rows 6 – 19: Continue adding edging rows in this manner, extending the collar by 10 hdc sts at the end of each row. (190, 190, 188, 188, 186, 186, 186 sts at the end of row 19)
Row 20: Ch-1, turn, sk the sl st, Fphdc around first hdc, Bphdc around next. * Fphdc around next, Bphdc around next * repeat between * * for all (190, 190, 188, 188, 186, 186, 186) sts. Starting with the same as where you sl st last time, Hdc 10x evenly across bottom edging row ends. (200, 200, 198, 198, 196, 196, 196)
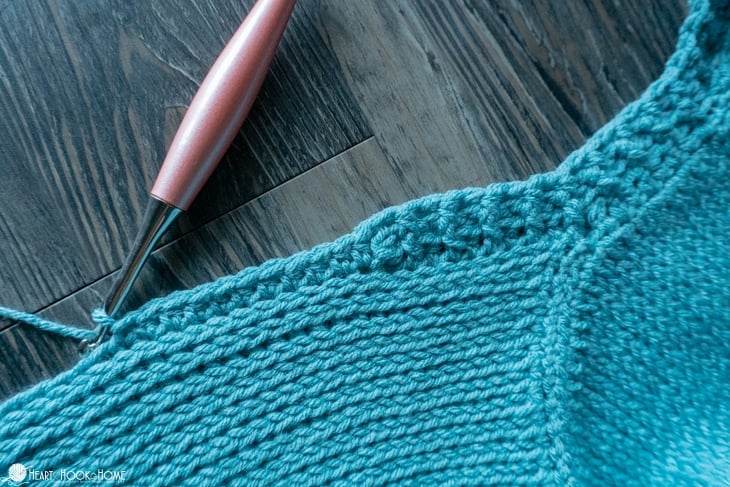
 *this puts you at the bottom left of the cardigan (were you wearing it).
Row 21: Ch-1, turn, hdc in first st. * Bphdc around next, fphdc around next * repeat between * * for all (200, 200, 198, 198, 196, 196, 196) sts. Hdc 9x evenly across bottom edging row ends. (209, 209, 207, 207, 205, 205, 205)
Note that at the end of row 21 you should be at the bottom right as pictured.
Row 22: Ch-1, turn, hdc in first st. * Fphdc around next st, Bphdc around next st * repeat between * * around. Fphdc around second to last st, hdc in last st. (209, 209, 207, 207, 205, 205, 205)
Wanna save this for later?

Row 23: Ch-1, turn, hdc in first st. * Bphdc around next st, Fphdc around next * repeat between * * around. Bphdc around second to last st, hdc in last st. (209, 209, 207, 207, 205, 205, 205)
Rows 24 – 29: repeat rows 22 & 23 (209, 209, 207, 207, 205, 205, 205)
Row 30: Ch-1, turn, sc in each st around, 3sc in corner st. Rotate clockwise and sc across the bottom edge of the cardigan, 2sc in corner st. Fasten off using Invisible Join.
Sleeves:
We are starting at the cuff and working our way in flat rows to the shoulder, then seaming and attaching. If you have a circular Tunisian hook (with a hook at both ends) you could make the sleeve in the round. Follow the same increases as stated for the pattern worked flat as below.
Sleeve length as written is 17.5” + 2.5” cuff = 20” total. Add or remove length as needed in the last rows (top/widest point/shoulder) of the sleeve.
Sewing instructions are included for ALL sizes below.
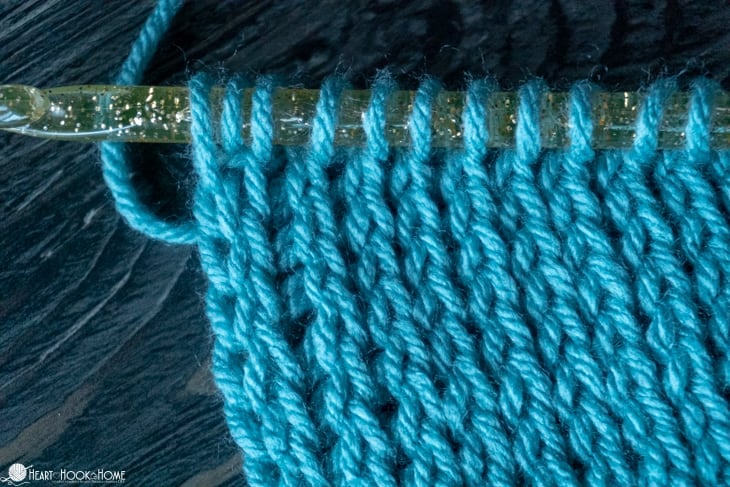
There are many ways to increase in Tunisian crochet. For this pattern I went through the chain in between stitches using the top loop AND the back bar to pull up my extra loop. (see photo)

Sizes (XS, S, M)
Row 1: Leaving a ~50” long tail for sewing later, ch- (25, 27, 29) TSS in each st to end. (25, 27, 29)
Rows 2 – 12: TKS in each st to end. (25, 27, 29)
Row 13: Increase at right edge. (26, 28, 30)
Rows 14 – 17: TKS in each st to end. (26, 28, 30)
Row 18: Increase at left edge. (27, 29, 31)
Rows 19 – 22: TKS in each st to end. (27, 29, 31)
Rows 23 – 62: repeat rows 13 – 22 (ending with 35, 37, 39 sts at row 62)
Row 63: repeat row 13 (36, 38, 40)
Rows 64 – 70: TKS in each st to end. (36, 38, 40)
Row 71: Working into the center of each Knit stitch (as normal) sl st across. Fasten off leaving a long tail for seaming.
Size L
Row 1: Leaving a ~50” long tail for sewing later, ch- (29) TSS in each st to end. (29)
Rows 2 – 12: TKS in each st to end. (29)
Row 13: Increase at right edge. (30)
Rows 14 – 16: TKS in each st to end. (30)
Row 17: Increase at left edge. (31)
Rows 18 – 20: TKS in each st to end. (31)
Rows 21 – 68: repeat rows 13 – 20 (ending with 43 sts at row 68)
Rows 69 – 70: TKS in each st to end. (43)
Row 71: Working into the center of each Knit stitch (as normal) sl st across. Fasten off leaving a long tail for seaming.
Size XL
Row 1: Leaving a ~50” long tail for sewing later, ch- (29) TSS in each st to end. (29)
Rows 2 – 12: TKS in each st to end. (29)
Row 13: Increase at right edge. (30)
Rows 14 – 16: TKS in each st to end. (30)
Row 17: Increase at left edge. (31)
Rows 18 – 20: TKS in each st to end. (31)
Rows 21 – 44: repeat rows 13 – 20 (ending with 38 sts at row 44)
Row 45: Increase at right edge. (39)
Row 46: TKS in each st to end. (39)
Row 47: Increase at left edge. (40)
Row 48: TKS in each st to end. (40)
Rows 49 – 64: repeat rows 45 – 48 (ending with 48 sts at row 64)
Rows 65 – 70: TKS in each st to end. (48)
Row 71: Working into the center of each Knit stitch (as normal) sl st across. Fasten off leaving a long tail for seaming.
Size 2XL
Row 1: Leaving a ~50” long tail for sewing later, ch- (29) TSS in each st to end. (29)
Rows 2 – 12: TKS in each st to end. (29)
Row 13: Increase at right edge. (30)
Row 14: TKS in each st to end. (30)
Row 15: Increase at left edge. (31)
Row 16: TKS in each st to end. (31)
Rows 17 – 64: Repeat rows 13 – 16 (ending with 55 sts at the end of row 64)
Rows 65 – 70: TKS in each st to end. (55)
Row 71: Working into the center of each Knit stitch (as normal) al st across. Fasten off leaving a long tail for seaming.
Size 3XL
Row 1: Leaving a ~50” long tail for sewing later, ch- (31) TSS in each st to end. (31)
Rows 2 – 8: TKS in each st to end. (31)
Row 9: Increase at right edge. (32)
Row 10: TKS in each st to end. (32)
Row 11: Increase at left edge. (33)
Row 12: TKS in each st to end. (33)
Rows 13 – 64: Repeat rows 9 – 12 (ending with 59 sts at the end of row 64)
Row 65: repeat row 9 (60)
Rows 66 – 70: TKS in each st to end. (60)
Row 71: Working into the center of each Knit stitch (as normal) al st across. Fasten off leaving a long tail for seaming.
Sleeve Seaming (all sizes):
Fold the sleeve into a tube shape to sew the seam. This will run up the underside of the arm. Once seamed, position so that the seam is at the center of the “underarm”.
Note that there are more stitches on the body of the cardigan than there are on the last row of the sleeve, but the size of the opening is the same. To make sure you sew evenly, use stitch markers to pin the sleeve into place before starting. Sew sleeve to the armhole opening, being careful not to pull too tight lest the seam start to pucker. I use the Mattress Stitch for seaming.
Cuff (all sizes):
Using the 6.5mm regular hook, attach at the bottom sleeve seam.
Round 1: Ch-1 (do not turn), * fphdc around next st, bphdc around next * repeat between * * around. Fphdc around last, join to top of first fphdc with sl st. (25, 27, 29, 29, 29, 29, 31)
Round 2: Ch-1, turn. * bphdc around next st, fphdc around next * repeat between * * around. Bphdc around last, join to top of first bphdc with sl st. (25, 27, 29, 29, 29, 29, 31)
Round 3: Ch-1, turn. * fphdc around next st, bphdc around next * repeat between * * around. Fphdc around last, join to top of first fphdc with sl st. (25, 27, 29, 29, 29, 29, 31)
Rounds 4 – 7 (or as tall as you like): Repeat rounds 2 & 3 (25, 27, 29, 29, 29, 29, 31)
Round 8: repeat round 2. (25, 27, 29, 29, 29, 29, 31)
Round 9: Ch-1, turn, sc in each st around. Join with Invisible Join.
Weave in all ends and you are DONE! Please share a photo of yours with me in the Heart Hook Home Crochet Community on Facebook or by tagging @HeartHookHome across all social media.
More free patterns:
Shady Shell Cocoon Crochet Pattern
Come On I Wanna Ruana: Free Crochet Along!
The Hedonist’s Housecoat: Free Crochet Housecoat Pattern (Medium, One-Size and Plus Size)


