Complete Guide to Changing Colors in Tunisian Crochet (Advanced Tunisian Workshop Week 2)
This post may contain affiliate links, meaning that I may earn a small commission if you make a purchase. See our disclosure policy for more information.


If there’s one thing we know about Tunisian crochet, it is that it is extremely versatile. You can do so much with it and incorporating yarn color changes is a huge part of that. Let’s dig in and learn all there is to know about changing colors in Tunisian Crochet.

Complete Guide to Changing Colors in Tunisian Crochet
Tunisian crochet is beautiful, easy to learn, and soothing to the soul. There’s nothing better on a chilly day than a warm fire, a cup of coffee, some soup on the stove, and a Tunisian work-in-progress on your lap.
This is the second installment of the Advanced Tunisian Crochet Workshop. This is a 6-week long workshop where we are learning allllll the ins and outs of more advanced tips and techniques related to Tunisian Crochet. This week is all about changing colors and how the placement of those color changes can – quite literally – change everything.
 When it comes to Tunisian crochet there is so much you can do with colorwork. You can do horizontal or vertical color striping, color changing graphs, color blocks, strand work, or even a Tunisian version of fair isle.


As we learned in the Ultimate Guide to Tunisian Crochet, there are two parts to every Tunisian crochet row: the Forward Pass and the Backward/Return Pass. The Forward Pass pulls up the vertical loops that you see on the surface of a Tunisian crocheted project. The Backward/Return Pass is the horizontal chain going through the vertical loops we just made in the Forward Pass. Because the two parts of each row are so distinguished from each other by appearance alone, incorporating a color change in there as well can really set things apart.
Read the Ultimate Guide to Tunisian Crochet here.

Why Tunisian for Color Work?
Color changing graphs are often made using Tunisian crochet because the width-to-height ratio of some of the most commonly used stitches, such as the Simple Stitch and the Knit Stitch, are roughly equal. For this reason crochet graphs (in particular the “portrait” blankets) turn out beautifully using Tunisian.
There are three places to change yarn colors in Tunisian: at the right edge, at the left edge, or in the middle. Where you do so makes all the difference in the overall look of the piece.
If you’re already an experienced crocheter you’ll know that changing colors in traditional crochet is as simple as pulling the new yarn color through on the last pull through of a stitch. This is the same in Tunisian crochet for the first two methods we’ll discuss today.
Mastering the third method, changing colors anywhere other than the outside edges, takes a bit more practice but once you get it, you’ll be flying!

Be sure to watch the VIDEO below.
3 Ways to change colors in Tunisian Crochet:
1. Forward Pass
If you want to keep a nice, clean edge across the width of your project, you’ll need to change colors at the beginning of a Forward Pass. To do so you’ll complete the Backward Pass of the previous row until just two loops remain.


Using the new color, yarn over and pull through two. You are now ready to continue on with the new color for as many rows as you like.


2. Backward/Return Pass
To spice things up a little, try changing colors at the beginning of the Backward/Return Pass. Complete the entire Forward Pass.

Use the new yarn color to pull up the chain one to start the new row, then complete the Backward Pass as normal.


The chains of the Backward Pass run through the vertical loops of the Forward Pass, giving it almost a woven effect. I find that my work looks cleaner if I do not change colors too frequently using this method.


3. Within a Row
While not particularly difficult, this is the most involved of all Tunisian color changes.
To change colors within a row of Tunisian Crochet, you’ll begin your Forward Pass as normal using the first color (Color A). At the desired stitch, drop the working yarn and pull up the next vertical loop using the new yarn color (Color B). Complete the Forward Pass as normal using Color B.

Begin the Backward/Return Pass as normal using Color B.

Wanna save this for later?
When you get to the stitch using Color A, you will drop Color B and drape it to the RIGHT and ON TOP of the Color A strand you’re picking up now.


This “locks” the color change into place. Pull both strands (Color A and Color B) gently to help settle the size of the loops. This helps to keep cleaner color changing edges. Complete the row as normal.

Change colors once in a row, or many times if you’re working on a more intricate design. Of course, the more strands of yarn you’re working with the more difficult it becomes.
Practice time!
I’ve created several color changing graphs for you to play around with the different ways of changing colors.


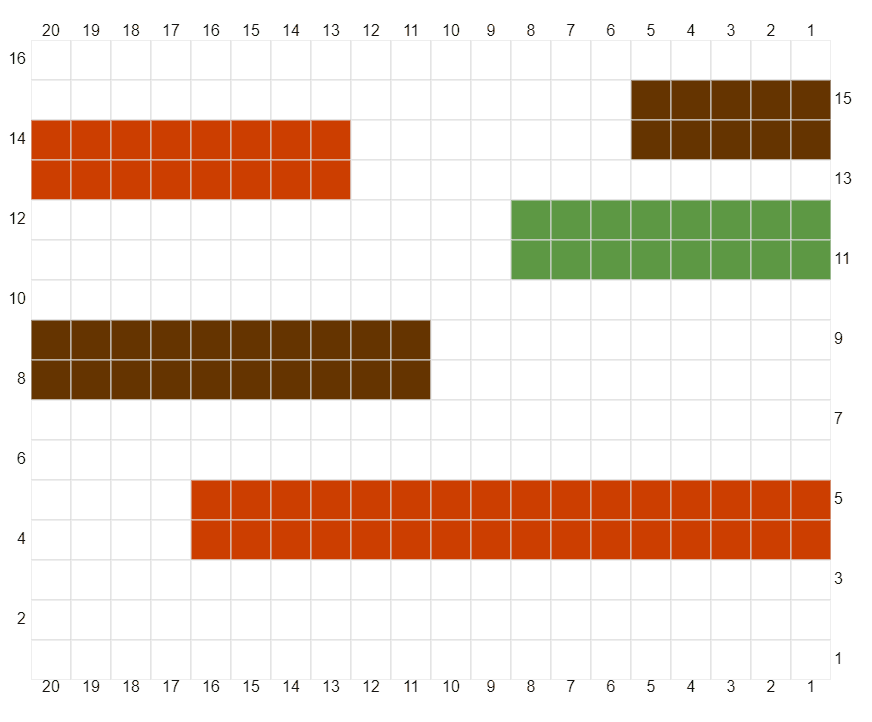


As you can see, I’ve made several of these graphs exactly the same, but switching out where I changed the colors. For example, the two squares below were made from the same graph, just changing colors at the beginning of the Backward Pass on the left, and changing at the beginning of the Forward Pass on the right. Crazy, right?


Make as many different squares as you like to practice. If you are participating in the Advanced Tunisian Crochet Workshop you may remember that I am compiling all of my squares later on into a baby blanket. Read more on that here.
Tunisian Yarn Color Change VIDEO:
If you would rather watch this video on my YouTube channel you can find that here. Subscribe while you’re there!
Helpful tips when changing colors in Tunisian:
Remember to count the loop that is always on your hook as stitch #1. The first loop you actually pull up will be stitch #2.
You can carry the yarn up the side of the work if you like. To do this you’ll just pull the non-working yarn color up along the outside of your piece. I typically avoid this and clip the yarn, even it it means weaving in more ends, but if you’ll be adding a border you may not be able to notice in the end anyway.
You can also carry the yarn along the back of your piece to avoiding clipping ends. This has a tendency to get sloppy quick. To combat this you will need to “lock” the carried yarn color in place every few stitches along the back side of the work only. This keeps any loops created small. There are few instances where I would recommend this technique, but it bears mentioning nonetheless.
When a pattern calls for two colors to be used along the bottom edge of a piece, you get to make a choice. 1. Crochet the entire chain using one color of yarn. This will not be as noticeable as it seems at first, especially if you are adding any kind of edging or border. 2. Include the new color in the chain. This can be quite cumbersome, and you’ll want to make sure that all loops are settled into place before continuing on with the pattern, but it is possible.

A set of bobbins may help if you’re looking to try graphs with multiple colors or strands of yarn. I have these “Large Bobbins” which comes in a set of 4. They hold a LOT more yarn than any other bobbins I’ve tried and I love the way they fold up around the yarn (almost like a Yo-Yo) to help keep from unraveling. A medium size set would probably suffice for most projects, and those come with 6 bobbins to a set!

One thing I do not enjoy about crocheting with multiple colors of yarn and the way you have to “lock” the stitch in place is how they are constantly winding around each other. This can create quite a nest of yarn in the back if you’re not careful. If your working yarn starts getting pretty tangled in the back, look at the upcoming rows for upcoming color changes and wherever possible, clip a strand as long as needed (best guess) to complete just those stitches. This frees up one more strand from the rats nest growing behind your work. I find it’s easier to weave in a few more ends than to fight it the whole time.
Stay tuned for next Wednesday when we’ll tackle How to Tunisian Crochet in the Round. Awesome!
More Tunisian Crochet For you:
How to Fix a Dropped Stitch in a Flat Row of Tunisian Crochet (Advanced Tunisian Workshop Week 1)
Full Skein Scarf: Free Tunisian Crochet Pattern


2 Comments