Track Stitch Tunic: Free Crochet Pattern (XS – 5XL)
This post may contain affiliate links, meaning that I may earn a small commission if you make a purchase. See our disclosure policy for more information.

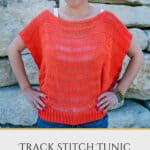


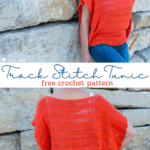
During the warmer months, I love having something to throw on over a tank top that is both flattering and comfortable to wear. The Track Stitch Tunic is the perfect design to show off your crochet skills while staying cool in the process. Let’s make one with this new, free crochet pattern!

Track Stitch Tunic
The Track Stitch Tunic features very tall crochet stitches: Triple Treble. We use these stitches in order to get the open columned effect and we separate these super tall stitches with a few rows of single crochet to help maintain the stability of the fabric and integrity of the design. I just love it and I hope you do, too!


I love the clean lines that the few rows of single crochet provide. I love how airy it is. I love how large the armholes are and how comfortable that makes this tunic to wear. I just love it all! ♥
For this design I am using Shine Sport yarn from WeCrochet. This is a gorgeous 60% Pima Cotton, 40% Modal blend and this colorway “Grapefruit” is absolutely stunning.
If you have never made a Triple Treble crochet stitch before (abbreviated as Trtr) you are in for a treat!

Materials:
Shine Sport Yarn (size 2, cotton/modal blend, “Grapefruit” colorway pictured)
-approx. (1080, 1090, 1100, 1140) (1550, 1575, 1585, 1600, 1620) yards
Crochet hook in size G/4mm
Gauge: 16 sc sts x 8 Track Stitch rows = 4” (before blocking)
Pattern for Gauge:
Row 1: Ch-17, sc in 2nd ch from hook and in each to end. (16)
Rows 2 & 3: Ch-1, turn, sc in each st to end. (16)
Row 4: Ch-6 (counts as Trtr), turn, sk-first st, Trtr in each st to end. (16)
Row 5: Ch-1, turn, sc in each st to end, sc in turning chain. (16)
Rows 6 & 7: Ch-1, turn, sc in each st to end. (16)
Row 8: repeat row 4 (16) Measure for gauge.


Pattern Notes:
Pattern written using US terms.
If you need help reading a crochet pattern, make sure you head over here and check out this detailed post.
Odd numbered rows are “right side”. (The Trtr rows should always be facing the same (”right”) direction.)
Trtr = YO 4x, insert into next stitch and pull up a loop. Yarn over, pull through two loops a total of 5 times. Full Trtr tutorial here.
The ch-1 at the beginning of the single crochet rows does NOT count as a stitch.
The ch-6 at the beginning of the Triple Treble rows DOES count as a stitch.
Fsc = Foundation Single Crochet. Full Fsc tutorial here.
For the band we are using Front Post/Back Post stitches. Full tutorial for fp/bp here.
The “one size” is approx. 27” wide before blocking and 30” wide after.
The “plus size” is approx. 35” wide before blocking and 38” wide after.

Wanna save this for later?
Get the ad-free, printable PDF on Ravelry or Etsy. Thank you!
Pattern:
Row 1: Fsc-(112, 144) *alternately you could ch-(113, 145), sc in 2nd ch from hook and in each ch to end.
Row 2: Ch-1, turn, sc in each st to end. (112, 144)
Row 3: Ch-6 (counts as Trtr), turn, sk first st, Trtr in each st across. (112, 144)
Row 4: Ch-1, turn, sc in each st to end, sc in turning chain. (112, 144)
Row 5 & 6: Ch-1, turn, sc in each st to end. (112, 144)
Rows 7 through (42, 46): repeat rows 3 – 6 (112, 144)
Row (43, 47): (neckhole) Ch-6, turn, sk first st, Trtr in next (32, 48) sts. Ch-46, sk-46 sts, Trtr in remaining (33, 49) sts. (112, 144)
Row (44, 48): Ch-1, turn, sc in each st/ch to end. Sc in turning chain. (112, 144)
Rows (45, 49) & (46, 50): Ch-1, turn, sc in each st to end. (112, 144)
Rows (47, 51) – (82, 90): repeat rows 3 – 6 (112, 144)
Row (83, 91): repeat row 3 (112, 144)
Rows (84, 92) & (85, 93): repeat rows 4 & 5 (112, 144)
Fasten off and weave in all ends. Block to measurements below.
The “One Size” should be ~30” wide after blocking.
The “Plus Size” should be ~38” wide after blocking.

Waist (all sizes):
Starting at the outside each time, sew bottom edge shut stitch-for-stitch for (30, 28, 25, 20, 30, 26, 24, 21, 18) sts on each side, leaving (52, 56, 62, 72, 84, 92, 96, 102, 106) sts free in the middle on both the “front” and the “back”, for (104, 112, 124, 144, 168, 184, 192, 204, 216) sts total for waist.
Attach at either side seam…
Row 1: Ch-1, Fphdc around first st. * Bphdc around next, fphdc around next * repeat between * * around. Join to top of first fphdc. (105, 113, 125, 145, 169, 185, 193, 205, 217)
Row 2: Ch-1, turn, Bphdc around first. * Fphdc around next, bphdc around next * repeat between * * around. Join to top of first bphdc. (105, 113, 125, 145, 169, 185, 193, 205, 217)
Row 3: Ch-1, turn, Fphdc around first st. * Bphdc around next, fphdc around next * repeat between * * around. Join to top of first fphdc. (105, 113, 125, 145, 169, 185, 193, 205, 217)
Rows 4 through 15: alternate rows 2 & 3 (105, 113, 125, 145, 169, 185, 193, 205, 217)
Row 16: Ch-1, do not turn, sc in each st around. Join using Invisible Join. (105, 113, 125, 145, 169, 185, 193, 205, 217) Weave in all ends.
You. Are. Done!
I hope you love this Track Stitch Tunic as much as I do, and that you will share a photo with me when you are done. Please do so in the Heart Hook Home Crochet Community on Facebook or by tagging @HeartHookHome across all social media.
More free patterns:
Shell Yeah! Free Tunic Crochet Pattern
Marvelous Moss Hooded Tunic Crochet Pattern


25 Comments