It’s a Wrap! Swimsuit Cover Up Crochet Pattern
This post may contain affiliate links, meaning that I may earn a small commission if you make a purchase. See our disclosure policy for more information.

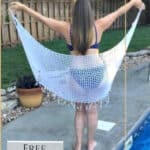
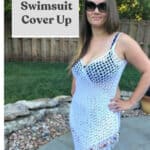

Swimsuit season is upon us, which means that I’m looking for a swimsuit cover up crochet pattern. Are you too? This wrap version of a swimsuit cover up is gorgeous, highlights those curves and it is crocheted. What’s not to love?
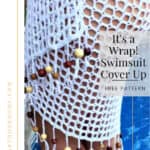
It’s a Wrap! Swimsuit Cover Up Crochet Pattern
This pattern uses filet crochet to form a “mesh” fabric to which we will then add armholes and straps. No matter if you’re making for a child or plus size, all you need is your body measurement and you are ready to rock and roll.


When wearing a swimsuit (or anytime, really 😉 ) I am most self conscious of the area starting at my waist and ending right above my knees. This wrap covers that area beautifully, and the beads weigh it down to create some nice curves and add just the right amount of pizzazz!

If you are looking for a cover up pattern that offers more complete coverage, stay tuned! I am currently designing a tunic-style swimsuit cover up crochet pattern as well and it is on its way to the testers! I will update when that is ready. ♥
Materials:
Cotton yarn – about 600 – 700 yards for “one size fits most” size
*I wear a size 10/12 for reference
Crochet hook in size J
Wooden beads if you’d like to add them with fringe
Notes:
Using a pliable measuring tape, *loosely* measure from one armpit down to your waist, behind your back and up to the other armpit. The “one size fits most” pattern should be around 60” – 65”. This is the measurement you’re going for when you hit row 83 in the pattern. If you don’t have a sewing style measuring tape you could use yarn (NOT stretched) to wrap around and then measure the length of the yarn.
We are working rows vertically, from armpit to hip and around your body. If you’d like additional length add to the beginning chain in multiples of THREE chains per extra block. Each block is about ¾” tall depending on your tension.
Wanna save this for later?
If you need help reading a crochet pattern, make sure you head over here and check out this detailed post.
Approximate dimensions as written:
27” tall and 60” wide (this doesn’t have to be exact, just close)
Swimsuit Cover Up Crochet Pattern:
Row 1: Ch-92. Dc in 8th ch from hk. * ch-2, sk 2 chs, dc in next * repeat between * * to end. Turn. (29 blocks)
***you might measure here to make sure you’re close to 27” – although an inch either way won’t matter much***
Rows 2 – 83 (or until measurement reached): Ch-5, sk first ch-2 sp, dc in top of next dc. * ch-2, dc in top of next dc * repeat between * * to end placing last dc in third ch from previous row’s beg ch. Turn. (29 blocks)
***wrap around yourself to make sure it is long enough and begin arm hole***
Row 84: Ch-5, sk first ch-2 sp, dc in top of next dc. * ch-2, dc in top of next dc * repeat between * * until you have 23 blocks made. Ch-2, sl st to top of next dc. Turn.
Row 85: Sl st up the ch-2 (end of the last row), sl st in the top of dc. * Ch-2, dc in top of next dc * repeat between * * to end placing last dc in third ch from previous row’s beg ch. Turn. (22 fully formed blocks)
Row 86: Ch-5, sk first ch-2 sp, dc in top of next dc. * ch-2, dc in top of next dc * repeat until you have 22 blocks made. Turn.
Row 87: Ch-5, sk first ch-2 sp, dc in top of next dc. * Ch-2, dc in top of next dc * repeat between * * to end placing last dc in third ch from previous row’s beg ch. Fasten off.
Other arm hole:
With the top of the wrap to your right and the bottom of the left, attach yarn to the 6th dc (including turning chain) so that you have 5 full blocks to the right of your hook.
Row 1: Ch-2, dc in top of next dc. * Ch-2, dc in top of next dc * repeat between * * to end placing last dc in third ch from previous row’s beg ch.. Turn. (23 fully formed blocks)
Row 2: Ch-5, sk first ch-2 sp, dc in top of next dc. * ch-2, dc in top of next dc * repeat between * * 20 times (22 fully formed blocks). Ch-2, sl st to top of next dc. Turn.
Row 3: Sl st up the ch-2 (end of row 2), sl st in top of next dc. ch-5, dc in top of next dc. * ch-2, dc in top of next dc * repeat between * * to end placing last dc in third ch from previous row’s beg ch. Turn.
Row 4: Ch-5, sk first ch-2 sp, dc in top of next dc. * ch-2, dc in top of next dc * repeat between * * to make 22 blocks total, placing last dc in ch-3 from previous row.
DO NOT FASTEN OFF. Instead, 2sc around the ch-2 spaces around the entire piece. Join and fasten off.
Straps:
I recommend tying some yarn on the corners where the straps will go. As each body varies, it is best to measure on yourself. I did about 12” for my straps.
When measurement is decided, hold three strands of yarn together and make a chain in that length. Attach to each arm hole corner securely. Wrap excess yarn around the front where the strap connects if you wish.
Fringe:
Cut fringe to 10” each and add one strand of fringe every other double crochet post. If desired, add wooden beads tying in varying lengths.
What do you think of your wrap-style swimsuit cover up? Share a photo with me by tagging @HeartHookHome on social media. I hope you love this swimsuit cover up crochet pattern and remember! I have a second one in the works as we speak that offers much more coverage if this is too revealing. But then again, you ARE in your swimsuit, right? 😉
More free crochet patterns
Easy Peasy Lemon Squeezy Pullover Crochet Pattern
Hair Towel with a Twist {FREE Crochet Pattern}
Easy Breezy Lightweight Summer Vest Crochet Pattern
Child Size Summer Vest Crochet Pattern (American Girl, Toddler, Child, Pre-Teen)
April’s Baby Giraffe Bookmark Amigurumi Crochet Pattern


30 Comments