Crochet Pan Protectors Pattern (Small, Medium, Large, X-Large)
This post may contain affiliate links, meaning that I may earn a small commission if you make a purchase. See our disclosure policy for more information.
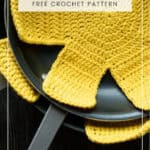


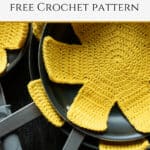
Do your pots and pans need protecting? I have the perfect pattern for you! These crocheted pan protectors are super easy and quick to work up, and will keep your pots from scratching in storage.

Crochet Pan Protectors Pattern
During the year 2020, every month I shared a new and free crochet pattern for cloths. We called it the 2020 Washcloth Series and each month there was a new crochet cloth pattern available in three sizes: small, medium, and large. That series was so fun I decided to continue the theme – but to change it up a little.

My goal with crochet has always been to create useful things that make life easier – and for a fraction of the price. Instead of each month being a cloth featuring a different stitch, in 2021 I will be sharing a monthly free crochet pattern for something useful to use around the house. We are calling it the 2021 Household Crochet Series. Why buy new when you can whip something up with materials you may already have?
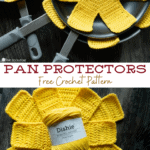
These crochet pan protectors are the perfect pattern to start this series! I will continue to use the lovely Dishie Cotton from WeCrochet. It is my favorite cotton! You can, of course, use any cotton you have on hand. They don’t take much!

Materials:
Dishie Cotton
-approx. 64 yards for small
-approx. 94 yards for medium
-approx. 134 yards for large
-approx. 180 yards for x-large
Crochet hook in size H/5mm
Gauge:
Approx. 3.75″ wide after round 4.
Diameter:
Small – 10″
Medium – 12.5″
Large – 15.5″
X-Large – 18.5″
Find the printable PDF of this pattern here on Ravelry or Etsy or right here in the Heart Hook Home shop!
If you need help reading a crochet pattern, make sure you head over here and check out this detailed post.

Small:
Round 1: Magic Circle, Ch-2, 12dc in circle. Join to top of first dc. (12)
Round 2: Ch-2, 2dc in each st around. Join to top of first dc. (24)
Round 3: Ch-2, * dc in first st, 2dc in next * repeat between * * around. Join to top of first dc. (36)
Round 4: Ch-2, * dc in first 2 sts, 2dc in next * repeat between * * around. Join to top of first dc. (48)
Do not fasten off.
Arms (make 6 total)
Where still attached…
Row 1: Ch-2, dc in next 8 sts. (8)
Rows 2 – 7: Ch-2, turn, dc in each st to end. (8)
Fasten off. Attach in next open stitch of round 4.
Repeat arm pattern until there are 6 arms total. Do not fasten off last arm, continue with edging below.

Medium:
Round 1: Magic Circle, Ch-2, 12dc in circle. Join to top of first dc. (12)
Round 2: Ch-2, 2dc in each st around. Join to top of first dc. (24)
Round 3: Ch-2, * dc in next st, 2dc in next * repeat between * * around. Join to top of first dc. (36)
Round 4: Ch-2, * dc in next 2 sts, 2dc in next * repeat between * * around. Join to top of first dc. (48)
Round 5: Ch-2, * dc in next 3 sts, 2dc in next * repeat between * * around. Join to top of first dc. (60)
Do not fasten off.
Arms (make 6 total)
Where still attached…
Row 1: Ch-2, dc in next 10 sts. (10)
Rows 2 – 9: Ch-2, turn, dc in each st to end. (10)
Wanna save this for later?
Fasten off. Attach in next open stitch of round 5.
Repeat arm pattern until there are 6 arms total. Do not fasten off last arm, continue with edging below.
Large:
Round 1: Magic Circle, Ch-2, 12dc in circle. Join to top of first dc. (12)
Round 2: Ch-2, 2dc in each st around. Join to top of first dc. (24)
Round 3: Ch-2, * dc in next st, 2dc in next * repeat between * * around. Join to top of first dc. (36)
Round 4: Ch-2, * dc in next 2 sts, 2dc in next * repeat between * * around. Join to top of first dc. (48)
Round 5: Ch-2, * dc in next 3 sts, 2dc in next * repeat between * * around. Join to top of first dc. (60)
Round 6: Ch-2, * dc in next 4 sts, 2dc in next * repeat between * * around. Join to top of first dc. (72)
Do not fasten off.
Arms (make 6 total)
Where still attached…
Row 1: Ch-2, dc in next 12 sts. (12)
Rows 2 – 11: Ch-2, turn, dc in each st to end. (12)
Fasten off. Attach in next open stitch of round 6.
Repeat arm pattern until there are 6 arms total. Do not fasten off last arm, continue with edging below.
X-Large:
Round 1: Magic Circle, Ch-2, 12dc in circle. Join to top of first dc. (12)
Round 2: Ch-2, 2dc in each st around. Join to top of first dc. (24)
Round 3: Ch-2, * dc in next st, 2dc in next * repeat between * * around. Join to top of first dc. (36)
Round 4: Ch-2, * dc in next 2 sts, 2dc in next * repeat between * * around. Join to top of first dc. (48)
Round 5: Ch-2, * dc in next 3 sts, 2dc in next * repeat between * * around. Join to top of first dc. (60)
Round 6: Ch-2, * dc in next 4 sts, 2dc in next * repeat between * * around. Join to top of first dc. (72)
Round 7: Ch-2, * dc in next 5 sts, 2dc in next * repeat between * * around. Join to top of first dc. (84)
Do not fasten off.
Arms (make 6 total)
Where still attached…
Row 1: Ch-2, dc in next 14 sts. (14)
Rows 2 – 13: Ch-2, turn, dc in each st to end. (14)
Fasten off. Attach in next open stitch of round 7.
Repeat arm pattern until there are 6 arms total. Do not fasten off last arm, continue with edging below.
Edging:
Technically speaking the edging is not required for the pan protectors to do their job. I do find that they lay nicer with it though.
Where still attached…
Ch-1, * sc down arm, placing sc3tog using last st of one arm, center, and first st of next arm. Sc up arm row ends, 3sc in corner st. Sc across top of arm, 3sc in corner st. * repeat between * * around entire pan protector. Fasten off using Invisible Join and weave in all ends.
Isn’t that fun? You choose which sizes you need most, and make several of each if needed! I’ve seen these for sale in stores for MUCH more than the cost of these materials. I hope you’ll join me in the 2021 series to create useful crochet with cotton for the kitchen and the home. ♥
More useful crochet patterns:
Hair Towel with a Twist {FREE Crochet Pattern}
Wave Market Bag Free Crochet Pattern
Two-Sided Scrubby Dishcloth Free Crochet Pattern
Mini Blind Cleaner Crochet Pattern: Duster for Cleaning Custom Wooden Blinds
Baby Bottle Cleaning Brush Free Crochet Pattern
Lonely Banana? How to Make a Fruit Hammock (free crochet pattern)


38 Comments