How to Add Crocheted Edging to Fabric
This post may contain affiliate links, meaning that I may earn a small commission if you make a purchase. See our disclosure policy for more information.
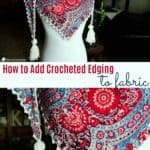
Do you have a scarf that has lost its pizzazz? One that was well loved, but hasn’t been worn in years? In this tutorial you will learn how to add a crocheted edging that will bring that old scarf back to life! This same technique can be used to add crocheted edges to fabric or fleece.

How to Add Crocheted Edging to Fabric
A crocheted edging can be added to a blanket, an existing scarf, or you could pick out new fabric and sew your own. When I spotted this fabric at Joann the other day, I just couldn’t stop myself. I love the print and with Memorial Day, 4th of July, and Labor Day coming up, and this fabric with its lightweight, fabulous drape SCREAMED crochet embellished triangle scarf to me. A little crocheted edging never hurt nobody. 😉

This tutorial is intended for those that already know how to crochet, but if you’re needing to learn how to read a crochet pattern or to learn any of the crochet stitches included below, I am happy to help you along!

Materials:
For this tutorial you will need either an existing scarf with a nice, hemmed edge OR a lightweight linen or rayon fabric (at least 2 yards) as I have done here. The great thing is that if you buy two yards of fabric to make your own, you can actually make TWO scarves or wraps! This is because for the width needed (72″) you have to buy two yards of fabric that is twice as wide as you need it to be. Woot woot!
You will need a size 2 or 3 weight yarn (size 3 crochet thread would also work). Not much – a scrap ball of yarn should suffice!
Edgit crochet hook
*a small, 2mm crochet hook may also work, but the Edgit brand has a pointier hook end that will help pierce the fabric.

Pattern Notes:
Be sure to stay as consistent as possible with the height of your loops on the single crochets.
If at all possible, test your edging crochet skills on a scrap piece of fabric before starting. Getting used to this smaller/pointier hook takes some time. If you have an older scarf that you really don’t care if you mangle, all the better for practicing! If it turns out great, even better!
Stitches Used:
Picot Stitch = chain three, single crochet in back bar of third loop from hook.
If using an existing scarf, skip straight to the crocheted edging section below.
Wanna save this for later?
Preparing the fabric:
Lay out fabric and cut a triangle as pictured. Using an iron on low heat, carefully fold and press a ¼” hem toward wrong side of fabric. Fold ¼” in again; press and pin hem into place. Sew around entire triangle (either with machine or by hand – I did by hand).


Crocheted Edging:
You can add virtually any crocheted edging pattern you like. For ease and consistency, I like to go just barely below the hemline because going through just one layer of fabric is MUCH easier than trying to go through two or three layers of fabric. It is important to keep the height of your stitches as consistent as possible.

With right side of fabric/scarf facing you, insert hook just below the hemline and just to the left of any corner. Pull up a loop. Yarn over and pull through both loops (single crochet made) * ch-1, picot, ch-1, move 3/4″ to the left and make another sc, just below the hem * repeat between * * to corner.

When you get to the corner, place (sc, ch-1, picot, ch-1, sc, ch-1, picot, ch-1, sc) all in same space. Continue in same manner around entire triangle. Join to first single crochet with slip stitch. Fasten off and weave in ends.

If you like, you could make two tassels using your leftover yarn to hang from the outermost corners. I love the weight it gives to the item and the added bit of spunk. Totally optional, though!
This is so easy and so fun! I hope you’ll share a photo with me in the Heart Hook Home Crochet Community on Facebook!
More fun with crochet:
How to Set Double Cap Rivets in Leather
How to Make a Crochet Star: Free Star Crochet Pattern (Video Tutorial)