The Easiest Way to Make Fringe
This post may contain affiliate links, meaning that I may earn a small commission if you make a purchase. See our disclosure policy for more information.


To fringe, or not to fringe? This is often a question when crocheting shawls, scarfs, or cardigans. What should not be a question, however, is how to make fringe. Making fringe can be super easy and super fast. I do not remember when I started making fringe this way, but it sure has saved me a LOT of time over the years!
How to Make Fringe
After deciding to add fringe to a crocheted or knitted shawl, scarf, or cardigan, you’ll need to decide how densely the fringe should be. Will you put a lot of fringe, or just a little to add some pizzazz? I typically do every other stitch when adding fringe to my shawls, but sometimes I like to go a little further, like on my Blanket Cardigan where I went every five stitches.

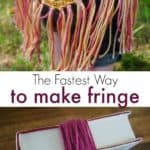
The fast way to make fringe is by using something I hope you already have on hand – a hard cover book. Choose a book that is TWICE as tall as you want the fringe to be long. For example, if you want to have 5″ long fringe, you will need a hard over book that is about 10″ tall. The taller the book, the longer the fringe.

1. Place yarn end at the back of the book and hold in place.

2. Wrap yarn around and around the book over and over. Continue wrapping until you’ve got a nice, thick chunk of yarn.


3. When you think you have enough (you can always make more if you run out) lay the book flat on the counter or table.
Wanna save this for later?

4. Push down firmly on the book to make sure the yarn doesn’t go anywhere and cut along the top end of the book.

5. Turn (keep constant pressure on the yarn to hold it in place!) and cut the yarn at the other end of the book.


Voila! You’ve got a pile of perfect, evenly cut fringe just waiting to be attached! Isn’t that just the most simple thing ever? It is so simple, in fact, that I wasn’t going to do a tutorial on it at all. But then I remembered the first time I tried to make fringe and it took me two hours to cut the strands individually – face palm – and if I didn’t know then, then I KNOW someone else out there is spending way too much time to make fringe now, too.

If you’re not sure how to attach your fringe, I do have a video tutorial (the one for the It’s Shawl Good cardigan pattern) and I have queued to the part where I do the fringe here. I hope you find it helpful!
More crochet tricks and tips:
7 Tips for Counting Rows in Crochet
How to Change Colors in Crochet
Amigurumi Tips and Tricks
12 Best Free Crochet Apps
18 Craft Fair Tips for Beginners: How to Run a Successful Craft Show Booth


3 Comments