Amigurumi Tips and Tricks
This post may contain affiliate links, meaning that I may earn a small commission if you make a purchase. See our disclosure policy for more information.
What is amigurumi? Only the hottest trend in crochet, that’s what. Say it with me now: ami-goo-roo-me. (at least I think that’s how you say it?) Amigurumi refers to the crocheting of stuffed things; animals, toys, dolls, objects… the list goes on and on. New to amigurumi? You’ll want to read up on my favorite amigurumi tips and tricks!
Amigurumi Tips and Tricks
If you can crochet in rounds and you know the single crochet stitch then you can create beautiful amigurumi. The only difference between regular crocheting and creating amigurumi projects is sewing and stuffing, and there are a few tricks that will take your amigurumi up that extra notch. Amigurumi does not have to be intimidating, so let’s demystify it, shall we?
1. Start with the magic circle
The magic circle is the best way to start working in rounds and especially in amigurumi. Instead of chaining 3 or 4 and joining to form a circle, the magic circle gives you the ability to cinch up that hole. This makes the top of the head and the ends of the limbs look so much cleaner. Just make sure to weave the tail through the first round of stitches to secure it as in this tutorial.
2. Use a smaller hook size than suggested on yarn label
Amigurumi needs to have tight stitches so that stuffing does not come out and so that the project looks more professional overall. I recommend going down at least one hook size than what is suggested on the yarn label. For example, if the yarn label suggests that I use an H/5.00mm hook, I would use a G/4.00mm hook instead.
3. Do not join every round

In order to keep your amigurumi heads, bodies, arms and legs as professional appearing as possible, do NOT join at the end of each round. Joining creates a line that will be clearly visible. Instead, work continuously without joining and keep track of your rows with stitch markers and/or running stitch markers.
4. Use stitch markers!
Stitch markers are not an option when crocheting amigurumi; they are a must! Because we are not joining at the end of each round we need to know exactly which stitch marks the beginning (and/or end) of each round.
You may decide to use a running stitch marker in addition to a regular stitch marker. Simply weave a different color strand of yarn back and forth (in and out of the project) as you complete each row.
5. Count your stitches
While counting your crochet stitches is always a good idea, it is imperative in amigurumi. When you’re increasing and decreasing you need to know that you are on track after each and every row completed. It stinks, but we all know that ripping out stitches stinks worse.
6. Even increases

Increasing in crochet is as simple as placing two stitches where there would normally only be one. By spacing your increases out (evenly around) your project will be more round and professional in appearance. If following a pattern, increases should be calculated for you, just make sure to count as you go.
7. Use pantyhose to keep stuffing from poking out
Since amigurumi is typically on the tight side, it is rare that stuffing will start to work its way out. You can, however, throw your polyfil in knee-highs or other pantyhose to make 100% sure that it won’t. Heck, you could even buy different colored hose for different projects!
8. Use leftover yarn ends for stuffing

Ideally you’ll want to use polyfil for stuffing your amigurumi projects. If you don’t have stuffing on hand, however, you could totally use yarn ends! I keep a vase full of my yarn ends for exactly this reason and hey! Those are free. 😉
Wanna save this for later?
9. Stuff evenly (more for feet, less for legs etc)

While you do want to make sure you’re evenly stuffing your amigurumi, some parts I stuff more tightly than others. You’ll want to stuff feet and hands more than legs and arms for example, if you want them to be bendable. I always stuff the head a little bit more fully than the body as well, for added hug-ability.
10. Be consistent
While tension and maintaining gauge is always important no matter what you’re crocheting, you’ll definitely want to make sure you’re focused and on track when creating amigurumi. We want all four legs, or both arms, to be the same size, right? One thing I do that I find helpful is making both feet at the same time to make sure they are identical before moving on to the legs etc.
11. Make invisible decreases
Decreases when working in rounds can stick out like a sore thumb. Invisible decreases make the piece really POP! Invisible decreases are so much easier than they sound. Learn with this Invisible Decrease tutorial.
12. Use invisible join for fastening off
If possible use the invisible join when finishing off an amigurumi project. Instead of leaving a knot where you fastened off, the invisible join helps to keep each element as even as possible, which in turn helps to make sure you’re sewing the pieces on as beautifully (and seamlessly) as possible.
13. Leave long tails for sewing
This tip will come to you after sewing together several amigurumi bodies, arms, and legs, but I wish I had known from the start. Instead of reattaching the yarn to sew limbs to torsos, leave a long tail when you fasten off each limb so that you can use that to sew instead. Note that if you’re using the invisible join for fastening off, you’ll want to weave the end of the yarn as close to the top as possible for a more seamless transition when sewing.
14. Use tacks to decide where eyes go
The placement of the eyes, nose and mouth can make or break your amigurumi project. Use tacks – before you sew up the head! – to play around with the eye placement. Because safety eyes (see #15!) would distort the stitches if removed from a project (meaning you would be able to tell where they were placed before) you’ll want to make sure you’re placing them exactly where you want them, and the first time!
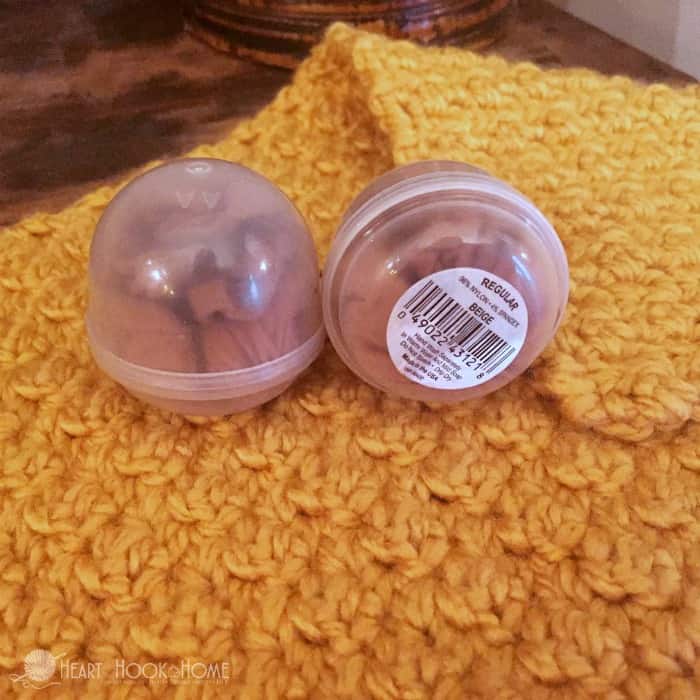
15. Use safety eyes

Safety eyes are inserted through a stitch like a screw, then a washer is placed on the back so that it can not be pulled out. If a small child will be playing with this amigurumi (or do it just because, you never know where a toy will end up years down the line) make sure to use safety eyes instead of buttons for eyes. While buttons are an extreme choking hazard (especially if the child is teething) you can avoid that hazard by using safety eyes.
16. Use the lines!
An easy way to make sure you’re placing the arms, legs and ears evenly is to use the lines of your crochet! If you place one ear 5 rows down from the magic circle, make sure the second is also placed 5 rows down. You can also count how many stitches between the front and back which is particularly helpful if you’re making an animal with four legs.

Ready to try your hand at amigurumi? I have a complete set of animal bookmarks that would be perfect to get your feet wet! Try Kenny the Koala, April’s Giraffe Baby, Webster the Elephant, the Adorable Pig, the Nerdy Bookworm, Freddy the Frog, the Bunny Rabbit or the Quacktastic bookmark.

Not into reading? I’m sad, but you could also try amigurumi with my free Joker amigurumi pattern or my Love Heart pattern!
More crochet tips and tricks:
5 Tips for Changing Colors in Corner to Corner Crochet (C2C)
How to Keep Straight Edges in Crochet
Keep a Straight Seam When Crocheting in the Round
How to Make an Invisible Join in Crochet
Russian Join Tutorial for Crochet and Knitting
What to Do When You Forget Which Crochet Hook Size You Used


19 Comments