Week #13: Tunisian Basics Crochet-Along
This post may contain affiliate links, meaning that I may earn a small commission if you make a purchase. See our disclosure policy for more information.
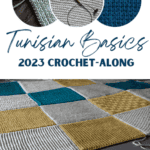
Today is the day we’ve all been waiting for! This week in the 2023 Tunisian Basics Crochet Along is assembly week. Now is the time that all of our hard work comes together and resembles something of a (albeit unfinished) blanket. Grab your completed squares and let’s do it!

Tunisian Basics Crochet Along Week #13
Now that we have finished all of the squares needed for the Tunisian Basics Blanket, it is time for assembly. I love seeing it all come together!
At this point you should have 9, 12, 20, 24, 30, or as many squares as desired for the size blanket you are making. Preferably these squares are all the same size (or as close as possible) and are blocked. If not it’s not the end of the world but the assembly will certainly go easier if they are.

I decided to make 24 squares for my crochet-along blanket, two of each week’s pattern. My finished blanket will be 4 blocks wide and 6 blocks tall, plus the width of the border. See more about blanket sizing here.

Week #13: Square Assembly
If you are new to this Crochet-Along, you will want to start here with the Materials & Information post. You will also benefit from the Ultimate Guide to Tunisian Crochet. This will not only help beginners to learn the techniques used in Tunisian crochet, there are helpful tips and notes for any skill level.
Now… let’s get to joining these squares!

Materials:
Completed squares, as many as needed for the size blanket you’re making. See more on blanket sizing here.
Crochet hook in size 7mm (or 8mm, read more below)
Plenty of stitch markers
Yarn for joining squares (using the main color, also the same color we’ll use to prep the border next week)
Assembly:
First we’re going to lay them all out and decide where each should go. I personally try to not have any square color next to the same color square and I do not place two of the same stitch squares next to each other either.

It may take you a few times to get the placement exactly as you like. The most important things to pay attention to at this point:
- Do not let the dogs back inside. Ha! Really though, make sure that there is as little traffic in the room as possible while you’re working – human or otherwise.
- Once you’re happy with the square placement… TAKE A PICTURE! 📸

You can refer back to this picture as often as needed. If you will be compiling your squares in more than one sitting this photo will be particularly helpful.
Another important note is to NOT weave in the ends when you’re finished slip stitching the length of your squares. We will weave those in after we have added the border. This is just a finishing preference but it makes a huge difference in the outcome.

Helpful Tips:
Stay LOOSE when slip stitching.
You may find it helpful to go up to an 8mm hook size when joining to make sure those slip stitches aren’t too tight.
Make sure all squares are oriented the correct direction (not upside-down or sideways) before starting.
Always have the “right sides” touching so that you are looking at the back/wrong side.
Wanna save this for later?
Use only the outside loop from each square to make your slip stitches. Shown in detail in the video below.
You will not easily be able to see what color yarn you used for the joining. I prefer it that way, but if you’d like that join color to POP consider doing an additional border row in the contrasting color before attaching. Lots more yarn ends to weave in but it would give a stained glass effect.

Pin the opposite corners of the next square/s together using stitch markers. Then pin the two squares together about halfway across. It does not matter how many stitches are on each square, rather that the squares are lined up AND “pinned” together at the half way mark. If there is a stitch count discrepancy we will navigate that as we seam. Again, shown in detail in the video below.
You may need to skip stitches on one square or another as you seam. If there are, for example, 40 stitches on one square and only 36 on the other, you will need to skip 4 stitches on the square with 40 stitches to end on the same corner stitch. Try to space the skipped stitches out along the length of the square as much as possible so not all of the skipping takes place in the same few inches. (Note: the stitch marker placed at the halfway mark makes this super easy! Refer to the video below for detailed examples.)
When you reach the corner-most stitch (the intersection) go through all loops of all corners. This is for added durability on those pressure points.

Start at the bottom of one row/seam and work allllll the way up to the top of the blanket…

Then move on to the next vertical column, then the next until all vertical edges have been seamed.


Once all of the vertical seams have been completed it is time to do the horizontal seaming.

Move up to the next and the next, until all horizontal lines have been seamed.

You will definitely want to watch the video for joining squares below. This video walks you through the exact process for seaming squares using my favorite method, the slip stitch outside loop only.
Remember to stay LOOSE as you slip stitch and DO NOT weave in your ends until we add the border next week. 😉
Seaming Squares VIDEO:
When you finish assembling your squares be sure to share a photo of it in the Heart Hook Home Crochet Community on Facebook. You can also tag me by using @HeartHookHome across all social media, and/or use the hashtag #2023TunisianCAL so we can ALL see!
Come back NEXT Wednesday, October 11th 2023, when we finish it off with a snazzy border!

More Tunisian crochet for you:
The Ultimate Guide to Tunisian Crochet (Printable Version)
How to Unkink Circular Knitting Needles and Tunisian Crochet Cords
2023 Tunisian Basics Crochet-Along: Materials, Dates & Information


