Home » Hook » Crochet Patterns » Hand Warmer Beanie: Free Crochet Pattern
| | | | | | |

Hand Warmer Beanie: Free Crochet Pattern

This post may contain affiliate links, meaning that I may earn a small commission if you make a purchase. See our disclosure policy for more information.

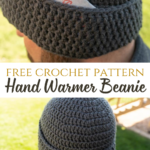
Do you spend a lot of time out of doors in the cold months? Whether you are watching football, hunting, or skiing etc, this Ear Warming Beanie is just that – an ear warming beanie with slots for hand warmers!! A Hand Warmer Beanie! Ahhh!!

Hand Warmer Beanie Crochet Pattern

Hand Warmer Beanie

Our younger son plays junior football. He plays corner position and sometimes wide reciever, and a couple of weeks ago on the way to his early (way too early for a Saturday!) morning football game I decided that I needed a green hat to match his team’s colors. While we were sitting in the stands, me finishing up said beanie, our older son went to the concessions and purchased a package of hand warmers.

Hand Warmer Beanie Crochet Pattern

As I sat crocheting, I thought of how cold my ears were, and how awesome it would be able to stick one of those hand warmers in my hat, one on each side of my head. BUT WAIT! Why COULDN’T I have one hand warmer over each of my ears?! And just like that, friends, the Hand Warmer Beanie pattern was born.

Even if you wear this beanie without the warmers in their pouches, it will still be warmer than the average beanie for the simple fact that we’ve doubled up the thickness of the brim – and for a good portion of it too, not just a short little cuff but a whopping 3+ inches!

Hand Warmer Beanie Crochet Pattern

It’s in there, you just can’t see it! 😀

How to crochet an ear warming beanie

Materials:

Worsted Weight/Size 4/Aran yarn
-approx 146 yards (Red Heart With Love in Platinum shown)
Crochet hook in size H/5mm
Yarn needle
Hand warmers (any brand should suffice)

I have noticed that when you use a different yarn (Red Heart Super Saver, for instance) that the hat turns out a bit larger. If this the case for you as well, or if you are making for a smaller head, try going down a hook size to a G/4mm hook.


hand warmer beanie pattern

Pattern Notes: 

Pattern written using US terms.

For this beanie we are using the yarn UNDER method of joining rows. Read more on that here.

I have been advised that the major brands of hand warmers are similar in size and shape. The hand warmers are rectangles approximately 3.75″ wide and 2.25” tall.

Obligatory disclaimer: Before placing hand warmers in the finished beanie, make sure to read the instructions on the package. I can not find anything that hints at this idea being unsafe, but as with anything else, read the directions and follow their instructions and guidelines for correct use. If the product gets too warm, remove from beanie. I myself find them to be perfectly, toasty warm!

Gauge:

Approximately 13 dc sts in 4″

Pattern:

Row 1: Magic Circle, 10 dc in circle. Join w/yarn under (here and throughout – see pattern notes) to top of first dc with sl st. (10)

Row 2: Ch-2, 2dc in each st around. Join w/yarn under to top of first dc with sl st. (20)

Row 3: Ch-2 *dc in next st, 2dc in next* repeat around. Join w/yarn under to top of first dc with sl st. (30)

Row 4: Ch-2 *dc in next 2 sts, 2dc in next* repeat around. Join to w/yarn under top of first dc with sl st. (40)

Row 5: Ch-2 *dc in next 3 sts, 2dc in next* repeat around. Join to w/yarn under top of first dc with sl st. (50)

Row 6: Ch-2 *dc in next 4 sts, 2dc in next* repeat around. Join to w/yarn under top of first dc with sl st. (60)

Row 7: Ch-2 *dc in next 5 sts, 2dc in next* repeat around. Join to w/yarn under top of first dc with sl st. (70)

Rows 8 – 16: Ch-2, dc in each st around. Join w/yarn under to top of first dc with sl st. (70)

Row 17: Ch-2, TURN, dc in each st around. Join w/yarn under to top of first dc with sl st. (70)

Rows 18 – 23: Ch-2, dc in each st around. Join w/yarn under to top of first dc with sl st. (70)

Row 24: Ch-1, sc in each st around. Fasten off using invisible join but do not clip yarn. Leave enough yarn to sew cuff around the hat – about a yard or so.

Crocheting a straight seam on a beanie

Pockets:

Fold the cuff up for the width of 6 double crochet rows. Sew the cuff to the hat as pictured, leaving openings for inserting the hand warmers, about 3.75″ wide or 13 sts when on gauge. Follow these numbers…

sewing pockets for ear warmer beanie

Sewing pockets for hand warmer beanie

Sewing pockets for hand warmer beanie

  1. Sew brim to hat for 22 stitches.
  2. Sew straight down to bottom edge going through both fabrics.
  3. Feed yarn through next 13 stitches.
  4. Sew straight up to top of brim going through both fabrics. (pocket made)
  5. Sew brim to hat for 22 stitches.
  6. Sew straight down to bottom edge going through both fabrics.
  7. Feed yarn through next 13 stitches.
  8. Sew straight up to top of brim going through both fabrics. (pocket made)

Fasten off and weave in all ends.

pockets for hand warmer beanie

Finishing:

Single Crocheting around folded edge

Attach yarn in bottom of hat going through that row as pictured. Sc in between each stitch all the way around, fasten off using Invisible Join. This gives a nice, clean bottom edge.

To use your hand warmer beanie, you’ll simply activate the hand warmers and insert them into the slots. I think this would an excellent addition to your craft fair table this fall. Maybe even buy a bunch of the hand warmers in bulk and roll them into the price of the beanie. You can get two Hand Warmer Beanies out of one skein of Red Heart With Love, and I have some pricing tips for selling handmade items.

More free beanie patterns:

The Libby: Quick, Cute, Chunky Adult Beanie Pattern
The Cameron Beanie: Child Size Beanie Crochet Pattern
How to Size Crochet Beanies + Master Beanie Pattern
Team Spirit Beanie Free Crochet Pattern
Jack Sparrow Inspired Halloween Beanie Free Crochet Pattern
How to Make the Perfect Mohawk Beanie Using Pom Poms

Similar Posts

Leave a Reply

Your email address will not be published. Required fields are marked *

This site uses Akismet to reduce spam. Learn how your comment data is processed.

32 Comments

  1. Ashlea, this beanie is awesome! This past summer I made 5 for my son and his family who live in Minnesota, winters are brutal there. (I live in Las Vegas, Nevada where winters are mild.) My grandsons shovel snow daily. They told me that it's finally beanie weather (it's December!) and that the hand warmers work amazingly well! They call this beanie the Ear Warmer Beanie. Now they need some in favorite team colors and neon colors! My son was outside for over 2 hours and the beanie kept his whole head warm. They sent a video of a snow shoveling session with the beanie, but I don't know how to post it here. Thanks so very much for the pattern!
  2. Ashlea, this beanie is awesome! This past summer I made 5 for my son and his family who live in Minnesota, winters are brutal there. (I live in Las Vegas, Nevada where winters are mild.) My grandsons shovel snow daily. They told me that it's finally beanie weather (it's December!) and that the hand warmers work amazingly well! They call this beanie the Ear Warmer Beanie. Now they need some in favorite team colors and neon colors! My son was outside for over 2 hours and the beanie kept his whole head warm. They sent a video of a show shoveling session with the beanie but I don't know how to post it here. Thanks so very much for the pattern!
    1. Hi Jane! You could start at row 2 or 3, by crocheting 20 or 30 dc's around a hair elastic/tie, then continue the pattern as written.
  3. Hi, thank you for the pattern I really like the idea of the pockets for the hand warmers! I’m a little confused on the part to sew the pockets. Where do you start your stitch counting? From the back side where you joined the rows? I counted starting at the joining stitch. ( sew 22 stitches than feed yarn13 where I joined the rows than sew 22 stitches and than feed yarn again for 13 stitches and it doesn’t look like the pockets will be even over both the ears.) Or did you mean to start counting from where u joined the rows on each side? ( count 22 stitches going left from the joining stitch and than start counting 22 stitches from the right of where the rows joined? Thank you GSomma
    1. Hi Gina! Yes, you start from the join seam and work your way around. When worn, the pockets will be covering the ears, so the join will not be in the middle of the back...more of to the side. Hope this helps!
  4. I have followed the pattern perfectly but used super saver yarn my boyfriend has a large head so it was that would make a bigger hat but it doesn’t come close to covering his ears what did I do wrong
    1. Hi, Sally! Is it possible that you may have skipped a few rows? Rows 8-16, are all under one line and I almost missed it, myself!
  5. I love this hat and have attempted to make it three time. Please tell me how do you do the yarn under? Do you slip stitch in the change two or the first double crochet after the change two
    1. Hi Teresa! For the yarn under...instead of bringing the yarn up and over your hook to slip stitch, you will just bring it under the hook and pull it through to complete the slip stitch. And you will slip stitch into the Dc after the chain 2. Hope this makes sense!
  6. Thanks so much for the pattern. I'm not sure exactly where you start from to count the 22 stitches, do you start from the seam? Do you have anymore pictures of making the pockets? Tia Sharon
    1. Hi Sharon! Unfortunately, I do not have more pictures of the pocket...but yes, you will begin at the seam.
  7. Ashlea, a few moments ago I finished the Hand Warmer Beanie for my grandson! He will love it. Made Schoodies for the three granddaughters. Thanks for the wonderful patterns.
  8. Hi. I'm totally confused and embarrassed that i can't quite figure out the "YARN UNDER" method. Ice tried looking it up with no success. PLEASE help me. Asap as I'm trying out your hat ear warmer pattern. Which is my first hat ever. Thank you so much. I just love your site.
  9. I absolutely love this idea!! I was just wondering of you have a YouTube video of this hat I am new to crocheting and find I understand better when I see it visually! Thank you so much!
    1. Hi Casie! Unfortunately, I do not have a video for the beanie...I do have a video on how to do the magic circle though to get you started. That can be found here: https://youtu.be/lVqOKCySmyo
  10. This is such a great idea! My hubby works outside all winter so I think he will really appreciate one. Thanks again for sharing.
  11. Ashlea, can the pattern be done in blanket yarn so it's warmer? If so, what has to be adjusted ...the number of stitches, rows or both? I will use the recommended hook on the yarn label. Thanks.
    1. Hi Dianne! Pretty much everything would need to be adjusted. You could start the pattern as written, but I would suggest using my chart on how to size beanies to make sure you will get an accurate fit. When your beanie reaches the hat height listed on chart, then turn your work and continue making rows for another 3". The link for how to size beanies can be found here: https://hearthookhome.com/how-to-size-crochet-hats-master-beanie-pattern/ Hope this helps!
  12. Hi Ashlea! I found this pattern just in time for Missouri deer season (which is Saturday). Just thought I would let you know, R3 & R4 are worded the same but you indicate stitch count different. R3 is (30) and R4 is (40). I know what it is suppose to be since I make hats but just thought you might want to know :) You're the Best !
    1. Hi Barb! This pattern will fit most adult heads. If you need to make smaller, you can omit some of the increase rounds. Hope this helps!
  13. Question.... i’m a very novice crochete so forgive me if I sound ignorant.... am I counting the chain 2 at the beginning of each round in the total at the end of the round or is that the amount of double crochets? I I got to round 4 and I feel like I have an extra stitch and I want to make sure I’m doing it right before I continue
  14. Absolutely brilliant thank you! I crochet winter woollies for the homeless in our town, so this will work a treat. xxx
  15. Ashlae, you have done it again! You created a special, and unique beanie, with an extra useful idea! I can't wait to try this pattern!. Thanks for all that you do, your help on your website, and oodles of patterns, so many are free. Stay warm this winter, or invent a way to keep you warm.