Woven In Time Sofa Blanket Crochet Along: Part THREE
This post may contain affiliate links, meaning that I may earn a small commission if you make a purchase. See our disclosure policy for more information.

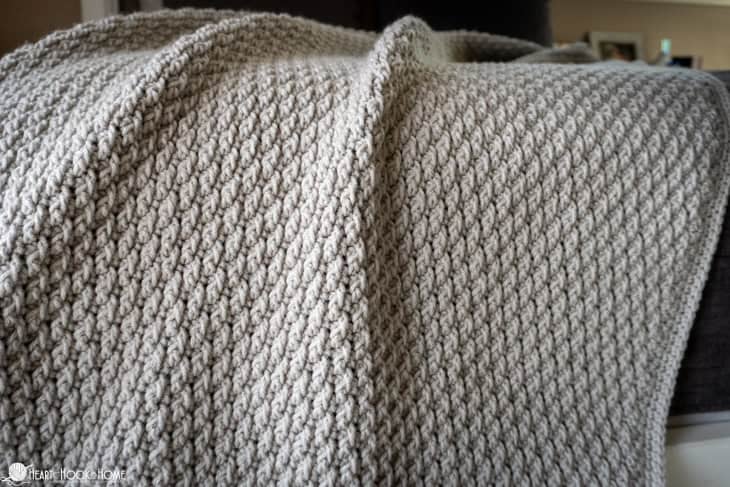
YAY! We made it! We are finally ready for part THREE of the Woven In Time Sofa Blanket Crochet Along! Today we will learn how to assemble, add the border, and stabilize the blanket. Make sure you read alllll of the instructions below. 😀

Woven In Time CAL: Part THREE
If you are starting at the beginning with this crochet along, find the materials list here (including hook size, yardage, etc) and find part ONE here and part TWO here. This is the final installment of our crochet along. At the end of this portion, you’ll have a finished blanket. Woohoo! I hope you have enjoyed picking your colors and working up the strips! Let’s take our strips and transform them, shall we? 😀
I asked the members of Heart Hook Home Crochet Community on Facebook to share their blankets after finishing part two. I wanted to share with you a few of my favorites, and you can see all of them here!
Kiki’s is gorgeous:

Here’s Debbi’s:

And Jami’s:

I’m loving Amy’s!

Norma’s is great too!

And Jenn’s has sure been a hit in the group!

As you can see, the color possibilities are E-N-D-L-E-S-S! See a whole slew of other beautiful Woven In Time blankets to get those creative juices flowing. And now, let’s get to work!
If you are just joining us on this crochet along, it will remain free in parts right here on Heart Hook Home, and you can find the ad-free, printable version (with all parts together) on Ravelry here.
Lay out
Lay out each of the nine vertical strips from part one. You want them to be touching – or darn close. You need to do this on a large surface that you can move around as you work. I chose to sit on the floor, but if you have a large table or work area, that would be sufficient. You will need to leave it in this spot without moving it for the majority of part three of the crochet along.
![]()
Add your first horizontal strip from part two like so:
![]()
![]()
Continue weaving in strips in a way so that every other strip alternates whether it starts on top or bottom of the blanket.
![]()
Note! You may need to stretch some (or all) of your strips. Mine were quite short and, not gonna lie, I was sweatin’ it for a bit, but it all worked out!
![]()


When finished weaving in strips, find a temporary way to keep them in place. This could be by using paper weights, candles, an old vase (as I have done on mine) or with binder clips or bobbins like these! The objective here is to not let the strips move around while you work.
![]()

stabilize blanket
Start border using single crochet. Insert hook into any corner, going through both sides of the fabric. Because of the nature of weaving a blanket such as this, you will need to single crochet through both sides of the fabric for the duration of row one of the border; sometimes the “pretty” edge will be on top (like the terracotta below), and sometimes the “raw” edge will be on top (like the grey below). Use thirteen (13) stitches of the “pretty” edge matched up to each of the row ends from the “raw” edge as pictured.
![]()
After you have thirteen stitches with the “raw” edge on the bottom, line up the next strip with the “raw” edge on top. Crochet through both sides of the fabric again, using thirteen stitches from the “pretty” side that is now on the bottom.
![]()
Continue adding thirteen stitches per perpendicular strip until you reach the next corner; with the corner being the thirteenth stitch of the last strip. Add one more stitch in the corner then start the next side, placing the first stitch of that strip’s thirteen stitches in the same as corner stitch.
This means that you will have three stitches in each corner; one to finish the last strip going one direction, one to form the corner, then one to start the first strip going the other direction. Continue around the entire blanket until you reach where you started. Do NOT fasten off, but stop here for now. Use a stitch marker to hold your place.
![]()
Begin to stabilize the blanket. We will do this now so that you can pick up/move the blanket when adding the rest of the border rows. Stabilize by adding a yarn tuft at each intersection. For the sake of maneuverability, get your comfy clothes on if you’ll be working on the floor, and pull up a chair if you’re at the table!
Wanna save this for later?
![]()
Cut two strands of yarn about 6″ in length per intersection. If you’re comfortable making these shorter and it works for you, that’s fine!
![]()
Insert yarn going one direction. I did this just by grabbing the yarn with my hook and pulling one end through.
![]()
Now go the other direction and do the same.
![]()
![]()
![]()
Tie the first (same strand) in a knot. Tie the second (other strand) in a knot.
![]()
Pull up all four strands and make a knot… I use my yarn needle to make sure the knot is as low to the fabric as it can go, and secure as tightly as possible.
![]()
![]()
![]()
![]()
Make sure knot is super secure and trim yarn ends to about 3/4″. Continue adding tufts at each intersection.
Yarn tuft tips and notes:
1. Work one entire strip left to right or vice versa.
2. When you finish one row, roll it up to bring the next working area closer to you instead of you moving closer to it.
3. If you would like additional stabilization, add an additional yarn tuft to the center of each square as well. I would use a yarn needle to do so instead of a hook. (I don’t find extra stabilization necessary on a blanket for myself, but for a small child I think I might.)

Look at all those lovely yarn tufts! Ahhh! ♥ Now that we are finished stabilizing the blanket it is safe to move it around, so let’s settle in and finish this thing, shall we?
Border:
Row 1 has already been completed. Pick up where you left off…
Rows 2 – 7: Ch-1, sc in each st around, placing 3sc in each corner. Join with sl st to first sc.
*if you would like a more substantial border, add additional rows here.
Row 8: Change to accent color. Ch-1, * Hdc in next, ch-1, sk next st * repeat between * * to corner, hdc in next to last st, ch-2, sk next st, hdc in next. Continue to next corner, hdc in next to last st, ch-2, sk next st, hdc in next. Continue around entire blanket. Join. (It’s okay if you have to fudge a bit to get the corners right – no one will know).
Row 9: Change back to main border color. Ch-1, 2sc around each ch-sp from row 8, placing 3sc around each corner ch from row 8. Join to top of first sc with sl st.
Rows 10 – 12: Ch-1, sc in each st around entire blanket, placing 3sc in each corner. Join to top of first sc and weave in ALL ends.

That. Is. It! Not too bad, right? I adore how cozy this blanket is and how it reminds me of home, comfort, and love. I hope you love yours too! Please share photos of your finished blankets and, when you do, tag me using @HeartHookHome on Twitter or Instagram. I know the Heart Hook Home Crochet Community group on Facebook would love to see them as well!
Woven In Time Crochet Along
Part ONE (vertical strips)
Part TWO (horizontal strips)
Part THREE (putting it all together)
Find the complete pattern by itself in printable format here.

similar crochet projects:
The Elizabeth Cardigan – Crochet Along (CAL) – Free Crochet Pattern


32 Comments