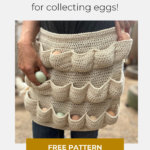
An Egg-cellent Apron: Free Crochet Pattern
This post may contain affiliate links, meaning that I may earn a small commission if you make a purchase. See our disclosure policy for more information.


I’ve always had a vision of being a homesteader; raising animals and tending to my fields. The good news: you can have a handful of chickens within (most) city limits and while I have not yet added chickens to my brood, I do understand the need for an egg apron for those of you that do! Hopefully I will be among your ranks soon. 😉

An Egg-cellent Apron
Enter my NEWEST free crochet pattern: An Egg-cellent Apron. Great for Easter Egg hunts as well! This is a free crochet pattern. If you would like an ad-free version, that is available here on either Ravelry, Etsy, or here in the Heart Hook Home shop. If you’re looking for child size, the Child Size Egg-cellent Apron pattern is fresh on the blog – as fresh as those eggs!
For this egg-cellent apron we will first create a the main body of the apron. Then we will make three strips that we will use for pockets. One large pocket is placed last, for your cell phone, to-do list, pen… whatever you need on hand. Then we will add a strap, doubled-up for added durability. You’ll be able to harvest up to NINETEEN eggs in your apron each morning.
Materials:
Worsted Weight Cotton/Acrylic blend yarn (approx. 725 yards)
*Comfy Worsted Weight Cotton would work great, or you could use a 100% cotton, such as Dishie.
Crochet hook in size 4.5mm or size needed to obtain gauge
Upholstery needle for sewing
Bobby pins (for stitch markers)
Gauge: 12 hdc sts wide x 11 rows = 4″ square
Pattern Notes:
Pattern written using US terms.
The turning chain does NOT count as a stitch.
Each individual egg pocket is 10 stitches wide across the back and 15 stitches wide across the front.
If you need help reading a crochet pattern, make sure you head over here and check out this detailed post.
Egg Apron PATTERN
Main body:
Row 1: Ch-77, hdc in 2nd ch from hook and in each across. (76)
Rows 2 – 39: Ch-1, turn, hdc in each st across. (76)
Fasten off and weave in all ends.

Bottom pocket:
Make one
Row 1: Ch-71, hdc in 2nd ch from hook and in each across. (70)
Row 2: Ch-1, turn, * hdc in next, 2hdc in next * repeat between * * to end. (105)
Rows 3 – 9: Ch-1, turn, hdc in each st to end. (105)
Fasten off and weave in all ends.
***all pocket strips will look curved and funky, like this:

Middle pockets:
Make two
Row 1: Ch-61, hdc in 2nd ch from hook and in each across. (60)
Row 2: Ch-1, turn, * hdc in next, 2hdc in next * repeat between * * to end. (90)
Rows 3 – 9: Ch-1, turn, hdc in each st across. (90)
Fasten off and weave in all ends.
Cell phone/To-Do list pocket:
Make one
Row 1: Ch-11, hdc in 2nd ch from hook and in each across. (10)
Row 2: Ch-1, turn, 2hdc in each st to end. (20)
Rows 3 – 20: Ch-1, turn, hdc in each st across. (20)
Wanna save this for later?
Fasten off and weave in all ends.
Construction
Before sewing anything, plot out the pocket placement. Using bobby pins (or stitch markers) mark where the bottom corners of each pocket will be. All three of the horizontal pockets will be placed three stitches in from the right edge of the apron.
Start with the bottom pocket. Find the fourth row up from the bottom and three stitches in on each side. Place your first two markers. (“bottom pocket” pictured below)
We allow for four rows in between each pocket. From where you placed your first (bottom right) marker, count up 12 rows to place the next bobbin pin, also three stitches in from the right edge. Count up another 12 rows to place the next stitch marker, also three stitches in from the right edge. Right edge ready!

To find and mark the left edge of the “middle pocket” and “top pocket”, count 60 stitches to the left of each bobby pin. Mark that stitch.
Mark the cell phone pocket last. Move one stitch to the left of the “middle pocket” and mark that stitch. Then move 10 stitches to the left of that and mark again.
You’re ready to sew! Definitely check out the VIDEO tutorial below for tips and tricks on sewing this bad boy together.

Start by sewing just the bottom edge of the bottom pocket. Sew the entire bottom edge (all 70 sts) to the corresponding stitches on the apron back.
Each individual pocket will be 10 stitches wide across the back to 15 stitches wide across the front (total pocket circumference per egg = 25 sts)

Place bobby pins (or stitch markers) every 15 stitches along what will be the top edge of the pocket. (see photo above)
Flip the pocket up and begin by sewing the outer pocket edge first (maintaining the three stitches for margin). Sew each individual pocket so that there are 15 sts across the front to 10 sts across the back and it looks like the photo below. (It may help to mark every 10 stitches on the apron back.)
Now you’ll carefully sew in between each egg to make sure the eggs won’t touch. (tip: instead of fastening off in between each individual pocket, feed the yarn through to the next pocket and sew a few stitches, then feed through to the next, then the next, etc) See what I mean in the video below.


Bottom row done; placed bobby pins (stitch markers) for middle row. (pictured below)
Sew the “middle pocket” and top pocket” in the same manner, then move on to the cell phone pocket.


Strap
Row 1: Ch-75, sc in each stitch across apron top, then ch-76. (227)
You should have one chain on either side of the apron.
Row 2: Sc in 2nd ch from hook and in each across. (226)
Rows 3 – 10: Ch-1, turn, sc in each st to end. (226)
Fasten off leaving a super long tail for sewing.
Fold strap back on itself and sew bottom edges together. This will create added durability.

Crochet Egg Apron VIDEO Tutorial:

Will you be making An Egg-cellent Apron as well? Perfect for Easter Egg hunts as well! Remember if you would like an ad-free version, that is available here on Ravelry and here on Etsy or right here in the Heart Hook Home blog shop! Thank you and enjoy!!
More Free Patterns:
Cocoon Sweater Free Crochet Pattern in Three Sizes
Mae’s Shawl: Free Triangle Shawl Crochet Pattern
How to Add Ear Flaps to a Crochet Beanie
The Elizabeth Cardigan – Crochet Along (CAL) – Free Crochet Pattern


390 Comments