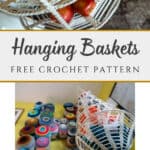
Hanging Baskets: Free Crochet Pattern
This post may contain affiliate links, meaning that I may earn a small commission if you make a purchase. See our disclosure policy for more information.
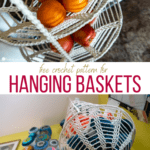
This year I am looking for NEW ways that I can use crochet around the house to either make life easier, more beautiful, or more fun. This pattern for Hanging Baskets is the newest installment in my 2021 Household Crochet Series, and I couldn’t love them more! I hope you love them, too.

Hanging Baskets: Free Crochet Pattern
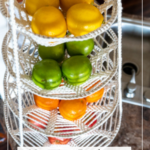
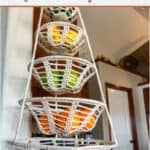
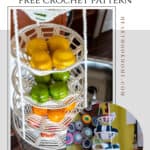
Whether you’ll be using your hanging baskets for fruit, vegetables, or yarn, they are the perfect way to incorporate crochet into your home’s routine. Even better, these use just a little bit of yarn! I decided to make five baskets for mine, since I’ll be using it for yarn storage and lord knows I need all the extra storage room I can get.


Not gonna lie, I kinda want to make several more. Hang them everywhere! Ha!


Depending on which size hoops you choose, you need as little as ONE 190-yard skein of Dishie Cotton to make yours. For example, if you decide on baskets that are 10″, 12″, and 14″, that’s just 173 yards total for the baskets themselves! If you decide to make the 8″, 10″, and 12″ sizes for your baskets, that’s just one skein – including the cords! For all five of my baskets – including the three cords – I used a total of 283 yards. Not bad at all!

Materials:
Steel metal hoops (6″, 8″, 10″, 12″, and 14″ hoops pictured)
-I purchased mine individually at Hobby Lobby inexpensively (here), and you can also find a whole set of 10 sizes on Amazon (here) in gold.
Dishie Cotton (“Swan” colorway pictured)
-6” hoop = 24 yards
-8” hoop = 34 yards
-10” hoop = 45 yards
-12” hoop = 56 yards
-14” hoop = 72 yards
-(3) Romanian cords as written = 52 yards total
Total for all five baskets + three cords = 283 yards
Crochet hook in size H/5mm

Gauge:
After round 2, the piece should measure ~2.75” across.
Pattern Notes:
Pattern written using US terms.
If you need help reading a crochet pattern, make sure you head over here and check out this detailed post.
Pattern:
Round 1: Magic circle, ch-2, 15dc in circle. Join to top of first dc. (15)
Round 2: Ch-2, 2dc in each st around. Join. (30)
Round 3: Ch-6 (counts as dc + ch-3), sk-2 sts, * dc in next, ch-3, sk-2 sts * repeat between * * around. Join to 3rd ch from beg. ch. (40)
Round 4: Ch-3 (counts as dc here and for remainder), 2dc in same st. Ch-3 * 3dc in next dc, ch-3 * repeat between * * around. Join to top of beg. ch. (60)
Round 5: Ch-3, dc in next 2 sts, ch-4 * dc in next 3 dcs, ch-4 * repeat between * * around. Join to top of beg ch. (70)
End here for 6” hoop. Line up hoop with circle and ch-1, * sc in next 3 dcs, sc 4x around hoop * repeat between * * around. Join. Fasten off and weave in ends.
Round 6: Ch-3, dc in next 2 sts, ch-5 * dc in next 3 dcs, ch-5 * repeat between * * around. Join to top of beg ch. (80)
Round 7: Ch-3, dc in next 2 sts, ch-6 * dc in next 3 dcs, ch-6 * repeat between * * around. Join to top of beg ch. (90)
End here for 8” hoop. Line up hoop with circle and ch-1, * sc in next 3 dcs, sc 6x around hoop * repeat between * * around. Join. Fasten off and weave in ends.
Round 8: Ch-3, dc in next 2 sts, ch-7 * dc in next 3 dcs, ch-7 * repeat between * * around. Join to top of beg ch. (100)
Wanna save this for later?
Round 9: Ch-3, dc in next 2 sts, ch-8 * dc in next 3 dcs, ch-8 * repeat between * * around. Join to top of beg ch. (110)
End here for 10” hoop. Line up hoop with circle and ch-1, * sc in next 3 dcs, sc 8x around hoop * repeat between * * around. Join. Fasten off and weave in ends.
Round 10: Ch-3, dc in next 2 sts, ch-9 * dc in next 3 dcs, ch-9 * repeat between * * around. Join to top of beg ch. (120)
Round 11: Ch-3, dc in next 2 sts, ch-10 * dc in next 3 dcs, ch-10 * repeat between * * around. Join to top of beg ch. (130)
End here for 12” hoop. Line up hoop with circle and ch-1, * sc in next 3 dcs, sc 10x around hoop * repeat between * * around. Join. Fasten off and weave in ends.
Round 12: Ch-3, dc in next 2 sts, ch-11 * dc in next 3 dcs, ch-11 * repeat between * * around. Join to top of beg ch. (140)
Round 13: Ch-3, dc in next 2 sts, ch-12 * dc in next 3 dcs, ch-12 * repeat between * * around. Join to top of beg ch. (150)
End here for 14” hoop. Line up hoop with circle and ch-1, * sc in next 3 dcs, sc 12x around hoop * repeat between * * around. Join. Fasten off and weave in ends.
If you want to go larger than 14″, simply keep adding two rows in the same manner.

Cords:
Make (3) Romanian Cords (or i-Cords) that are ~36″ in length. (My Romanian Cords were all 230 stitches) You can also use a Lucet Fork to make your cords. Leave a ~12″ yarn tail to start and fasten off with a ~50″ yarn tail.
Construction:
The most important part of the construction of your hanging baskets is the spacing between and keeping all three cords consistent. The cords are 36″ in length and will stretch to ~40″ when used. We are maintaining 5″ of length in between each of the tiers/hoops.

If you are making your baskets with 5 hoops as I did, that means that the cord from the bottom hoop up to the top hoop is 20″ tall. The remaining 16″ in length is for hanging the completed project.

To make sure you are placing your cords evenly around the circle, place stitch markers as follows for each size hoop (remember that the thickness of the crochet around the hoop increases the circumference ever so slightly):

6″ hoop: place a marker every 6.75″ or so.
8″ hoop: place a marker every 8.75″ or so.
10″ hoop: place a marker every 10.75″ or so.
12″ hoop: place a marker every 12.75″ or so.
14″ hoop: place a marker every 14.75″ or so.

Now that you have your markers placed for the placement of the cords, we are ready to assemble!

Starting with the largest hoop, attach using the longer tail (the 50″ you fastened off with). Go around the steel hoop at least twice, then feed it back through the center of the cord to secure. Feed the yarn up through the center of the cord to the next basket. For consistency, I counted up 15 horizontal bars (as seen in the Romanian cord, pictured below) before attaching to each hoop.


When all three cords have been added, it is time to pull the three up, tie a knot, and create a hanger loop. Weave in these ends very well, so that it will not come undone and topple all of your goodies. You. Are. Done!
I hope whatever you choose to hold in your hanging baskets finds a lovely home there. I just love how chic they look, and the fact that I made them myself! ♥ Stay tuned all of 2021 because the second Friday of each month I’ll be adding a NEW, fun pattern for use around the house!
More household crochet:
Llama Dusting Mitt: Free Crochet Pattern
Crochet Pan Protectors Pattern (Small, Medium, Large, X-Large)
Two-Sided Scrubby Dishcloth Free Crochet Pattern


36 Comments